background image

13

divide the focal length of the telescope by the focal length of
the eyepiece:

For example, the SpaceProbe 130mm EQ, which has a focal
length of 900mm, used in combination with a 25mm eyepiece,
yields a power of 

Every telescope has a useful limit of power of about 45x-60x
per inch of aperture. Claims of higher power by some telescope
manufacturers are a misleading advertising gimmick and
should be dismissed. Keep in mind that at higher powers, an
image will always be dimmer and less sharp (this is a funda-
mental law of optics). The steadiness of the air (the “seeing”)
will also limit how much magnification an image can tolerate.

Eyepiece Selection

By using eyepieces of varying focal lengths, it is possible to
attain a great many magnifications with the SpaceProbe
130mm EQ. The telescope comes with two high-quality
Explorer II eyepieces: a 25mm, which gives a magnification
of 36x, and a 10mm, which gives a magnification of 90x.
Other eyepieces can be used to achieve higher or lower pow-
ers. It is quite common for an observer to own five or more
eyepieces to access a wide range of magnifications. This
allows the observer to choose the best eyepiece to use
depending on the object being viewed. At least to begin with,
the two supplied eyepieces will suffice nicely.

Whatever you choose to view, always start by inserting your
lowest-power (longest focal length) eyepiece to locate and
center the object. Low magnification yields a wide field of
view, which shows a larger area of sky in the eyepiece. This
makes acquiring and centering an object much easier. If you
try to find and center objects with high power (narrow field of
view), it’s like trying to find a needle in a haystack!

Once you’ve centered the object in the eyepiece, you can
switch to higher magnification (shorter focal length eyepiece),
if you wish. This is especially recommended for small and
bright objects, like planets and double stars. The Moon also
takes higher magnifications well.

Deep-sky objects, however, typically look better at medium or
low magnifications. This is because many of them are quite
faint, yet have some extent (apparent width). Deep-sky
objects will often disappear at higher magnifications, since
greater magnification inherently yields dimmer images. This
is not the case for all deep-sky objects, however. Many galax-
ies are quite small, yet are somewhat bright, so higher power
may show more detail.

The best rule of thumb with eyepiece selection is to start with
a low power, wide field, and then work your way up in magni-
fication. If the object looks better, try an even higher
magnification. If the object looks worse, then back off the
magnification a little by using a lower-power eyepiece.

Objects to Observe

Now that you are all set up and ready to go, one critical deci-
sion must be made: what to look at?

A. The Moon

With its rocky surface, the Moon is one of the easiest and most
interesting targets to view with your telescope. Lunar craters,
marias, and even mountain ranges can all be clearly seen
from a distance of 238,000 miles away! With its ever-chang-
ing phases, you’ll get a new view of the Moon every night. The
best time to observe our one and only natural satellite is dur-
ing a partial phase, that is, when the Moon is NOT full. During
partial phases, shadows are cast on the surface, which reveal
more detail, especially right along the border between the dark
and light portions of the disk (called the “terminator”). A full
Moon is too bright and devoid of surface shadows to yield a
pleasing view. Make sure to observe the Moon when it is well
above the horizon to get the sharpest images.

Use an optional Moon filter to dim the Moon when it is very
bright. It simply threads onto the bottom of the eyepieces (you
must first remove the eyepiece from the focuser to attach a fil-
ter). You’ll find that the Moon filter improves viewing comfort,
and also helps to bring out subtle features on the lunar surface.

B. The Sun

You can change your nighttime telescope into a daytime Sun
viewer by installing an optional full-aperture solar filter over
the front opening of the SpaceProbe 130mm EQ. The prima-
ry attraction is sunspots, which change shape, appearance,
and location daily. Sunspots are directly related to magnetic
activity in the Sun. Many observers like to make drawings of
sunspots to monitor how the Sun is changing from day to day.

Important Note: Do not look at the Sun with any optical instru-
ment without a professionally made solar filter, or permanent eye
damage could result.

C. The Planets

The planets don’t stay put like the stars, so to find them you
should refer to Sky Calendar at our website (telescope.com),
or to charts published monthly in 

Astronomy, Sky & Telescope

,

or other astronomy magazines. Venus, Mars, Jupiter, and
Saturn are the brightest objects in the sky after the Sun and
the Moon. Your SpaceProbe 130mm EQ is capable of show-
ing you these planets in some detail. Other planets may be
visible but will likely appear star-like. Because planets are quite
small in apparent size, optional higher-power eyepieces are
recommended and often needed for detailed observations.
Not all the planets are generally visible at any one time.

JUPITER The largest planet, Jupiter, is a great subject for
observation. You can see the disk of the giant planet and
watch the ever-changing positions of its four largest moons -
Io, Callisto, Europa, and Ganymede. Higher-power eyepieces
should bring out the cloud bands on the planet’s disk.

SATURN The ringed planet is a breathtaking sight when it is
well positioned. The tilt angle of the rings varies over a period
of many years; sometimes they are seen edge-on, while at
other times they are broadside and look like giant “ears” on

Telescope focal length

Eyepiece focal length 

= Magnification 

900mm

25mm

= 36x

Summary of Contents for SpaceProbe 130mm EQ 9027

Page 1: ...cal Products Since 1975 Customer Support 800 676 1343 E mail support telescope com Corporate Offices 831 763 7000 P O Box 1815 Santa Cruz CA 95061 INSTRUCTION MANUAL Orion SpaceProbe 130mm EQ Equatorial Newtonian Reflector Telescope 9027 ...

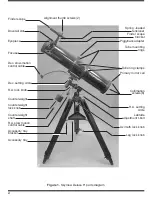
Page 2: ...ube mounting rings Tube ring clamps Primary mirror cell Collimation screws 6 R A setting circle Latitude adjustment t bolt Azimuth lock knob Leg lock knob Accessory tray Accessory tray bracket Eyepiece Focuser Dec slow motion control cable Dec setting circle R A lock knob Counterweight Counterweight lock knob Counterweight shaft R A slow motion control cable ...

Page 3: ...l objects With its precision optics and equatorial mount you ll be able to locate and enjoy hundreds of fascinating celestial denizens including the plan ets Moon and a variety of deep sky galaxies nebulas and star clusters If you have never owned a telescope before we would like to welcome you to amateur astronomy Take some time to familiarize yourself with the night sky Learn to recognize the pa...

Page 4: ...l Be sure to loosen the RA and Dec lock knobs before doing this Retighten the R A and Dec lock knobs once the equatorial mount is properly oriented 6 Slide the counterweight onto the counterweight shaft Make sure the counterweight lock knob is adequately loosened to allow the counterweight shaft to pass through the hole in the counterweight 7 Now with the counterweight lock knob still loose grip t...

Page 5: ...e eyepiece The telescope system is now fully assembled Keep the dust cap over the front end of the telescope when it is not in use 4 Getting Started Balancing the Telescope To insure smooth movement of the telescope on both axes of the equatorial mount it is imperative that the optical tube be properly balanced We will first balance the telescope with respect to the R A axis then the Dec axis 1 Ke...

Page 6: ...ith your glasses off by just refocusing the telescope the needed amount Aligning the Finder Scope The finder scope must be aligned accurately with the tele scope for proper use To align it aim the main telescope in the general direction of an object at least 1 4 mile away such as the top of a telephone pole a chimney etc Do this by first loosening the R A and Dec lock knobs Position the telescope ...

Page 7: ...ig Dipper point right to Polaris Observers in the Southern Hemisphere aren t so fortunate to have a bright star so near the south celestial pole SCP The star Sigma Octantis lies about 1 from the SCP but it is bare ly visible with the naked eye magnitude 5 5 For general visual observation an approximate polar align ment is sufficient 1 Level the equatorial mount by adjusting the length of the three...

Page 8: ... 2M Motor Drive 7827 can be mounted on the R A axis of the equatorial mount to provide hands free tracking Objects will then remain stationary in the field of view without any manual adjustment of the R A slow motion control Understanding the Setting Circles The setting circles on an equatorial mount enable you to locate celestial objects by their celestial coordinates Every object resides in a sp...

Page 9: ...s pointed north as it would be during polar alignment The counterweight shaft is oriented down ward But it will not look like that when the telescope is pointed in other directions Let s say you want to view an object that is directly overhead at the zenith How do you do it One thing you DO NOT do is make any adjustment to the lat itude adjustment t bolt That will nullify the mount s polar alignme...

Page 10: ...ing the mirrors so they are precisely aligned with each other Your telescope s optics were aligned at the factory and should not need much adjust ment unless the telescope was roughly handled during shipment Accurate collimation is important to insuring the peak performance of your telescope so it should be checked before each observing session Collimation is easy to do and should be done in dayli...

Page 11: ...ning the other two Figure 10 The goal is to center the primary mirror reflection in the secondary mirror as depicted in Figure 8d Don t worry that the reflec tion of the secondary mirror the smallest circle with your eye reflected in it is off center as also is the case in Figure 8d you will fix that in the next step Adjusting the Primary Mirror The final adjustment is made to the primary mirror I...

Page 12: ...f poor seeing atmospheric tur bulence causes objects viewed through the telescope to boil If when you look up at the sky with just your eyes the stars are twinkling noticeably the seeing is bad and you will be limited to viewing with low powers bad seeing affects images at high powers more severely Planetary observing may also be poor In conditions of good seeing star twinkling is minimal and imag...

Page 13: ...e made what to look at A The Moon With its rocky surface the Moon is one of the easiest and most interesting targets to view with your telescope Lunar craters marias and even mountain ranges can all be clearly seen from a distance of 238 000 miles away With its ever chang ing phases you ll get a new view of the Moon every night The best time to observe our one and only natural satellite is dur ing...

Page 14: ...ssional and amateur astronomers alike Keep in mind as with any new task that star hopping may seem challenging at first but will become easier over time and with practice To starhop only a minimal amount of additional equipment is necessary A star chart or atlas that shows stars to at least magnitude 5 is required Select one that shows the positions of many deep sky objects so you will have a lot ...

Page 15: ...ece and insert the illuminated reticle eyepiece into the telescope s star diago nal Turn the eyepiece s illuminator on dimly Re center the bright star guide star on the crosshairs of the reticle eyepiece Check again to make sure that the object to be photographed is still centered within the camera s field of view If it is not re center it either by re positioning the camera on the piggyback adapt...

Page 16: ...Be careful not to touch the front surface of the mirror with your fingers Set the mirror on a clean soft towel Fill a clean sink free of abrasive cleanser with room temperature water a few drops of liquid dishwash ing detergent and if possible a cap full of rubbing alcohol Submerge the mirror aluminized face up in the water and let it soak for several minutes or hours if it s a very dirty mirror W...

Reviews: