background image

and cable should extend toward the front (open) end of
the telescope optical tube. If it does not, you will need to
remove the tube from the mounting rings, rotate the mount
180° about the Dec. axis (first loosen the Dec. lock knob),
and then replace the tube.

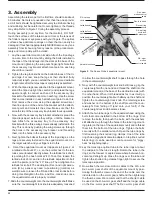
12.To place the finder scope in the finder scope bracket, first

unthread the two black nylon screws until the screw ends
are flush with the inside diameter of the bracket. Place
the O-ring that comes on the base of the bracket over
the body of the finder scope until it seats into the groove
on the middle of the finder scope. Slide the eyepiece end
(narrow end) of the finder scope into the end of the
bracket's cylinder that does not have the alignment
screws while pulling the chrome, spring-loaded tension-
er on the bracket with your fingers. Push the finder scope
through the bracket until the O-ring seats just inside the
front opening of the bracket’s cylinder. Now, release the
tensioner and tighten the two black nylon screws a cou-
ple of turns each to secure the finder scope in place.

13.Insert the base of the finder scope bracket into the dove-

tail slot near the focuser. Lock the bracket into position by
tightening the knurled thumb screw on the dovetail slot.

14.Remove the cap from the focuser and insert the chrome

barrel of one of the eyepieces into the drawtube. Secure

the eyepiece with the thumb screws on the drawtube.
Remember to always loosen the thumb screws before
rotating or removing the eyepiece.

The telescope system is now fully assembled. Keep the dust
cap over the front end of the telescope when it is not in use.

4. Getting Started

Balancing the Telescope

To insure smooth movement of the telescope on both axes of
the equatorial mount, it is imperative that the optical tube be
properly balanced. We will first balance the telescope with
respect to the R.A. axis, then the Dec. axis.

1. Keeping one hand on the telescope optical tube, loosen

the R.A. lock knob. Make sure the Dec. lock knob is
locked, for now. The telescope should now be able to
rotate freely about the R.A. axis. Rotate it until the coun-
terweight shaft is parallel to the ground (i.e., horizontal).

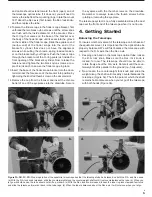
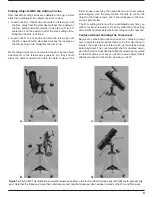
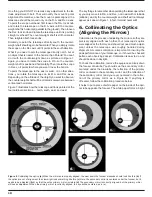
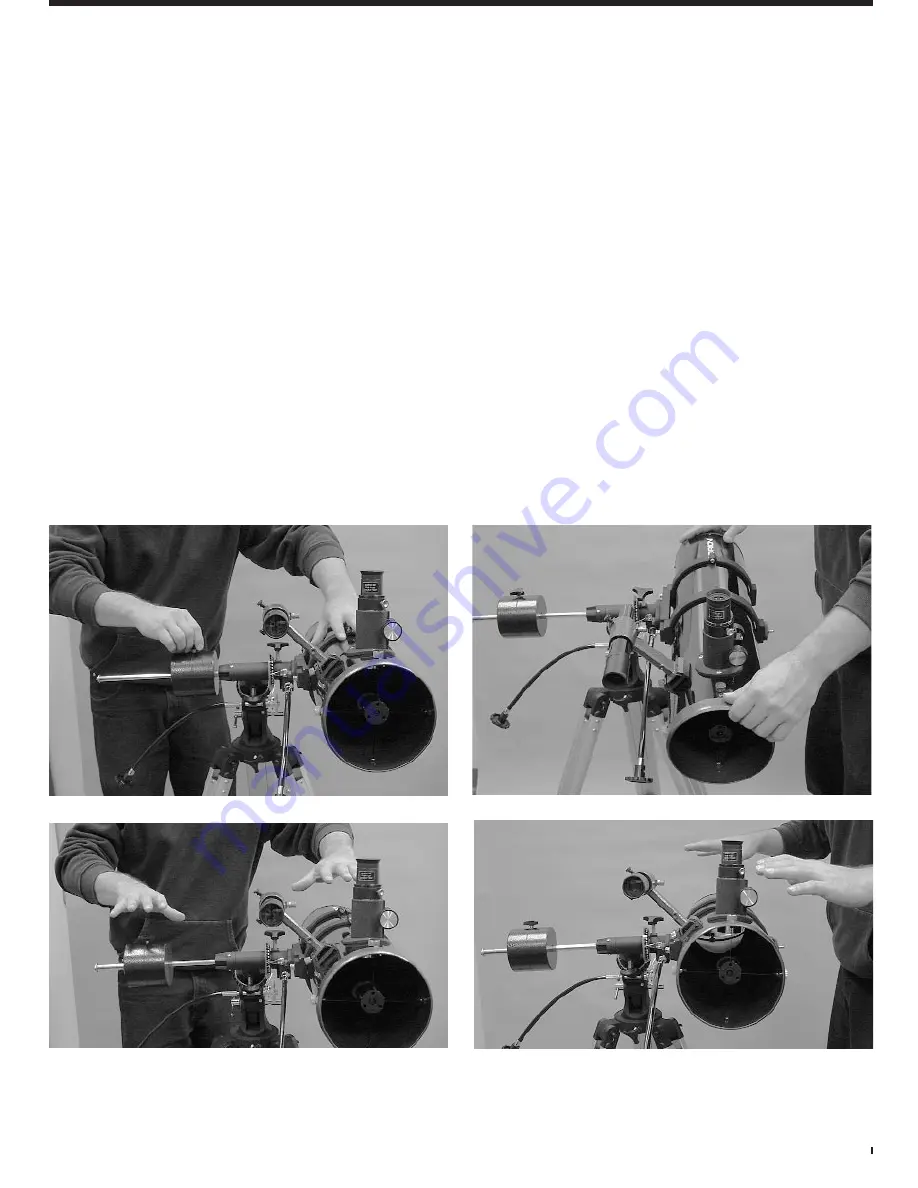
2. Now loosen the counterweight lock knob and slide the

weight along the shaft until it exactly counterbalances the
telescope (Figure 3a). That’s the point at which the shaft
remains horizontal even when you let go of the telescope
with both hands (Figure 3b).

5

b.

d.

c.

a.

Figure 3A, 3B, 3C, 3D: Proper operation of the equatorial mount requires that the telescope tube be balanced on both the R.A. and Dec. axes.
(a) With the R.A. lock knob released, slide the counterweight along the counterweight shaft until it just counterbalances the tube. (b) When you
let go with both hands, the tube should not drift up or down. (c) With the Dec. lock knob released, loosen the tube ring lock clamps a few turns
and slide the telescope forward or back in the tube rings. (d) When the tube is balanced about the Dec. axis, it will not move when you let go.

Summary of Contents for SpaceProbe 130ST EQ 9007

Page 1: ...cal Products Since 1975 Customer Support 800 676 1343 E mail support telescope com Corporate Offices 831 763 7000 P O Box 1815 Santa Cruz CA 95061 INSTRUCTION MANUAL Orion SpaceProbe 130ST EQ Equatorial Newtonian Reflector Telescope 9007 ...

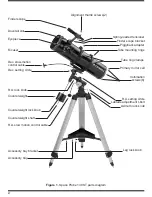
Page 2: ...Tube mounting rings Tube ring clamps Primary mirror cell Collimation screws 6 R A setting circle Latitude adjustment t bolt Azimuth lock knob Leg lock knob Accessory tray Accessory tray bracket Eyepiece Focuser Dec slow motion control cable Dec setting circle R A lock knob Counterweight Counterweight lock knob Counterweight shaft R A slow motion control cable ...

Page 3: ... astronomical objects With its precision optics and equatorial mount you ll be able to locate and enjoy hundreds of fascinating celestial denizens including the plan ets Moon and a variety of deep sky galaxies nebulas and star clusters If you have never owned a telescope before we would like to welcome you to amateur astronomy Take some time to familiarize yourself with the night sky Learn to reco...

Page 4: ...ash mark at 40 To do this loosen the latitude lock t bolt and turn the latitude adjustment t bolt until the pointer and the 40 line up Then retighten the latitude lock t bolt The declination Dec and right ascen sion R A axes may need re positioning rotation as well Be sure to loosen the RA and Dec lock knobs before doing this Retighten the R A and Dec lock knobs once the equatorial mount is proper...

Page 5: ...the drawtube Remember to always loosen the thumb screws before rotating or removing the eyepiece The telescope system is now fully assembled Keep the dust cap over the front end of the telescope when it is not in use 4 Getting Started Balancing the Telescope To insure smooth movement of the telescope on both axes of the equatorial mount it is imperative that the optical tube be properly balanced W...

Page 6: ...y a portion of the full field If they do you can easily observe with your glasses off by just refocusing the telescope the needed amount Aligning the Finder Scope The finder scope must be aligned accurately with the tele scope for proper use To align it aim the main telescope in the general direction of an object at least 1 4 mile away such as the top of a telephone pole a chimney etc Do this by f...

Page 7: ... to revolve around the NCP To find Polaris in the sky look north and locate the pattern of the Big Dipper Figure 6 The two stars at the end of the bowl of the Big Dipper point right to Polaris Observers in the Southern Hemisphere aren t so fortunate to have a bright star so near the south celestial pole SCP The star Sigma Octantis lies about 1 from the SCP but it is bare ly visible with the naked ...

Page 8: ...tracking Objects will appear to move faster at higher magnifications because the field of view is narrower Optional Motor Drives for Automatic Tracking An optional DC motor drive can be mounted on the R A axis of the equatorial mount to provide hands free tracking Objects will then remain stationary in the field of view without any manual adjustment of the R A slow motion control cable Understandi...

Page 9: ...ned Use the slow motion controls to center the object in the finder scope and it should appear in the tele scope s field of view The R A setting circle must be re calibrated every time you wish to locate a new object Do so by calibrating the setting circle for the centered object before moving on to the next one Confused About Pointing the Telescope Beginners occasionally experience some confusion...

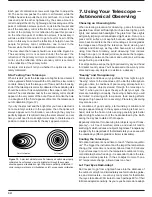
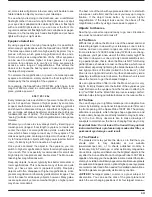
Page 10: ...he telescope is that a you only move it in R A and Dec not in azimuth or latitude altitude and b the counterweight and shaft will not always appear as it does in Figure 1 In fact it almost never will 6 Collimating the Optics Aligning the Mirrors Collimation is the process of adjusting the mirrors so they are precisely aligned with each other Your telescope s optics were aligned at the factory and ...

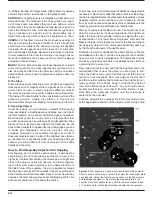
Page 11: ...ary mirror is as centered in the secondary mirror as it will get It still may not be perfectly centered yet but that is OK Now tighten the three set screws to secure the secondary mirror in that posi tion This adjustment will rarely need to be done if ever If the entire primary mirror reflection is not visible in the sec ondary mirror as it is not in Figure 8c adjust the tilt of the secondary mirr...

Page 12: ...he surrounding air and degrades the images seen through the telescope Avoid viewing over rooftops and chimneys as they often have warm air currents rising from them Similarly avoid observing from indoors through an open or closed window because the tempera ture difference between the indoor and outdoor air will cause image blurring and distortion If at all possible escape the light polluted city s...

Page 13: ...er Many galax ies are quite small yet are somewhat bright so higher power may show more detail The best rule of thumb with eyepiece selection is to start with a low power wide field and then work your way up in magni fication If the object looks better try an even higher magnification If the object looks worse then back off the magnification a little by using a lower power eyepiece Objects to Obse...

Page 14: ...he simplest way to hunt down deep sky objects to view in the night sky It entails first pointing the telescope at a bright star close to the object you wish to observe and then progress ing to other stars closer and closer to the object until it is in the field of view of the eyepiece It is a very intuitive technique that has been employed for hundreds of years by profession al and amateur astrono...

Page 15: ...ting on the mirrors Improper cleaning can scratch mirror coatings so the fewer times you have to clean the mir rors the better Small specks of dust or flecks of paint have virtually no effect on the visual performance of the telescope The large primary mirror and the elliptical secondary mirror of your telescope are front surface aluminized and over coated with hard silicon monoxide which prevents...

Page 16: ...warranty gives you specific legal rights and you may also have other rights which vary from state to state For further warranty service information contact Customer Service Department Orion Telescopes Binoculars P O Box 1815 Santa Cruz CA 95061 800 676 1343 9 Specifications Optical tube Steel Primary mirror diameter 130mm Primary mirror coating Aluminum with silicon monoxide SiO overcoat Primary m...

Reviews: