illumination. Typically the dimmer setting is used under
dark skies and the brighter setting is used under light-
polluted night skies or in daylight. Position your eye at
a comfortable distance from the rear of the unit. Look
through the rear of the finder scope with both eyes open
to see the illuminated red dot. The target object should
appear in the field of view somewhere near the red dot.
5. You’ll want to center the red dot on the target object. To do
so, without moving the telescope, use the red dot finder
scope’s vertical and horizontal adjustment knobs (shown
in
Figure 9
) to position the red dot on the object.
6. When the red dot is centered on the distant object, check
to make sure the object is still centered in the telescope’s
eyepiece. If it isn’t, re-center it then adjust the red dot
scope’s alignment again. When the object is centered in
the telescope eyepiece and on the finder scope’s red dot,
the finder scope is properly aligned with the telescope. The
red dot finder scope’s alignment should be checked before
every observing session. At the end of your observing
session, be sure to slide the power switch on the red dot
finder scope to OFF to preserve battery life.
Telescope Operation
Extending the Tripod Legs
To extend the tripod legs to the desired length, simply turn the
leg lock knob counterclockwise to release the leg, then retighten
the knob after extending the leg. Do not overtighten the lock
knobs or you could damage the leg collars or strip the threads of
the bolt or its receptacle.
Using the Pan Head
The StarBlast 102mm refractor features a standard “altazimuth”
pan head mount, which permits motion along two perpendicu-
lar axes: altitude (up/down) and azimuth (left/right). This makes
pointing the telescope easy and intuitive. To move the telescope
in the azimuth direction, loosen the azimuth tension knob a little
(refer to
Figure 8
), then take hold of the pan handle and gently
move it left or right.
To move the telescope in altitude, first twist the pan handle
counterclockwise, then move the telescope up or down to the
desired position. Then twist the pan handle clockwise to lock
that position. You may be able to find a suitable azimuth and
altitude axis tension to allow the telescope to be moved freely
without having to make any adjustments to the tension every
time you move the telescope.
Eyepiece Selection
Magnification, or power, is determined by the focal length of
the telescope and the focal length of the eyepiece being used.
Therefore, by using eyepieces of different focal lengths, the
resultant magnification can be varied. It is quite common for
an observer to own five or more eyepieces to access a wide
range of magnifications. This allows the observer to choose the
best eyepiece to use depending on the object being viewed and
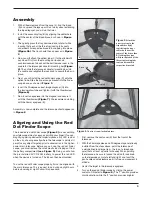
Figure 4.
Attaching the optical tube to the mount.
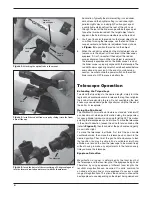
Figure 5.
Install the red dot finder scope by sliding it into the finder
base all the way.
Figure 6.
Insert the barrel of the correct-image 90-degree diagonal
into the focuser drawtube and secure it with the thumbscrew.
Dovetail
saddle
Dovetail
mounting bar
Lock
knob
Base
Thumbscrew
4


