13
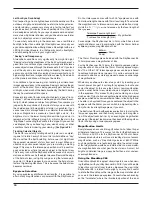
mirror, as in
Figure 29B
, you will need to adjust the tilt of the
secondary mirror. This is done by alternately loosening one of
the three secondary mirror alignment screws then lightly tighten-
ing the other two (
Figure 28
). The goal is to center the primary
mirror reflection in the secondary mirror, as in
Figure 29C
. Don’t
worry that the reflection of the secondary mirror (the smallest
circle) is off-center. You will fix that in the next step. It will take
some trial and error to determine which screws to loosen and
tighten to move the reflection of the primary mirror to the center
of the secondary mirror. But be patient and you’ll get it.
Aligning the Primary Mirror
The final adjustment is made to the primary mirror. It will need
adjustment if, as in
Figure 29C
, the reflection of the primary
mirror is centered in the secondary mirror, but the small reflec-
tion of the secondary mirror is off-center. The tilt of the primary
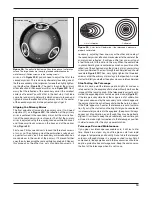
mirror is adjusted using three spring-loaded collimation knobs
and three small locks screws on the back end of the optical
tube (
Figure 30
).
First use a Philips screwdriver to loosen the three lock screws
a turn or so. Then tighten one of the collimation knobs about
a quarter turn and see if the secondary mirror reflection has
moved closer to the center of the primary. If it moved farther
away then try loosening the same collimation knob a bit. Repeat
this process on the other two sets of collimation screws, if
necessary, adjusting them one way or the other and seeing if
the secondary mirror reflection moves closer to the center of the
primary mirror reflection. It will take a little trial and error to get
a feel for how to tilt the mirror in this way. When the center hole
in your collimating tool is centered as much as possible on the
reflection of the adhesive dot on the primary mirror, your primary
mirror is collimated. The view through the collimation cap should
resemble
Figure 29D
. Then, very lightly tighten the three lock
screws so that the primary mirror stays in that position. A simple
star test will tell you whether the optics are accurately collimated.
Star-Testing the Telescope
When it is dark, point the telescope at a bright star and accu-
rately center it in the eyepiece’s field of view. Slowly de-focus the
image with the focusing knob. If the telescope is correctly colli-
mated, the expanding disk should be a perfect circle (
Figure 31
).
If the image is unsymmetrical, the scope is out of collimation.
The dark shadow cast by the secondary mirror should appear in
the very center of the out-of-focus circle, like the hole in a donut.
If the “hole” appears off-center, the telescope is out of collima-
tion. If you try the star test and the bright star you have selected
is not accurately centered in the eyepiece, the optics will always
appear out of collimation, even though they may be perfectly
aligned. It is critical to keep the star centered, so over time you
will need to make slight corrections to the telescope’s position
in order to account for the sky’s apparent motion.
Telescope Care and Maintenance
If you give your telescope reasonable care, it will last a life-
time. Store it in a clean, dry, dust-free place, safe from rapid
changes in temperature and humidity. Do not store the telescope
outdoors, although storage in a garage or shed is okay. Small
components like eyepieces and other accessories should be
kept in a protective box or storage case. Keep the dust cover on
the front of the telescope when it is not in use.
Figure 30.
The optical tube’s rear cell has three pairs of collimation
screws. The large knobs are the spring-loaded collimation knobs
while the small Philips screws are the locking screws.
Collimation knob
Lock screw
Out
of
collimation
Collimated
Figure 31.
A star test will determine if the telescope's optics are
properly collimated
.
Summary of Contents for 52598
Page 15: ...15 ...

