4
divide the focal length of the telescope by the focal length of
the eyepiece:
Telescope Focal Length (mm)
= Magnification
Eyepiece Focal Length (mm)
For example, the 6" Newtonian Imaging Reflector, which has
a focal length of 750mm, used in combination with a 25mm
eyepiece, yields a magnification of
750 mm
= 30x
25 mm
Every telescope has a useful limit of power of about 45x60x
per inch of aperture. Claims of higher power by some tele
scope manufacturers are a misleading advertising gimmick
and should be dismissed. Keep in mind that at higher pow
ers, an image will always be dimmer and less sharp (this is
a fundamental law of optics). The steadiness of the air (the
“seeing”) will usually limit how much magnification an image
can tolerate.
Always start viewing with your lowestpower (longest focal
length) eyepiece in the telescope. After you have located and
observed the object with it, you can try switching to a higher
power eyepiece to ferret out more detail, if atmospheric con
ditions permit. If the image you see is not crisp and steady,
reduce the magnification by switching to a longerfocallength
eyepiece. As a general rule, a small but wellresolved image
will show more detail and provide a more enjoyable view than
a dim and fuzzy, overmagnified image.
astroimaging with the 6" newtonian
imaging reflector
The 6" Newtonian Imaging Reflector has been specifically
designed for use with astronomical CCD imaging cameras
like the Orion StarShoot, but other imaging systems such as
digital SLR cameras will also work well with the telescope.
The secondary mirror of the 6" Newtonian Imaging Reflector
has been sized appropriately to provide a fully illuminated
field of view for Orion StarShoot cameras and most popular
digital SLR models.
Unlike most Newtonian reflector designs, the 6" Imaging
Reflector's secondary mirror has been recessed further into
the tube to prevent offaxis glare from being detected by imag
ing devices. Glare can contaminate nightsky images by reduc
ing image contrast and giving the object a “soft” appearance.
To use your CCD camera with the 6" Newtonian Imaging
Reflector, the camera must have a 1.25 inch “nosepiece”.
Otherwise an external camera adapter with Tthreads is
required. All Orion StarShoot cameras feature this nosepiece
(Figure 2). Insert the nosepiece equipped camera into the
focuser just like an 1.25" eyepiece.
If your camera does not include a 1.25" nosepiece, you have
a digital SLR, or if you wish to utilize a secure Tthread con
nection with a CCD camera like the Orion StarShoot, a zero
profile camera adapter is required (available from Orion). The
zeroprofile adapter is inserted into the focuser just like a 2"
eyepiece and provides Tthreads for attachment of digital SLR
Trings or Tthreaded CCD cameras.
To attach a digital SLR to the telescope, remove any attached
lenses and connect a modelspecific Tring to the camera
body. Thread the Tring onto the zeroprofile adapter to com
plete attachment. To securely attach a CCD imaging cam
era like the Orion StarShoot via Tthreads, remove the 1.25"
nosepiece and thread the CCD camera onto the zeroprofile
camera adapter to complete attachment.
Due to its imagingoptimized design, no external extension
tubes are required to appropriately couple the telescope to an
imaging camera.
To record an image of a nightsky object, you will need to first
acquire and center the object with an eyepiece. You may need
to extend the focuser’s builtin extension tube to achieve focus
with an eyepiece. Once you have centered the target object
in the eyepiece field of view, remove the eyepiece and insert
your CCD camera into the telescope’s focuser (don’t forget
to retract the builtin extension tube if it has been extended).
Secure the camera with the thumbscrew on the focuser. Use
the focus and finefocus wheels to bring the image into focus.
collimating the optics
Collimating is the process of adjusting the mirrors so they are
aligned with one another. Your telescope’s optics were aligned
at the factory, and should not need much adjustment unless
the telescope is handled roughly. Accurate mirror alignment is
important to ensure peak performance of your telescope, so it
should be checked regularly. Collimating is relatively easy to
do and can be done in daylight.
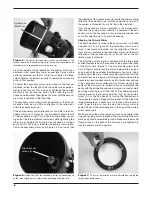
To check optical alignment, remove the eyepiece and look
down the focuser drawtube. You should see the secondary
mirror centered in the drawtube, as well as the reflection of
the primary mirror centered in the secondary mirror, and the
reflection of the secondary mirror (and your eye) centered in
the reflection of the primary mirror, as in Figure 3a. If anything
is offcenter, proceed with the following collimating procedure.
The Collimating Cap and Primary Mirror Center Mark
Your 6" Newtonian Imaging Reflector comes with a collimat
ing cap. This is a simple cap that fits on the focuser drawtube
like a dust cap, but has a hole in the center and a silver bot
Figure 2.
To use a CCD camera with the 6" Imaging OTA, the
camera must have a 1.25” nosepiece, like the Orion StarShoot
Imaging cameras, or else an external camera adapter with
Tthreads is required.
1.25" nosepiece


