background image


12 

MISE EN GARDE!!

 Tenez compte de tous les avertissements, mises en garde et consignes 

avant de remplacer les piles. 

Remarque:

 Lors de la déconnexion de la batterie, l'équipement n'est pas protégé contre les 

coupures de courant. 


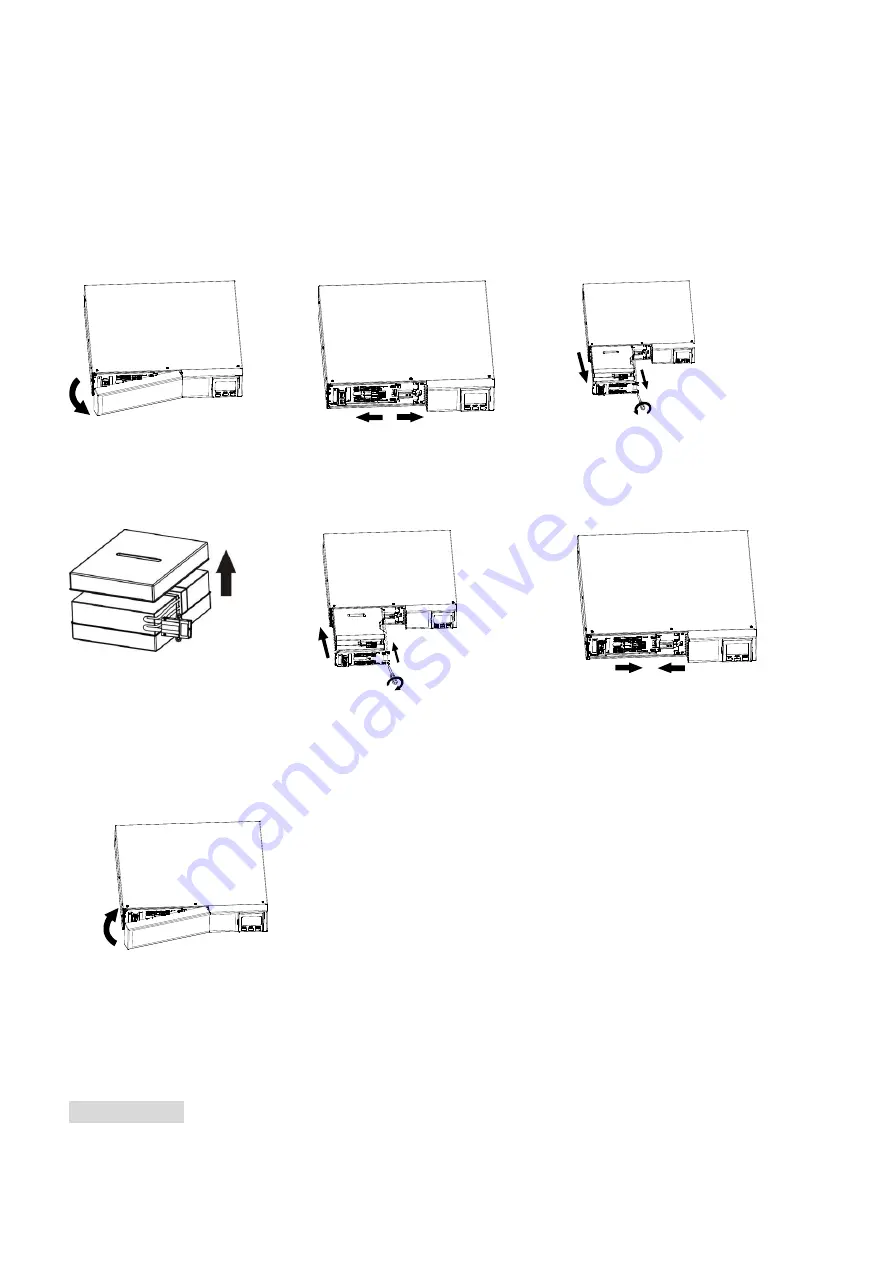
Step 1 

Step 2 

Step 3 


Remove front panel.   

Disconnect battery wires. 

Pull out the battery box by 
removing two screws on the 

front panel.   


Step 4 

Step 5 

Step 7 


Remove the top cover of 

battery box and replace the 
inside batteries.   

After replacing the batteries, 

put the battery box back to 
original location. Put the front 
panel back to the unit and 
install screws.   

Re-connect the battery wires.   

Step 8 


2-6 Battery Kit Assembly (option) 
NOTICE:

 Please assemble battery kit first before installing it inside of UPS. Please select 

correct battery kit procedure below to assemble it.   

AVIS:

 Veuillez assembler le kit de batterie avant de l'installer à l'intérieur de l'onduleur. Veuillez 

sélectionner la procédure de kit de batterie appropriée ci-dessous pour l'assembler. 


2-battery kit 
Step 1

: Remove adhesive tapes.   

Step 2

: Connect all battery terminals by 

following below chart.   

Summary of Contents for Network Pro RTX2

Page 1: ...Line Interactive Sinewave UPS 800 1 1K 1 5K 2K 2 2K 2 5K 3K VA Uninterruptible Power Supply System Version 1 1 www orionpowersystems com Network Pro RTX2 User Manual ...

Page 2: ...le 8 2 3 Install The UPS 8 2 4 Setup The UPS 10 2 5 Battery Replacement 11 2 6 Battery Kit Assembly option 12 3 Operations 15 3 1 Button Operation 15 3 2 LCD Panel 15 3 3 Audible Alarm 16 3 4 LCD Display Wordings Index 17 3 5 UPS Setting 17 3 6 Operating Mode Description 20 3 7 Faults Reference Code 22 3 8 Warning Indicator 23 4 Troubleshooting 24 5 Storage and Maintenance 25 5 1 Operation 25 5 2 ...

Page 3: ...nt d être installé Veuillez prévoir au moins deux heures pour que le système UPS s acclimate à l environnement Do not install the UPS system near water or in moist environments N installez pas le système UPS près de l eau ou dans des environnements humides Do not install the UPS system where it would be exposed to direct sunlight or near heater N installez pas le système UPS ni où il pourrait être...

Page 4: ...e l onduleur et des appareils connectés ne dépasse pas 3 5 mA Temperature Rating Units are considered acceptable for use in a maximum ambient of 40 C 104 F Cote de température Les unités sont considérées comme acceptables pour une utilisation dans une température ambiante maximale de 40 C 104 F For PLUGGABLE EQUIPMENT the socket outlet shall be installed near the equipment and shall be easily acce...

Page 5: ...ircuit doit être séparé de tout circuit de tension dangereux par une isolation renforcée 1 5 Maintenance Service And Faults Maintenance service et défauts The UPS system operates with hazardous voltages Repairs may be carried out only by qualified maintenance personnel Le système UPS fonctionne avec des tensions dangereuses Les réparations ne peuvent être effectuées que par un personnel de mainten...

Page 6: ...ls with insulated grips and handles Les batteries peuvent provoquer un choc électrique et avoir un courant de court circuit élevé Veuillez prendre les mesures de précaution spécifiées ci dessous et toute autre mesure nécessaire lorsque vous travaillez avec des piles Retirer les montres bracelets bagues et autres objets métalliques Utilisez uniquement des outils avec poignées isolées et poignées Wh...

Page 7: ...Disconnect charging source prior to connecting or disconnecting battery terminals f Determine if battery is inadvertently grounded If inadvertently grounded remove source from ground Contact with any part of a grounded battery can result in electrical shock The likelihood of such shock can be reduced if such groundsare removed during installation and maintenance Les précautions suivantes doivent ê...

Page 8: ...___________________________ WARNING Changes or modifications not expressly approved by the manufacturer could void the user s authority to operate the equipment ___________________________________________________________________________ Déclaration de conformité FCC Cet équipement a été testé et déclaré conforme aux limites d un appareil numérique de classe B conformément à la partie 15 des règles...

Page 9: ...mballage d origine dans un endroit sûr pour une utilisation future 2 1 Rear Panel View 800 1 1K 1 5K IEC Type 2K IEC Type 2 5K 3K IEC Type 800 1 1K 1 5K NEMA Type 2K 2 2K NEMA Type 2 5K 3K NEMA Type 1 Programmable outlets connect to non critical loads 2 Output receptacles connect to mission critical loads 3 AC input 4 Input circuit breaker 5 Network Fax Modem surge protection 6 Emergency power off...

Page 10: ...l back to the unit Rack mount Installation CAUTION Do NOT use the mounting brackets to lift the unit The mounting brackets are only for securing the unit to the rack Use optional PN OPS Railkit to support rear of UPS in 4 post racks and enclosures ATTENTION N utilisez PAS les supports de montage pour soulever l appareil Les supports de montage servent uniquement à fixer l unité aux supports de pot...

Page 11: ... 2 Step 3 Install UPS and external battery NOTE When installing the UPS or battery pack with feet please keep 70mm distance from the edge of the unit REMARQUE Lors de l installation de l onduleur ou de la batterie avec des pieds veuillez garder une distance de 70 mm du bord de l unité ...

Page 12: ...u can schedule UPS shutdown start up and monitor UPS status through PC The UPS is equipped with intelligent slot perfect for either SNMP or AS400 card When installing either SNMP or AS400 card in the UPS it will provide advanced communication and monitoring options PS USB port and RS 232 port can t work at the same time Step 4 Network connection Network Fax Phone surge port Connect a single modem ...

Page 13: ...onitoring software to fully configure UPS shutdown Please follow steps below to download and install monitoring software 1 Go to the website https www orionpowersystems com software downloads html 2 Click ViewPower software icon and then choose your required OS to download the software 3 Follow the on screen instructions to install the software 4 When your computer restarts the monitoring software...

Page 14: ...tteries After replacing the batteries put the battery box back to original location Put the front panel back to the unit and install screws Re connect the battery wires Step 8 2 6 Battery Kit Assembly option NOTICE Please assemble battery kit first before installing it inside of UPS Please select correct battery kit procedure below to assemble it AVIS Veuillez assembler le kit de batterie avant de...

Page 15: ...it Step 1 Remove adhesive tapes Step 2 Connect all battery terminals by following below chart Step 3 Put assembled battery packs on one side of plastic shells Step 4 Cover the other side of plastic shell as below chart Then battery kit is assembly well 6 battery kit Step 1 Remove adhesive tapes Step 2 Connect all battery terminals by following below chart Tapes Tapes Tapes ...

Page 16: ...14 Step 3 Put assembled battery packs on one side of plastic shells Step 4 Cover the other side of plastic shell as below chart Then battery kit is assembly well Tapes Tapes ...

Page 17: ...er UPS self testing while in AC mode OFF ENTER Button Turn off the UPS Press and hold this button at least 2 seconds to turn off the UPS Confirm selection key Press this button to confirm selection in UPS setting mode SELECT Button Switch LCD message Press this button to change the LCD message for input voltage input frequency battery voltage output voltage and output frequency Setting mode Press ...

Page 18: ...es that programmable management outlets are working Mode operation information Indicates the UPS connects to the mains Indicates the battery is working Indicates the bypass circuit is working Indicates the ECO mode is enabled Indicates the inverter circuit is working Indicates the output is working Indicates that the UPS alarm is disabled Battery information Indicates the Battery level by 0 24 25 ...

Page 19: ... Refer to below table for details Parameter 2 It s setting options or values for each program 01 Output voltage setting Interface Setting For 208 220 230 240 VAC models you may choose the following output voltage 208 presents output voltage is 208Vac 220 presents output voltage is 220Vac 230 presents output voltage is 230Vac Default 240 presents output voltage is 240Vac For 110 115 120 127 VAC mod...

Page 20: ... This setting is only effective for super charger 06 Autonomy limitation setting Interface Setting Parameter 2 Set up backup time on battery mode for general outlets 0 999 setting the backup time in minutes from 0 999 for general outlets on battery mode DIS Disable the autonomy limitation and the backup time will depend on battery capacity Default Note When setting as 0 the backup time will be onl...

Page 21: ...rnal battery AH rating plus the sum of the AH rating of the EBMs For example an NP2000RTX2 with 2 NP2000RTX2EBM would have a total AH rating of 45AH 08 EPO logic setting Interface Setting Set up the EPO function control logic AO Active Open Default When AO is selected as EPO logic it will activate EPO function with Pin 1 and Pin 2 in open status AC Active Close When AC is selected as EPO logic it ...

Page 22: ...time Push Up button to change the value of backup time according your demand Then press Enter to confirm the setting Step 5 Press Up button ON MUTE to switch to 00 of program list Then press Enter button to exit setting menu Step 6 Disconnect AC input and wait until the LCD display is off The new setting will be activated when turning on the UPS again 3 6 Operating Mode Description Operating mode ...

Page 23: ...normal When the input voltage is lower than the voltage regulation range but higher than low loss point the boost AVR will be activated Battery mode When the input voltage is beyond the acceptable range or power failure and alarm is sounding every 10 seconds UPS will backup power from battery Standby mode UPS is powered off and no output supply power but still can charge batteries ...

Page 24: ...code Icon Bus start fail 01 x Inverter output short 14 Bus over 02 x Battery voltage too high 27 Bus under 03 x Battery voltage too low 28 Inverter soft start fail 11 x Over temperature 41 x Inverter voltage high 12 x Over load 43 Inverter voltage Low 13 x Charger failure 45 x ...

Page 25: ...e Sounding every 2 seconds Site wiring fault Sounding every 2 seconds EPO enable Sounding every 2 seconds Over temperature Sounding every 2 seconds Charger failure Sounding every 2 seconds Battery fault Sounding every 2 seconds At this time UPS is off to remind users of something wrong with battery EEPROM error Sounding every 2 seconds Battery replacement Sounding every 2 seconds ...

Page 26: ...2 seconds The external or internal battery is incorrectly connected Check if all batteries are connected well Fault code is shown as 27 and the icon is lighting on LCD display and alarm is continuously sounding Battery voltage is too high or the charger is fault Contact your dealer Fault code is shown as 28 and the icon is lighting on LCD display and alarm is continuously sounding Battery voltage ...

Page 27: ...ave output and battery voltage is less than 10V PC Contact your dealer 5 Storage and Maintenance 5 1 Operation The UPS system contains no user serviceable parts If the battery service life 3 5 years at 25 C ambient temperature has been exceeded the batteries must be replaced In this case please contact your dealer 5 2 Storage Before storing charge the UPS 5 hours Store the UPS covered and upright ...

Page 28: ...30 240 VAC 90 for 110 115 120 127 VAC 92 for 208 220 230 240 VAC BATTERY Battery Type Number 12 V 7 Ahx2 12 V 9 Ahx2 12 V 7 Ahx4 12 V 9 Ahx4 12 V 7 Ahx6 12 V 7 Ahx6 12 V 9 Ahx6 Charging Voltage 27 4 VDC 1 54 8 VDC 1 82 1 VDC 1 Recharge Time 4 hours recover to 90 capacity PROTECTION Full Protection Overload short discharge and overcharge protection ALARM Battery Mode Sounding every 10 seconds Low B...

Page 29: ... 874 292 123 5 N A N A N A N A N A N A 4 EBM 1183 398 171 5 N A N A N A N A N A N A NP1100RTX2 83 25 10 5 N A N A N A N A N A 1 EBM 326 105 43 25 N A N A N A N A N A 2 EBM 602 198 84 50 N A N A N A N A N A 3 EBM 897 300 127 77 N A N A N A N A N A 4 EBM 1206 406 175 105 N A N A N A N A N A NP1500RTX2 154 49 20 12 7 6 5 N A N A 1 EBM 704 235 100 60 41 33 28 N A N A 2 EBM 1320 447 194 117 82 65 56 N ...

Page 30: ...urned Material Authorization RMA number The RMA number must appear on the outside of the box and on the Bill Of Lading Original packaging should be used if available Systems that get damaged in transit as a result of improper packaging are not covered under warranty A replacement or repair unit will be shipped freight prepaid for all units under warranty NOTE For critical applications immediate re...

Reviews: