background image


5

7.  Add one tablespoon oil into the appliance from feeding funnel. Connect the appliance to power supply. Turn the 

speed selector to the “2” setting. 

8.  Then add water (the maximum water quantity is 225g) with food pusher from the feeding funnel slowly within 20s. 

NOTE: the food pusher also can be used as measuring cup for measuring oil or water. 

9.  The proportion of the flour and water is 5:3. Make sure the quantity of the water shall not be more than the 

maximum specified water quantity. 

Note:

 Add some more water if the processing speed slows down during operating so as to make the motor run 

smoothly, otherwise the motor may be damaged. During kneading/mixing, to avoid shaking, press the lid with one 

hand, and the other hand is holding the handle. 

10. Stop the process by turning the speed selector to “0” position as soon as the pastry starts to form a ball.   

CAUTION:

 The total operation time is not more than 90 seconds. And minimum 2 minutes rest period must be 

maintained after one operation cycle. At least 30 minutes rest period must be maintained to let the appliance cool 

down after three operation cycles. 

10. Unplug the appliance, detach the cover, firstly remove the plastic blade, then remove the dough. 


CLEANING 

1.


Disconnect the power supply before cleaning. 

2. Empty the jar and remove the lid, the plastic blade, pusher, then immerse them in water and clean them with a 

damp cloth or soft brush.   

3. Wipe the outside of base with a damp cloth. Never immerse the motor base in water as electric shock is possible to 

occur. Then dry thoroughly. Ensure the


interlock area is free of food particles. 


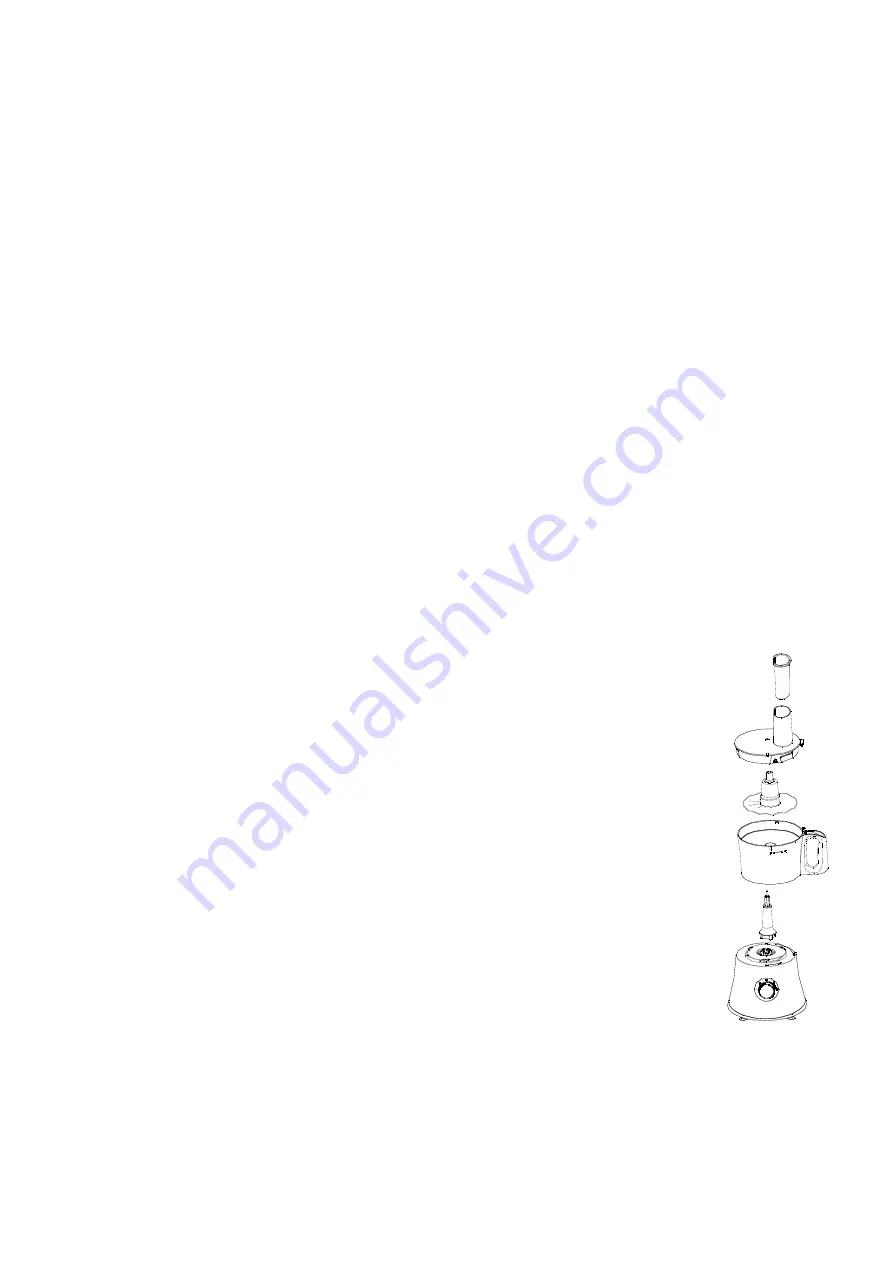
BEATING AND WHISKING 


1.

  Firstly assemble the driving shaft into the motor base, make sure it is clipped into position.   

2.

  Place the chopping jar on the Motor Unit from the unlock position and slightly turn the 

chopping jar clockwise until the chopping jar locks into the lock position on the motor base. 

Make sure it is assembled in place correctly, otherwise the appliance will not operate.   

3.

  Insert the whisk into the driving shaft in the jar securely. 

4.

  Place the ingredient into the bowl. You can use it to prepare mayonnaise, sauces, egg 

whites, meringues (up to 10 egg whites), and whip cream. 

5.

  Place the lid onto the chopping jar and turn it clockwise until the tab of the lid clicks into slot 

in the jar handle. Make sure it is locked in position correctly, otherwise the appliance will not 

operate. 

6.

  Set the speed selector to the high speed.   

Note: Never use this whisk to knead dough or mix cake mixtures. 

7.

  Do not run the appliance for more than 2 minutes per time.   


CLEANING 

1.


Disconnect the power supply before cleaning. 

2. Empty the jar and remove the lid, the whisk, pusher, then immerse them in water and clean them with a damp cloth 

or soft brush.   

3. Wipe the outside of base with a damp cloth. Never immerse the motor base in water as electric shock is possible to 

occur. Then dry thoroughly. Ensure the


interlock area is free of food particles. 


Summary of Contents for OXB-902

Page 1: ...ON MANUAL MODEL OXB 902 FOOD PROCESSOR Please read these instructions for use and have a good look at the illustration before using the appliance Importer Orion Electronics Ltd 29 J szber ny t Budapes...

Page 2: ...until the blades have come to a complete stop 12 Do not use fingers to scrape food away from discharge disc while appliance is operating Cut type injury may result 13 Be certain lid is securely locked...

Page 3: ...R Plastic blade S blade Whisk Chopping jar Driving shaft Motor base Speed selector Lid Feeding funnel Food pusher Blade base Blending jar Jar cover Measuring cup Disk stand Shredding blade Chipping bl...

Page 4: ...ent blending Note The total operating time should not more than 3 minutes 6 Turn the Speed Selector to 0 Position once the mixture has been blended to your desired consistency 7 Remove the blending ja...

Page 5: ...ping jar dismantle all detachable parts and rinse them in warm soapy water Extreme caution must be taken when handling blade as it is very sharp All the accessories except motor base are dishwasher sa...

Page 6: ...th a damp cloth or soft brush 3 Wipe the outside of base with a damp cloth Never immerse the motor base in water as electric shock is possible to occur Then dry thoroughly Ensure the interlock area is...

Page 7: ...t 30 minutes rest period must be maintained to let the appliance cool down after three operation cycles 7 Turn the speed selector to 0 position and unplug unit after processing Remove the blade ass y...

Page 8: ...HASZN LATI TMUTAT MODELL OXB 902 KONYHAI ROBOTG P K rj k olvassa el a le r st a g p haszn lata el tt s n zze t a mell kelt br kat Import r Orion Electronikai Kft H 1106 Budapest J szber nyi t 29...

Page 9: ...szt tsa m k d s k zben ujjal a reszel kgy jt t rol t mert ez v g shoz s r l shez vezethet 13 Bizonyosodjunk meg arr l hogy a tet biztons gosan le van z rva miel tt elind tja a g pet 14 Gy z dj n meg a...

Page 10: ...de Chipping blade fine Slicing blade Chipping blade coarse ELS HASZN LAT EL TT Az els haszn lat el tt csomagolja ki a robotg pet s tartoz kait T vol tsa el a csomagol st s a matric kat Tiszt tsa meg a...

Page 11: ...poh rba a tartalm t TISZT T S 1 Kapcsolja ki a k sz l ket 2 nts n egy kev s langyos vizet a kancs baba ford tsa el a sebess g ll t t P poz ci ba s tartsa ebben az llapotban n h ny m sodpercig 3 Vegye...

Page 12: ...t t t r lje le egy nedves ronggyal Sose mer tse v zbe mert ram t st szenvedhet Sz r tsa meg s bizonyosodjon meg arr l hogy nem maradt semmilyen marad k az alkatr szeken GYORS TISZT T S K t felhaszn l...

Page 13: ...ir nyba Amennyiben nincs rendesen sszerakva az eszk z nem fog beindulni 5 Rakja magas sebess gre a kever t Figyelem A habver t ne haszn lja t szt k bekever s re 6 Az egyidej haszn lata ne haladja meg...

Page 14: ...n tsa a k sz l ket 2 r tse ki a v g ed nyt s vegye ki a v g lt a tart korongb l vegye le a tetej t s szedje ki bel le az telnyom t Az alkatr szeket rakja v zbe s egy puha kef vel tiszt tsa meg Nagyon...

Page 15: ...EL OXB 902 ROBOT DE BUC T RIE V rug m s citi i aceste instruc iuni de utilizare i verifica i bine ilustra iile nainte de folosirea acestui aparat de uz casnic Importator Orion Electronics Ltd 29 J szb...

Page 16: ...r zuire dar numai dup ce opri i aparatul 9 Evita i contactul cu p r ile n mi care 10 Nu introduce i alimentele cu m na Folosi i mping torul pentru alimente 11 nainte de scoaterea capacului de la can o...

Page 17: ...ratului nu ar trebui f cut de copiii sub 8 ani i nesupraveghea i 29 ine i aparatul i cablul de alimentare departe de copiii mai mici de 8 ani 30 P stra i aceste instruc iuni NUMAI PENTRU FOLOSIRE N CA...

Page 18: ...re c nd vre i s deschide i roti i cana pentru m surare n sens invers acelor de ceas cu 90 pentru deblocare 4 Conecta i la priz techerul de alimentare i seta i selectorul de viteze pe viteza dorit Exis...

Page 19: ...de tocare Deschide i capacul i apuca i lama de punctul central i trage i afar Decupla i cana pentru tocare i roti i n sens invers acelor de ceas i lua i o de pe baza motorului Goli i cana ATEN IE Lama...

Page 20: ...sc pentru 30 de minute 10 Decupla i aparatul de la priz scoate i capacul scoate i prima dat lama din plastic apoi aluatul CUR AREA 1 nainte de sp lare deconecta i de la priz 2 Goli i cana i introduce...

Page 21: ...r cire dup 3 cicluri consecutive de lucru al aparatului 7 Dup terminarea procesului pune i selectorul de viteze pe pozi ia 0 i decupla i unitatea de la sursa de alimentare Scoate i ansamblul de lame D...

Page 22: ...a pou itie MODELL OXB 902 Kuchynsk robot Pred pou it m pr stroja si pros m pozorne pre tajte n vod na pou itie a prezrite si prilo en n kresy Import r Orion Elektronikai Kft J szber nyi t 29 Budapest...

Page 23: ...sa no e celkom zastavia 12 Ne istite za chodu prstom n dobu na postr han potraviny mohli by ste sa poreza porani 13 Pred t m ne pr stroj zapnete sa presved te o tom i je jeho kryt dobre zavret 14 Po...

Page 24: ...u itie si odlo te Iba na dom ce pou itie Obozn mte sa s robotom Pred prv m pou it m Pred prv m pou it m robot aj jeho pr slu enstvo rozba te Odstr te balenie a n lepky O istite v etko pr slu enstvo ok...

Page 25: ...yt poh ra a vylejte jeho obsah ISTENIE 1 Pr stroj pred isten m odpojte z elektrickej siete 2 Nalejte do poh ra trochu vla nej vody oto te vyp na do polohy P a nieko ko sek nd ho tak dr te 3 Odn mte po...

Page 26: ...a um vanie nesmie prekro i 70 stup ov 3 Vonkaj ok pr stroja utrite vlhkou utierkou Nikdy ho nepon rajte do vody m ete tak sp sobi der elektrick m pr dom Potom nechajte pr stroj celkom uschn Presved te...

Page 27: ...cou ahacieho n stavca m ete pripravi majon zu om ky sneh z bielkov snehov pusinky z 10 bielkov a aha ku 4 Polo te kryt na misku a oto te ho smerom pohybu hodinov ch ru i iek Presved te sa i je kryt sp...

Page 28: ...e s ve mi ostr ISTENIE 1 Pr stroj pred isten m odpojte z elektrickej siete 2 Vypr zdnite misku na drvenie sn mte kryt a vyberte z neho pr tla n valec vyberte kr jac kot Pr slu enstvo umyte vla nou vod...

Page 29: ...na pou it MODELL OXB 902 Kuchy sk robot P ed pou it m p stroje si pros m pozorn p e t te n vod na pou it a prohl dn te si p ilo en n kresy Import r Orion Elektronikai Kft J szber nyi t 29 Budapest H...

Page 30: ...kejte a se no e pln zastav 12 Ne ist te za chodu prstem n dobu na nastrouhan potraviny mohli by jste se po ezat poranit 13 P ed t m ne p stroj zapnete p esv d te se o tom zdali je jeho kryt dob e zav...

Page 31: ...stupu k p stroji 30 N vod na pou it si odlo te Jenom na dom c pou it Obeznamte se s robotem P ed prvn m pou it m P ed prvn m pou it m robot aj jeho p slu enstv rozbalte Odstra te balen a n lepky O is...

Page 32: ...s motorem poh rem ot ejte proti sm ru pohybu hodinov ch ru i ek opatrn sejm te kryt poh ru a vylijte jeho obsah I T N 1 P stroj p ed ist n m odpojte z elektrick s t 2 Nalijte do poh ru trochu vla n vo...

Page 33: ...vodou s ist c m prost edkem S no i zach zejte velmi opatrn jsou ostr V echny sti robotu krom podstavce s motorem m ete um vat v my ce n dob Teplota vody na um v n nesm p ekro it 70 stup 3 Vn j ek p st...

Page 34: ...podstavce a oto te ji ve sm ru pohybu hodinov ch ru i ek P esv d te se zdali je n doba spr vn zalo en jinak se robot nebude d t zapnout 2 Vlo te leha do pohonn jednotky 3 Suroviny vlo te do misky Pomo...

Page 35: ...rick s t Vyberte no e Oto te m su sm rem proti pohybu hodinov ch ru i ek a sejm te ji Vysypte zpracovanou potravinu UPOZORN N No e jsou velmi ostr ISTENIE 1 P stroj p ed isten m odpojte z elektrick s...

Page 36: ...MODEL OXB 902 Robot kuchenny Przed rozpocz ciem korzystania z urz dzenia prosimy o dok adne zapoznanie si z niniejsz instrukcj i obejrzenie ilustracji Importer Orion Electronikai Kft J szber nyi t 29...

Page 37: ...nale y u ywa popychacza 11 Przed zdj ciem pokrywki z pojemnika nale y wy czy urz dzenie i poczeka a no e przestan si kr ci 12 W czasie dzia ania nie czy ci palcem pojemnika w kt rym zbierane jest star...

Page 38: ...e Speed selector Lid Feeding funnel Food pusher Blade base Blending jar Jar cover Measuring cup Disk stand Shredding blade Chipping blade fine Slicing blade Chipping blade coarse Przed pierwszym u yci...

Page 39: ...unku przeciwnym do ruchu wskaz wek zegara delikatnie zdj pokrywk z miseczki a nast pnie opr ni j CZYSZCZENIE 1 Przed czyszczeniem nale y wyci gn wtyczk z gniazdka 2 Do dzbanka wla troch letniej wody a...

Page 40: ...n powierzchni wytrze wilgotn szmatk Nigdy nie zanurza w wodzie poniewa mo e doprowadzi do pora enia pr dem Wysuszy i przekona si e w cz ciach nie pozosta y resztki pokarmu SZYBKIE CZYSZCZENIE W przerw...

Page 41: ...wek zegara O ile urz dzenie nie jest dobrze z o one nie b dzie dzia a 5 Urz dzenie ustawi na wysokie obroty mieszania Uwaga Trzepaczek nie nale y u ywa do mieszania ciasta 6 Jednorazowe dzia anie urz...

Page 42: ...d czyszczeniem od czy urz dzenie od pr du 2 Opr ni naczynie i wyj n z tarczy zdj pokrywk i popychacz Cz ci zamienne w o y do wody i wyczy ci mi kk szczotk Nale y bardzo uwa a poniewa drobne no e s bar...

Reviews: