9
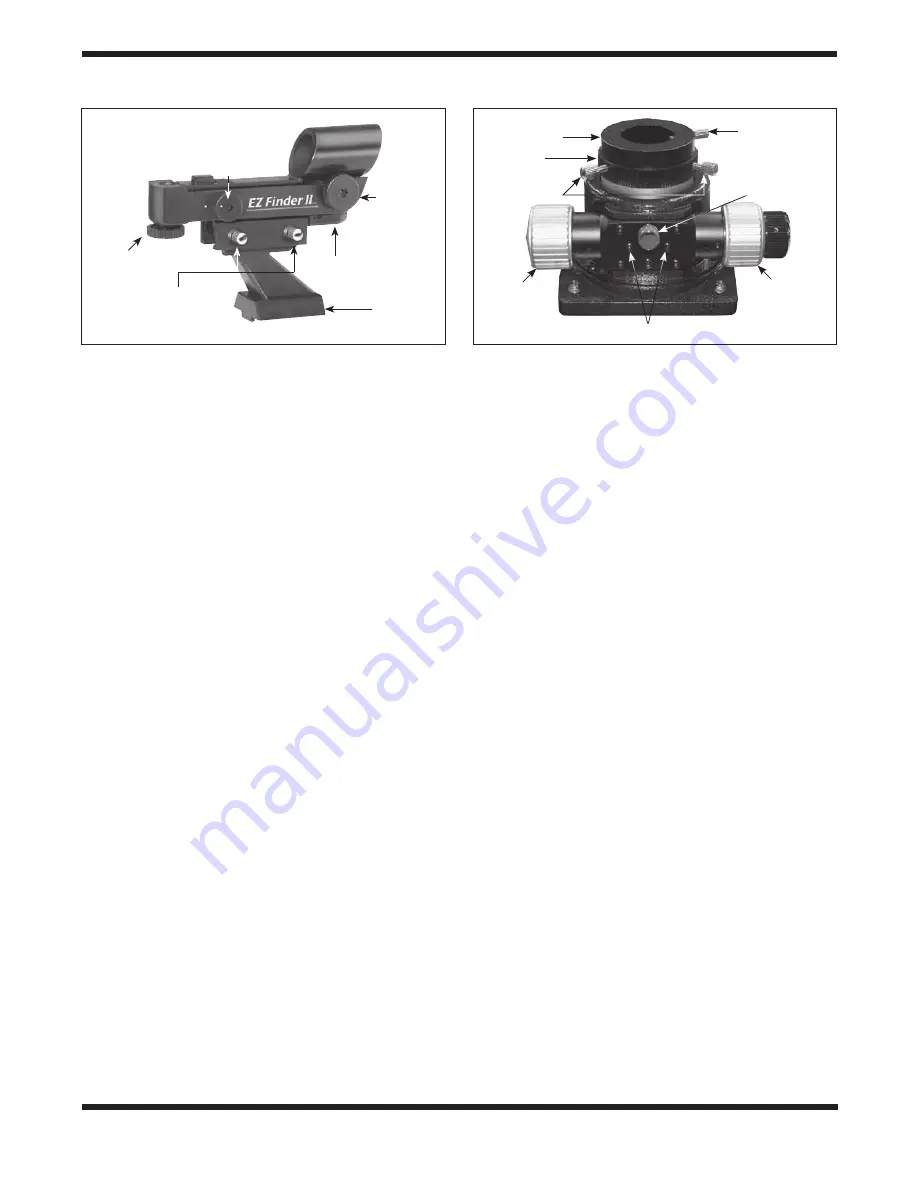
operating the EZ Finder ii
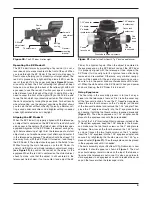
The EZ Finder II works by projecting a tiny red dot (it is not a
laser beam) onto a lens mounted in the front of the unit. When
you look through the EZ Finder II, the red dot will appear to
float in space, helping you to pinpoint your target object. The
red dot is produced by a light-emitting diode (LED) near the
rear of the sight. Turn the power knob
(see Figure 20) clock-
wise until you hear the “click” indicating that power has been
turned on. Look through the back of the reflex sight with both
eyes open to see the red dot. Position your eye at a comfort-
able distance from the back of the sight. In daylight you may
need to cover the front of the sight with your hand to be able
to see the dot, which is purposefully quite dim. The intensity of
the dot is adjusted by turning the power knob. For best results
when stargazing, use the dimmest possible setting that allows
you to see the dot without difficulty. Typically a dimmer set-
ting is used under dark skies and a brighter setting is needed
under light-polluted skies or in daylight.
aligning the EZ Finder ii
When the EZ Finder II is properly aligned with the telescope,
an object that is centered on the EZ Finder II’s red dot should
also appear in the center of the field of view of the telescope’s
eyepiece. Alignment of the EZ Finder II is easiest during day-
light, before observing at night. Aim the telescope at a distant
object such as a telephone pole or roof chimney and center it
in the telescope’s eyepiece. The object should be at least 1/4
mile away. Now, with the EZ Finder II turned on, look though
the EZ Finder II. The object should appear in the field of view.
Without moving the main telescope, use the EZ Finder II’s
azimuth (left/right) and altitude (up/down) adjustment knobs
(see Figure 20) to position the red dot on the object in the
eyepiece. When the red dot is centered on the distant object,
check to make sure that the object is still centered in the
telescope’s field of view. If not, re-center it and adjust the EZ
Finder II’s alignment again. When the object is centered in
the eyepiece and on the EZ Finder’s red dot, the EZ Finder
II is properly aligned with the telescope. Once aligned, the
EZ Finder II will usually hold its alignment even after being
removed and remounted. Otherwise, only minimal realign-
ment will be needed. At the end of your observing session,
be sure to turn the power knob counterclockwise until it clicks
off. When the white dots on the EZ Finder II’s body and power
knob are lined up, the EZ Finder II is turned off.
using Eyepieces
The final step in the assembly process is to insert an eye-
piece into the telescope’s focuser. First, take the cover cap
off the focuser drawtube. To use the 2" DeepView eyepiece,
loosen the two thumb screws on the 2" adapter (on the end
of the focuser drawtube) and remove the 1.25" adapter. Then
place the 2" eyepiece directly into the 2" eyepiece holder
and secure it with the two thumb screws loosened previously
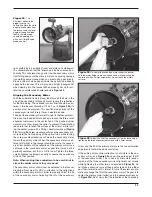
(Figure 21). The other eyepiece and 1.25" adapter can be
placed in the eyepiece rack until they are needed.
To install the 1.25" Illuminated Plössl eyepiece instead of the
2" DeepView eyepiece, keep the 1.25" adapter in the focuser,
and make sure the two thumb screws on the 2" adapter are
tightened. Now, loosen the thumb screw on the 1.25" adapt-
er, do not loosen the two thumb screws on the 2" adapter.
Insert the 1.25" eyepiece into the 1.25" eyepiece adapter, and
secure it by retightening the thumb screw on the 1.25" eye-
piece adapter
(Figure 21). The other eyepiece can be placed
in the eyepiece rack until it is needed.
The basic assembly of your SkyQuest XTg Dobsonian is now
complete. It should appear as shown in
Figure 1. The dust
cap should always remain in place on the top of the tube sec-
tion when the telescope is not in use. It is also a good idea to
store eyepieces in an eyepiece case and to replace the cover
cap on the focuser when the telescope is idle.
Figure 20.
The EZ Finder II reflex sight.
Figure 21.
Detail of the SkyQuest XTg 2" dual-speed focuser.
Power
knob
Altitude
adjustment
knob
Thumbscrews
Dovetail
mounting
bracket
Battery
casing
Azimuth
adjustment
knob
Drawtube tension setscrews
2" adapter
thumbscrews
1.25" adapter
thumbscrew
1.25" adapter
2" adapter
Focus lock
thumbscrew
Fine
focus
knob
Coarse
focus knob
Coarse
focus knob

