9
polar finder from getting bumped, which could knock it out of
alignment.
using the Polar axis Finder scope
1. Approximately polar‑align the mount as outlined in the
procedure above.
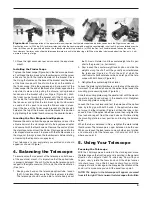
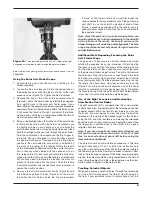
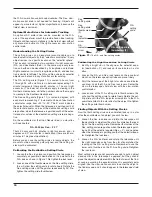
2. Loosen the Dec. lock lever and rotate the optical tube on
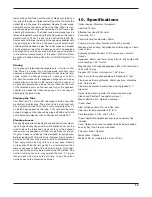
the declination axis so that the tube is at a 90° to the right
ascension axis (Figure 10). Tighten the Dec. lock lever.
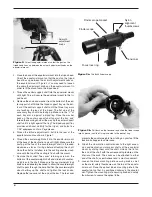
3. Remove the cap on the front of the equatorial mount
(Figure 6). Focus the polar finder by rotating the eyepiece.
Now, sight Polaris in the polar axis finder scope. If you
have followed the approximate polar alignment procedure
accurately, Polaris will probably be within the field of view.
If not, move the tripod left‑to‑right, and adjust the latitude
up‑and down until Polaris is somewhere within the field of
view of the polar axis finder scope.
4. Shine a red flashlight down the front end of the polar finder
to illuminate the reticle within the field of view. Make sure
the flashlight shines in at an angle, so as not to block the
polar finder’s field of view. It may be helpful to have a friend
hold the flashlight while you look through the polar finder.
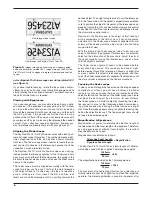
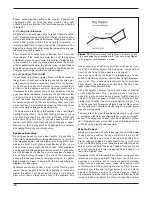
Note the constellation Cassiopeia and the Big Dipper in
the reticle. They do not appear in scale, but they indicate
the general positions of Cassiopeia and the Big Dipper
relative to the north celestial pole (which is indicated by
the cross at the center of the reticle). Rotate the reticle
so the constellations depicted match their current orienta‑
tion in they sky when viewed with the naked eye. To do
this, release the R.A. lock lever and rotate the main tele‑
scope around the R.A. axis until the reticle is oriented with
sky. You may need to remove the tube from the mount to
prevent it from bumping into the mount. Once the reticle
is correctly oriented, use the right ascension lock lever to
secure the mount’s position.
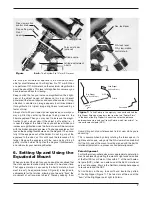
5. Now use the azimuth adjustment knobs (Figure 8) and
the latitude adjustment L‑bolts (Figure 6) on the mount
to position the star Polaris inside the tiny circle marked
“Polaris” on the finder’s reticle. You must first loosen the
knob underneath the equatorial mount on the center sup‑
port shaft to use the azimuth adjustment knobs. Once
Polaris is properly positioned within the reticle, you are
precisely polar aligned. Retighten the knob underneath
the equatorial mount.
Note: From this point on in your observing session, you
should not make any further adjustments in the azimuth
or the latitude of the mount, nor should you move the
tripod. Doing so will undo the polar alignment. The tele
scope should be moved only about its right ascension
and declination axes.
additional note regarding Focusing the Polar
axis Finder scope
The polar axis finder scope is normally focused by simply
rotating the eyepiece focus ring. However, if after adjusting
the focus ring you find that the image of the reticle is sharp,
but the stars are out of focus, then you must adjust the focus
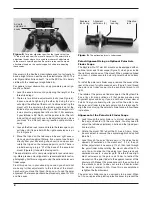
of the polar axis finder’s objective lens. To do this, first remove
the polar axis finder from the mount. Look through the polar
axis finder at a star (at night) or distant object at least 1/4 mile
away (during daylight). Use the eyepiece focus ring to bring
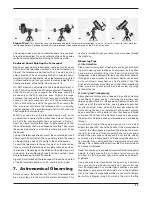
the reticle into sharp focus. Now, loosen the focus lock ring
(Figure 9) and thread the entire objective end of the finder
inwards or outwards until images appear sharp. Re‑tighten
the focus lock ring. Once the polar axis finder’s objective lens
is focused, it should not need to be adjusted again.
use of the right ascension and Declination
slow‑Motion control Knobs
The right ascension (R.A.) and declination (Dec.) slow‑motion
control knobs allow fine adjustment of the telescope’s position
to center objects within the field of view. Before you can use
the knobs, you must manually “slew” the mount to point the
telescope in the vicinity of the desired target. Do this by loos‑
ening the R.A. and Dec. lock levers and moving the telescope
about the mount’s right ascension and declination axes. Once
the telescope is pointed close to the object to be viewed,
retighten both lock levers.
Note: If you have an optional motor drive attached, you
will need to loosen the manual clutch on the R.A. (and
Dec. for dualaxis drives) gear shaft before using the
slowmotion control knob.
The object should now be visible somewhere in the tele‑
scope’s finder scope. If it isn’t, use the slow‑motion knobs to
scan the surrounding area of sky. When the object is visible in
the finder scope, use the slow‑motion knobs to center it. Now,
look in the telescope’s eyepiece. If the finder scope is properly
aligned, the object should be visible somewhere in the field of
view. Once the object is visible in the eyepiece, use the slow‑
motion knobs to center it in the field of view.
tracking celestial objects
When you observe a celestial object through the telescope,
you’ll see it drift slowly across the field of view. To keep it in
the field, if your equatorial mount is polar aligned, just turn
Figure 10.
The optical tube must be at a 90º angle to the right
ascension axis in order to view through the polar axis finder.


