6
4. Make certain that the teeth of the
smaller
gear of the Dec.
GoTo motor assembly meshes with the brass gear. Also,
make certain the gears are not too tightly pressed togeth-
er. You can adjust the way the gears mesh by tightening
or loosening the socket-head cap screw that is used to
attach the Dec. GoTo motor assembly to the mount and/or
the small setscrews on the brass gear. If the gears are not
meshed correctly or are too tightly pressed together, then
the drive will not track properly, or at all. This attachment
process is tricky, and it may take several adjustments
before the gears properly mesh.
Note: There is a small packet of grease included with your
SkyView Pro GoTo system. Once you have installed the GoTo
motor so the gears mesh properly, you can apply a very small
amount of the included grease to the meshed gears to ensure
optimal gear mating.
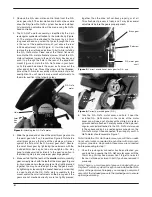
5. Once the Dec. GoTo motor and gear have been installed
and the gears mesh appropriately, you can install and
secure the Dec. GoTo motor cover with the two 8mm long
Phillips screws. Once you have installed the Dec. GoTo
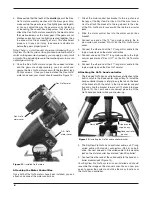
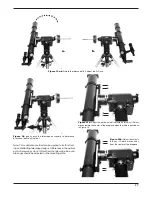
motor and cover, your mount should resemble Figure 12.
attaching the Motor control Box
Once both of the GoTo motors have been installed, you can
attach and connect the motor control box.
1. Attach the motor control box bracket to the top of one of
the legs of the SkyView Pro tripod. It will be most conve-
nient to attach the bracket to the leg closest to the side
of the R.A. GoTo motor cover with the two 8-pin circular
jacks.
2. Slide the motor control box into the motor control box
bracket.
3. Connect one end of the 13" long motor cable to the 8-
pin circular jack marked “R.A. IN” on the R.A. GoTo motor
cover.
4. Connect the other end of the 13" long motor cable to the
8-pin circular jack on the motor control box.
5. Connect one end of the 27" long motor cable to the 8-pin
circular jack marked “Dec. OUT” on the R.A. GoTo motor
cover.
6. Connect the other end of the 27" long motor cable to the
8-pin circular jack on the Dec. GoTo motor.
attaching the Goto hand controller
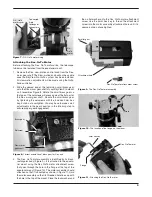
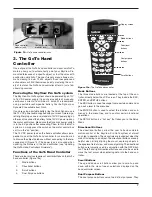
1. The included GoTo hand controller bracket attaches to the
built-in notch in the tripod center support tray. To install the
hand controller bracket, simply line up the tab on the back
of the bracket with the notch in the tripod center support
tray and slide the bracket forward until it clicks into place
(Figure 13). You now have a convenient place to put the
GoTo hand controller while you are viewing.
2. The SkyView Pro GoTo hand controller cable is a 30" long
coiled cable with modular connectors (RJ-45) on both
ends. Connect one end of the coiled cable to the modular
jack on the motor control box marked “Hand Controller.”
3. Connect the other end of the coiled cable to the hand con-
troller modular jack (Figure 14).
Your SkyView Pro GoTo system is now installed and should
resemble the image on the manual cover. You can now pro-
ceed to power the system and utilize the many functions of
the GoTo hand controller.
Figure 12.
Installed GoTo motors
Dec. GoTo motor
Dec. GoTo
motor cover
R.A. GoTo
motor cover
Figure 13.
Installing the GoTo hand controller bracket
Notch
Tripod center
support tray
Hand controller
bracket


