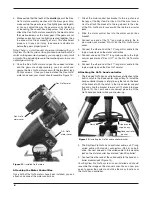
8
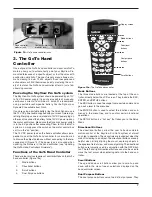
are used for data entry and as quick reference keys.
TOUR button: Takes you on a preset tour of the best night sky
objects visible
RATE button: Changes the speed of the motors when the
directional buttons are pressed. There are 10 speeds to
choose from, with 0 being the slowest and 9 being the fast-
est.
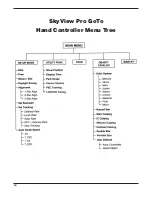
UTILITY button: “Hot key” access to the Utility Functions
menu.
USER button: Enter or recall coordinates for up to 25 objects
in the User Defined database.
ID button: Identifies the object the mount is currently pointing
to.
NGC, IC, M, Planet, and Object buttons: Allow direct access
to catalogs and databases of over 13,400 objects.
Goto Hand controller operation
This section provides a guide for initial setup and alignment of
the SkyView Pro mount with the GoTo hand controller.
initial setup
1. Perform the polar alignment using the procedure previ-
ously outlined in Section 6 of the instruction manual that
came with your SkyView Pro mount. A rough polar align-
ment will suffice, but an accurate polar alignment using
the polar axis finder scope will increase tracking accuracy
(and pointing accuracy for one-star alignments).
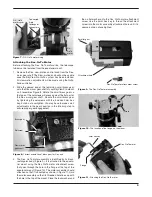
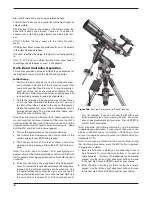
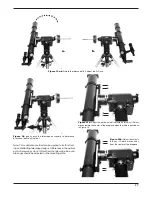
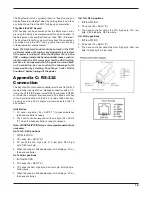
2. Rotate the telescope tube about the mount’s declination
axis so the tube is parallel with the mount’s R.A. axis (and
the front of the tube is pointed to the sky, not the ground).
Rotate the mount’s R.A. axis so the counterweight shaft is
pointed straight down. This will be called the “home” posi-
tion of the mount (Figure 15b).
Note: Once the mount is initially set to its “home” position, the
mount should not be moved manually. Otherwise, the GoTo
hand controller will lose track of the mount’s position, and the
alignment procedure will need to be performed again. Keep
both the R.A. and Dec. lock levers engaged.
3. Turn on the power switch on the motor control box.
4. The initial screen displayed on the hand controller is the
version screen. Press ENTER to proceed.
5. The hand controller’s LCD screen will show a safe solar
viewing warning message. Press the ESC button to con-
tinue.
Note: The GoTo hand controller’s LCD backlighting will
become dim and the illuminated buttons will turn off if left idle
for 30 seconds. Pressing any button will re-illuminate the hand
controller.
6. Enter your observing site’s longitude and latitude coordi-
nates. First enter the longitude coordinate and hemisphere,
followed by the latitude coordinate and hemisphere. Use
the numerical keypad to enter the digits, and use the left
and right directional buttons to move to the next digit. Use
the scroll buttons to choose W or E (for longitude) and N
or S (for latitude). If you do not know the longitude and
latitude coordinates of your viewing location, consult an
atlas or geographical map of your area. Press ENTER to
confirm your coordinates.
Note: Longitude and latitude coordinates must be entered
in degrees and arcminutes. If your map or atlas gives coor-
dinates in decimal values (i.e. latitude = 36.95 N) you must
convert into degrees and arcminutes (i.e. latitude 36.95 N =
latitude 36°57’ N).
Note: If a mistake is entered into the hand controller during
the initial setup procedure, press the ESC button to go back
to the previous screen.
7. Enter the time zone in which you are observing in hours
(see Appendix D), using the scroll buttons (+ for east of
Prime Meridian, - for west of Prime Meridian) and numeric
keypad. Use the left and right directional buttons to move
to the next digit. Press ENTER to confirm your choice.
8. Enter the date in mm/dd/yyyy format using the numeric
keypad. Use the left and right directional buttons to move
to the next digit. Press ENTER to confirm your choice.
Figure 15b.
SkyView Pro mount in its
“home”
position


