background image

2

1. Parts list 

(refer to Figure 2)

Qty. 

Description

1   

Tripod

1   

Accessory tray (with 3x wing screws)

1   

Arm

1   

Upper base

1   

Lower base

1   

Dovetail holder

2   

Knobs

1   

Handle

2   

Large Teflon bearing rings

4   

Small Teflon rings

8   

Disc springs

2   

Thumb screws

2   

Socket head cap screws

1    

Hex key

1   

Rubber bumper

2. assembly

Carefully open all of the boxes in the shipping container. Make 
sure all the parts listed in the Parts List are present. Save the 
boxes and packaging material. In the unlikely event that you 
need to return the mount, you must use the original packag-
ing.
Initially assembly of the mount should only take about 20-30 
minutes. No tools, other than the provided hex key, are need-
ed. Refer to Figure 1 during assembly.
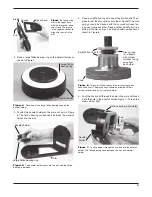
1.  Assemble the arm to the upper base. This is done with the 

two socket head cap screws. Orient the parts as shown in 
Figure 3. The groove in the upper base should register with 
the slot in the arm. Insert the screws through the holes in 
the arm and into the upper base. Tighten the screws firmly 
with the hex key.

Congratulations on your purchase of a quality Orion product. Your VersaGo Altazimuth Mount is a sturdy, 
yet highly portable observing platform for small telescopes. The simple design makes setting up and 
using the mount very easy. Teflon bearing surfaces for both axes of motion insure smooth telescope 
pointing, even when making very small, precise positional adjustments. Great for daytime terrestrial or 
nighttime astronomical applications, you’ll find yourself observing more and fussing with equipment less 
when using the VersaGo.
These instructions will help you set-up, properly use, and care for your mount. Please read them over 
thoroughly before getting started.

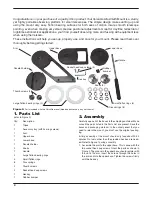
Figure 2. 

Parts included with the VersaGo mount (tripod and accessory tray not shown).

Arm

Upper base

Lower base

Dovetail holder

Knobs (2)

Handle

Large Teflon bearing rings (2)

                       Small Teflon rings (4)
                 Disc springs (8)

Thumb screws (2)

Socket head cap screws (2)

Hex key

Rubber 

bumper

Summary of Contents for VERSAGO

Page 1: ... Exceptional Consumer Optical Products Since 1975 Customer Support 800 676 1343 E mail support telescope com Corporate Offices 831 763 7000 89 Hangar Way Watsonville CA 95076 Orion VersaGo Altazimuth Mount 5682 Figure 1 The VersaGo Altazimuth Mount ...

Page 2: ...egister with the slot in the arm Insert the screws through the holes in the arm and into the upper base Tighten the screws firmly with the hex key Congratulations on your purchase of a quality Orion product Your VersaGo Altazimuth Mount is a sturdy yet highly portable observing platform for small telescopes The simple design makes setting up and using the mount very easy Teflon bearing surfaces fo...

Page 3: ...ight Figure 4 Place one of the large Teflon bearing rings on the dovetail holder Large Teflon bearing ring Dovetail holder Figure 5 The dovetail holder seats into the arm with the Teflon bearing in between Large Teflon bearing ring Dovetail holder Arm Figure 6 Two small Teflon rings and four disc springs go on each knob shaft The disc springs should be oriented so their curved surfaces face away f...

Page 4: ...is is done by pushing the bolts up through the holes in the bracket and then thread ing them into the holes in the accessory tray Figure 10 The tray gives the tripod extra stability and is a convenient area to place telescope accessories during use Figure 9 Position the upper base over the lower base and connect the parts by passing the knob through the upper base and threading it into the lower b...

Page 5: ...elescope has a 1 4 20 threaded mounting hole Orion offers two different dovetail adapters that will thread into this hole one orients the bar parallel to the tube the 1 4 20 dovetail adapter the other orients the bar perpendicular to the tube the 1 4 20 dovetail L adapter see Figure 14 Once you have a dovetail mounting bar on your telescope tube connecting the telescope to the mount is exceptional...

Page 6: ... an altazimuth mount Figure 16 Simply move the telescope up or down and left to right The handle provides a convenient way to position the mount s axes If the motion of one or both of the axes is too loose or too tight you can adjust the bearing tensioning by tightening or loosening the knobs You should be able to adjust these knobs so even the smallest motions of the mount are very smooth If the ...

Page 7: ...nt reasonable care it will last a lifetime Store it in a clean dry dust free place Do not store the mount outdoors although storage in a garage or shed is OK Your mount requires very little mechanical maintenance It is constructed of aluminum and has a black anodized finish that is fairly scratch resistant If a scratch does appear it will not harm the mount Dust dirt or moisture on the mount shoul...

Page 8: ...gar Way Watsonville CA 95076 If the product is not registered proof of purchase such as a copy of the original invoice is required This warranty does not apply if in Orion s judgment the instrument has been abused mishandled or modified nor does it apply to normal wear and tear This warranty gives you specific legal rights and you may also have other rights which vary from state to state For furth...

Reviews: