4
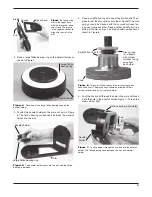
6. Place the other large Teflon bearing ring onto the lower
base as shown in Figure 8.
7. Place the remaining two small Teflon rings and four disc
springs onto the other knob shaft, the same as in step 4.
8. Place the upper base over the lower base, then pass the knob
shaft through the hole in the upper base and thread it into the
hole in the lower base (Figure 9). Thread the knob until just
tight.
9. Stand the tripod upright and spread the legs apart. Tighten
the leg lock knobs at the base of the tripod legs. For now,
keep the legs at their shortest (fully retracted) length; you
can extend them to a more desirable length later, after the
mount is completely assembled.
10. Spread the tripod legs apart as far as they will go, until the
accessory tray bracket is taut. Attach the accessory tray
to the accessory tray bracket with the three wing screws
already installed in the tray. This is done by pushing the
bolts up through the holes in the bracket, and then thread-
ing them into the holes in the accessory tray (Figure 10).
The tray gives the tripod extra stability and is a convenient
area to place telescope accessories during use.
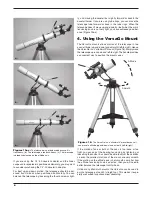
Figure 9.
Position the upper base over the lower base, and
connect the parts by passing the knob through the upper base and
threading it into the lower base. The Teflon bearing ring should seat
between these parts.
Upper base
Teflon bearing ring Lower base
Knob with small
Teflon rings (2) and
disc springs (4)
Figure 10.
Attach the accessory tray to the tripod’s tray bracket
with the three wing screws that come installed in the tray.
Wing screw
Tripod leg
Accessory tray
Accessory tray bracket
Figure 11.
The post on the tripod head goes into the hole on
the underside of the lower base. The VersaGo mount connects to
the tripod with the knob under the tripod head; be sure to tighten
this knob firmly.
Knob under
tripod head
Hole
Post
Figure 8.
Place a large Teflon bearing ring onto the lower base.
Large Teflon
bearing ring
Lower base


