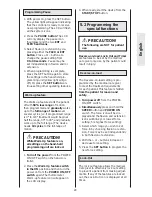
To detach the finger actuator, pinch
together the lock for finger clip and
laterally slide the lock for finger clip
out of the finger clip.
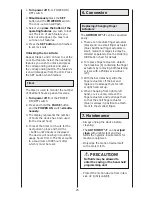
– Rotate splint from the dorsal forearm
to the radial side as shown. (fig. 3)
– Apply finger clip to the thumb.
– Apply the motor (11) to the splint (12)
aligning the device with the CMC
joint. (fig. 5)
– Depending on the size of the hand
different sizes of actuators can be
used. The blue actuator (8) provides
good motion to the average sized
thumb.
– To avoid an ulnar deviation as the
thumb flexes, the patient should place
their hand on a flat surface such as a
table, couch arm or other comfortable
surface.
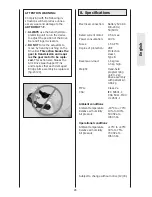
– Figure 6 shows the device in full
opposition/flexion.
– Apply ARTROMOT
®
-F as usual.
– Extend splint (12) by pulling on distal
and proximal ends, so that the splint
is positioned in-between the MP and
PIP joints. (fig. 7)
– Apply the volar block by placing it
under the fingers and attaching the
long black Velcro straps (14) to the
splint. (fig. 8)
– The MP joints are now blocked from
both extension and flexion.
Figure 10 shows the device in flexion.
The axis is on the PIP and the fingers
are flexed at the DIP and PIP only.
Make sure you adjust the flexion ROM
on the controller to match this limited
arc of motion.
This setup can be accomplished by
using all clip attachment methods
including the silipos digital cap (fig.11)
or to the preferences of the clinician,
patient or you. (see “Features”, page 28)
22
English
PRECAUTION!
The center of the clip should
straddle the DIP of the thumb as
shown, since this position allows
for more opposition motion to
occur. (fig. 4)
PRECAUTION!
Attaching the finger actuators to
the finger clips is best done after
the CPM actuator is attached to
the splint and positioned correctly.
PRECAUTION!
It is important that the actuator
bar does not hit the index finger
when it reaches this position as
it could cause irritation to the
patients skin.
4.2 Adjusting the device
for the thumb treat-
ment
4.3 Adjusting the device
for MP Block treat-
ment
PRECAUTION!
As the force of the motor needs
to be concentrated on the PIP
joints, not on the MP joints, move
the motor so that the axis point is
aligned with the PIP joints. (fig. 9)


