7
- Fix patient kit (14) for the lower leg
and patient kit (16) for the upper leg
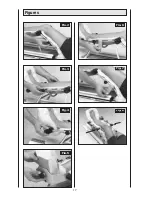
by using the velcro tapes. (figure 6
and figure 7)
- Control correct adjustment. Exercise
only in painfree range of motion.
Patient should be positioned with
maximum comfort.
- Connect the power adapter (7)
to a safety socket (120 Volt, 60 Hertz)
- Turn on the device with the main
switch (8)
Set the device at a knee-angle position
that is not likely to cause the patient
any pain.
Positioning the upper leg
- Open the black knurled knob (1),
and move thigh support to the
desired length (figure 2)
Positioning the lower leg
- Loosen the two knobs (6), move the
foot support horizontally and adjust
precisely to the patients lower leg
length. (figure 3)
Positioning of foot dorsi- / plantar
flexion
- Loosen the two knobs (9) and adjust
the foot plate at a comfortable angle.
(figure 4)
Positioning of foot rotation
- Loosen the knurled knob (12) and
move the foot plate into the required
rotation position. (figure 5)
4. Adjusting the device
4.3. Adjusting the
patient kit
4.1. Connecting
the device
4.2. Adjusting the femur
length
Note: Fold out pages 1 and 17
To get a better understanding of the
individual steps.
CAUTION!
The knee and hip axis of the
ARTROMOT
®
-K3 should align with
the patients knee and hip axis
(Figure 8)
After adjustments have been
made, perform several test runs.
When correctly adjusted, there
should be no excursion of the knee
and hip joint during motion.


