60 / 60
CONDITIONS FOR DURABILITY, REUSE AND
REASSIGNMENT TO A NEW USER
Granted that Ormesa products should be selected, evaluated and ordered for
the needs of an individual user, reuse is however possible with the respect the
following conditions.
Based on the experience of other similar sold models, on technological progress, on
the guarantees of the Quality Management System certificated in 1998 according to
ISO 9001, there is adequate confidence that the average lifespan of the NOVUS is
about 5 years, on condition that it is used according to the directions given in
the user manual.
Only when the conditions for storage and transport of chapter HOW TO STORE AND
TRANSPORT THE MEDICAL DEVICE” are followed, the periods in which the product
is stored at the dealer should not be considered in that time period
Factors unrelated to the product such as the development of the user, its
diseases, the use and the surrounding environment can make significantly
lower the duration of life of the product; on the contrary, if the indications on the
use and maintenance are properly observed, the reliability of the product can
extend well beyond the lifetime average above.
Prior to recycling or reassignment an already used Ormesa product, it is
required that:
1. a doctor or therapist verifies that the aid is appropriate and adequate to
meet the dimensional, functional and postural needs of the new user,
and if all its components are suitable / appropriate for him. You should
also consider that the
marking and the manufacturer's responsibility
for safety requirements for the product remain only if the original
product still has not changed and only original accessories or spare
parts have been applied
2. qualified technical personnel of a company specialized in the
maintenance of technical aids for disabled people performs a detailed
technical inspection to verify its condition and wear, the absence of any
damage and failure of all components / adjustments, the presence of
the user’s manual, of the label with the date and serial number. A copy
of the manual and maintenance may be always requested to the retailer
that supplied the product or directly to Ormesa
3. The product has been thoroughly cleaned and disinfected following the
directions given in the “MAINTENANCE, CLEANING AND
DISINFECTION” Chapter
We recommend you keep written records on all inspections performed on the product before any
assignment to the new user.
In case of doubt about the safety of the product or damage to
parts or components, you are urged to immediately discontinue
use and contact a specialized service center in the maintenance of
mechanical aids for disabile, or directly ORMESA
Summary of Contents for Novus 2
Page 2: ......
Page 27: ...24 60 DE BEENSTEUN VERSTELLEN DE VOETSTEUN VERSTELLEN ...
Page 31: ...28 60 KAP 819 BORSTGORDEL 828 ACHTERAANZICHT ...
Page 33: ...30 60 ZITSCHAAL 824 Formaat 2 en 3 één instellingspositie Formaat 4 twee instellingsposities ...
Page 35: ...32 60 VOETRIEMEN 827 SLEUTEL SLEUTEL ABDUCTIEBLOK 834 WAARSCHUWING DRAAI DE KNOP AAN ...
Page 37: ...34 60 BESCHERMHOEZEN ZIJKANT 844 KLITTENBAND DRAADMAND 858 ...
Page 45: ...42 60 45 GORDEL VOOR HET BEKKEN 894 ...
Page 49: ...46 60 C DE TWEE PLATEN MONTEREN ACHTERAANZICHT SLEUTEL SCHROEF ...
Page 59: ...56 60 ZIJAANZICHT BUS ACHTERAANZICHT BUS ...
Page 60: ...57 60 FLESSENHOUDER 922 KLITTENBAND ...
Page 66: ......
Page 83: ...16 60 7 1 8 0 60 7 5 8 1 62 17 3 18 5 ...
Page 84: ...17 60 INITIAL PREPARATION ...
Page 89: ...22 60 ADJUSTMENT of the SEAT WIDTH ADJUSTMENT of the SEAT DEPTH KNOB VIEW FROM UNDER THE SEAT ...
Page 91: ...24 60 ADJUSTMENT of the LEGREST ADJUSTMENT of the FOOTREST ...
Page 92: ...25 60 FOLDING the STROLLER ...
Page 93: ...26 60 FIXING THE ACCESSORIES WHEEL DIRECTION LOCKS 812 INGUINAL STRAPS 817 ...
Page 94: ...27 60 THERMAL COVER 818 REAR VIEW ...
Page 95: ...28 60 CANOPY 819 CHEST BELT 828 ...
Page 96: ...29 60 RAIN COVER 825 CAREFULLY ...
Page 97: ...30 60 TRAY 824 Sizes 2 and 3 one adjustment position Size 4 two adjustment position ...
Page 101: ...34 60 SIDE PROTECTING COVERS 844 MESH BASKET 858 ...
Page 102: ...35 60 VEST HARNESS 853 ...
Page 109: ...42 60 45 BELT FOR THE PELVIS 894 LATERAL VIEW ...
Page 110: ...43 60 FIVE POINT VEST HARNESS 903 VIEW FROM THE BACK ...
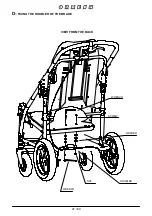
Page 113: ...46 60 C ASSEMBLING THE TWO PLATES VIEW FROM THE BACK WRENCH SCREW ...
Page 117: ...50 60 FIXING THE FRONT BUCKLES ASSEMBLED HARNESS 4 5 SIZE CIRCUMFERENCE min max cm ...
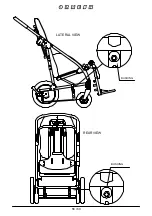
Page 123: ...56 60 LATERAL VIEW BUSHING REAR VIEW BUSHING ...
Page 124: ...57 60 BOTTLE HOLDER 922 ...
Page 130: ......
Page 155: ...24 60 RÉGLAGE de l APPUIE JAMBES RÉGLAGE du REPOSE PIEDS ...
Page 158: ...27 60 SAC THERMIQUE 818 VUE DE DERRIÈRE ...
Page 159: ...28 60 CAPOTE 819 CEINTURE ABDOMINALE 828 ...
Page 161: ...30 60 PLATEAU 824 taille 2 3 une position taille 4 deux positions ...
Page 165: ...34 60 SANGLES REMBOURRÉES de PROTECTIONLATÉRALE 844 POSITIONNABLES AVEC VELCRO PANIER 858 ...
Page 173: ...42 60 CEINTURE à 45 pour BASSIN 894 VUE DE CÔTÉ ...
Page 177: ...46 60 C MONTAGE DEUX DEUX PLAQUES VUE DE DESSOUS VIS CLÉ ...
Page 179: ...48 60 E INSERTION FILS BRIDES PINCE FIL TROU INSERTION FIL PINCE FIL FIL GAINE ...
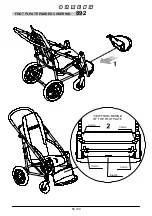
Page 185: ...54 60 PROTECTION REMBOURREE POUR REPOSE PIEDS REPOSE PIEDS VU DE DOS 892 ...
Page 187: ...56 60 BAGUE DE SERRAGE BAGUE DE SERRAGE ...
Page 188: ...57 60 PORTE BOUTEILLE 922 ...
Page 192: ...SINCE 1980 CRASH TESTED Selon la Règle ANSI RESNA WC 19 ...
Page 194: ......
Page 195: ...REHABUGGY REHABUGGY TEDESCO Cod 22923 25 07 13 CRASH GETESTET nach ANSI RESNA WC 19 ...
Page 217: ...22 60 SITZBREITE VERSTELLEN ANSICHT VON UNTEN SITZ KLEMMGRIFF SITZTIEFE REGULIEREN ...
Page 219: ...24 60 BEINSTÜZEN VERSTELLEN FUSSSTÜTZE VERSTELLEN ...
Page 222: ...27 60 SCHLUPFSACK 818 RÜCKANSICHT 3 2 1 ...
Page 223: ...28 60 SCHUTZDACH 819 BAUCHGURT 828 RÜCKANSICHT ...
Page 225: ...30 60 THERAPIETISCH 824 Größe2 3 eine Position Größe 4 zwei Positionen ...
Page 229: ...34 60 SEITLICHE GESTELLPOLSTER 844 MIT KLETTBAND REGULIERBAR ABLAGEKORB 858 ...
Page 237: ...42 60 BECKENGURT 45 894 SEITENANSICHT ...
Page 241: ...46 60 C BREMSBLECHE BEIDSEITIG MONTIEREN ANSICHT VON UNTEN SCHRAUBE SCHLÜSSEL ...
Page 245: ...50 60 4 FÜHRUNG DER VORDEREN SCHNALLEN 5 SO IST DER GURT KORREKT ANGELEGT Vermessen Umfang ...
Page 249: ...54 60 SCHUTZPOLSTER FÜR FUSSSTÜTZE 892 RÜCKANSICHT DER FUSSSTÜTZE ...
Page 251: ...56 60 SEITENANSICHT HÜLSE ANSICHT VON HINTEN HÜLSE ...
Page 252: ...57 60 FLASCHENHALTER 922 ...
Page 258: ......
Page 259: ...Uw dealeradres Your dealer s address Adresse de votre revendeur Adresse Ihres Händlers ...


