13 / 60
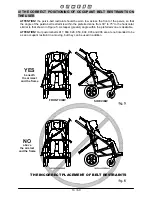
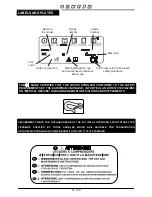
4) THE CORRECT POSITIONING OF OCCUPANT BELT RESTRAINTS ON
THE USER
ATTENTION!
the pelvic-belt restraint should be worn low across the front of the pelvis, so that
the angle of the pelvic-belt restraint is within the preferred zone from 30° to 75° to the horizontal,
similar to that shown in Figure 5. A steeper (greater) angle within the preferred zone is desirable,
ATTENTION!
Our postural belts 817, 868, 828, 853, 894, 903 and 906 are are not intended to be
as an occupant restraint in a moving, but they can be used in addition
YES
beneath
the armrest
and the frame
SIDE VIEW
FRONT VIEW
NO
above
the armrest
and the frame
THE INCORRECT PLACEMENT OF BELT RESTRAINTS
Summary of Contents for Novus
Page 2: ......
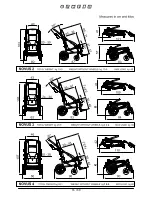
Page 18: ...16 7 1 8 0 60 7 5 8 1 62 17 3 18 5 ...
Page 19: ...17 INITIAL PREPARATION ...
Page 24: ...22 ADJUSTMENT of the SEAT WIDTH ADJUSTMENT of the SEAT DEPTH KNOB VIEW FROM UNDER THE SEAT ...
Page 26: ...24 ADJUSTMENT of the LEGREST ADJUSTMENT of the FOOTREST ...
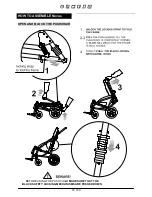
Page 27: ...25 FOLDING the STROLLER ...
Page 28: ...26 FIXING THE ACCESSORIES WHEEL DIRECTION LOCKS 812 INGUINAL STRAPS 817 ...
Page 29: ...27 THERMAL COVER 818 REAR VIEW ...
Page 30: ...28 60 CANOPY 819 CHEST BELT 828 ...
Page 31: ...29 RAIN COVER 825 CAREFULLY ...
Page 32: ...30 60 TRAY 824 Sizes 2 and 3 one adjustment position Size 4 two adjustment position ...
Page 36: ...34 60 SIDE PROTECTING COVERS 844 MESH BASKET 858 ...
Page 37: ...35 60 VEST HARNESS 853 ...
Page 44: ...42 60 45 BELT FOR THE PELVIS 894 LATERAL VIEW ...
Page 45: ...43 60 FIVE POINT VEST HARNESS 903 VIEW FROM THE BACK ...
Page 48: ...46 60 C ASSEMBLING THE TWO PLATES VIEW FROM THE BACK WRENCH SCREW ...
Page 52: ...50 60 FIXING THE FRONT BUCKLES ASSEMBLED HARNESS 4 5 SIZE CIRCUMFERENCE min max cm ...
Page 58: ...56 60 LATERAL VIEW BUSHING REAR VIEW BUSHING ...
Page 59: ...57 60 BOTTLE HOLDER 922 ...
Page 63: ......

