9
Securing the Fireplace
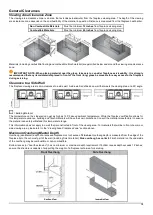
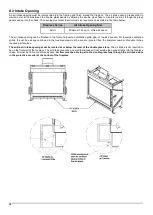
The fireplace has nailing flanges attached to the face of the fireplace (see figures below). The nailing flanges are to be attached into
the framing upon installation. It is crucial to the finishing that the fireplace is stable, level, and plumb. For added stability (though not
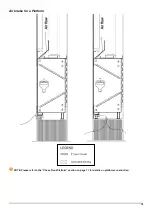
required), re-use the shipping brackets to secure the legs of the fireplace to floor/platform.
Nailing Flanges for Front Facing
Nailing Flanges for Corner (RS/LS)
Nailing Flanges for Three Sided
Vent Installation
Venting must be installed according to the requirements detailed in the “Venting” section of this manual (on page 28) in conjunction
with the vent system manufacturer’s installation instructions. Venting must be supported by the structural surrounding and not by the
fireplace. Each elbow must be strapped to reduce movement or possible disconnection.
The first section of venting must be secured to the fireplace starter collar with a minimum of 3 sheet metal screws no longer than
1
/
2
”.
DO NOT use silicone to seal the sections. If sealing is required by the vent manufacturer or local code, use Mil-Pac sealant.
Third Trip to Site: Startup
Perform a visual inspection to confirm that all work was completed correctly and per specification.
Confirm that gas and electrical are properly connected and live.
Remove the safety barrier and glass and clean the inside of the fireplace.
Place interior design media as specified in the “Interior Design Media” section on page 43.
Confirm media is set up per specification.
Confirm the fireplace is operating properly.
Check remote-control setup.
Remove protective layer from glass.
Clean glass.
Reinstall the glass and safety barrier.
Review operation of the fireplace and remote control with the owner.
Set up return visit to clean glass after the Initial Burning Period (see “Post-Installation” section below).
Post-Installation
Complete the following post-installation steps upon 4
th
trip to site.
Initial Burning Period
There is a 12-hour minimum burning period following installation of the fireplace. This 12-hour period must include a minimum of 4
consecutive hours of continuous burning. During this time, the owner or installer may notice:
The glass developing a white or “cloudy” residue.
An unusual smell
Both the residue and the smell are due to the paint on the fireplace metal heating and “burning off”. This is normal. The cloudiness
and odor will disappear after the 12-hour period elapses and the installer returns to service the fireplace and complete startup.
Final Inspection Procedure
When the 12-hour burning period is complete, the installer must return and perform the final inspection, which includes:
Cleaning the glass with a ceramic glass cleaner (otherwise the white residue will remain)
Checking the interior media setup
Checking for gas leaks
Adjusting the restrictor (if necessary)
Performing an overall check to make sure that everything is working properly.
When these activities are complete, initial startup is concluded and the fireplace may be operated by the owner.
Final Checks and User Instruction
Before releasing the fireplace to the customer for use without installer supervision, the installer must ensure that the fireplace is
burning correctly. In addition, the installer must review and explain the following to the owner:
Safety warnings
Fireplace operation
Warranty requirements
Maintenance requirements
Glass is hot during and after operation.
If any questions or concerns arise, owner must contact the local Ortal dealer/installer for support.
Summary of Contents for 44HH Corner LS
Page 42: ...42 Wiring Diagram Double Glass Fireplace with Interior Lighting...
Page 52: ......


