
LED Security Lights
Instruction Manual
1-888-543-6473
1-888-541-6474
13376 Comber Way
Surrey BC V3W 5V9
info@ortechindustries.com
www.ortechindustries.com
375 Admiral Blvd
Missis
s
auga
,
ON L5T 2N1
PLEASE READ INSTRUCTION BEFORE COMMENCING INSTALLATION AND RETAIN FOR FUTURE REFERENCES.
Electrical products can cause death or injury, or damage to property.
If in any doubt about the installation or use of this product, consult a competent electrician.
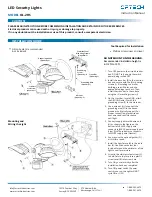
MODEL
OL-
2HS
CAUTION
INSTALLATION GUIDE
**
Tool Required for Installation
•
Phillips screw driver and level
Mounting and
Wiring the Light
DO NOT MOUNT ON THE GROUND.
Recommended installatio height is
6-1/2 ft to 10 ft.
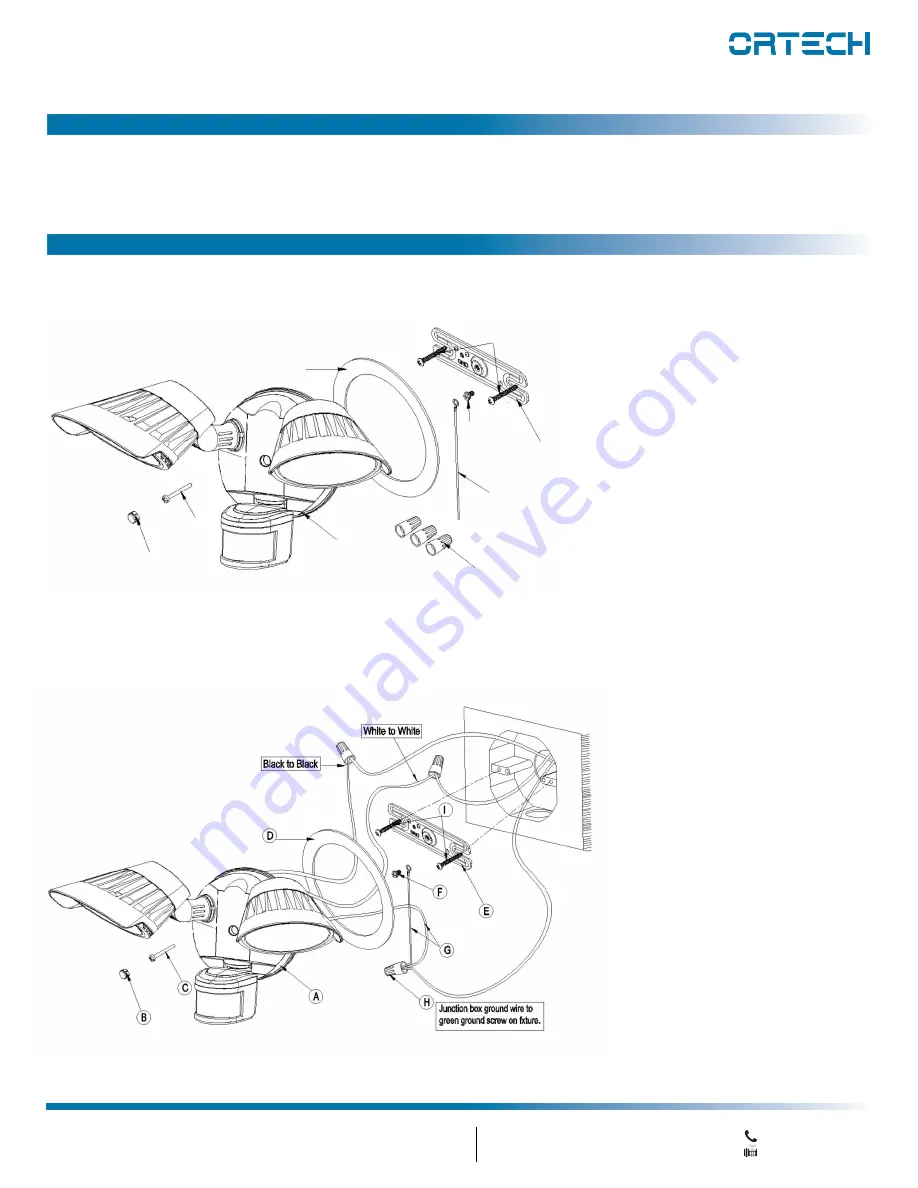
1.
Turn OFF power to the circuit breaker
box. DO NOT rely on only the switch
power being turned OFF
2.
Install the cross bar (E) to the junction
box and secure with the (2) mounting
screws (
I
). If installing to a wall or
building, pre-drill holes and use
appropriate
plugs
/ anchors
. Then,
install the cross bar to the surface
using the (2) mounting screws (
I
)
3.
On the cross bar,
locate GND, attach
the GROUND wire (G) with the
grounding screw (F) to the cross bar
4. Use a wire nut (H) to connect the
grounding wire (G) to the house
ground wire (typically copper). For
proper connection, place wire nut
over wires and twist clockwise
until tight
5. Connect supply wires with wire nuts
(H) as shown in the figure on the
bottom left. BLACK supply wire
connects to BLACK power supply wire
(Live). WHITE product wire connects
to WHITE supply wire (Neutral)
6. You may use the optional gasket (D)
at this time round
7. Install the light fixture (A) to the cross
bar (E). Use silicone sealant (not
included) around the perimeter of the
light to seal for moisture
8. Screw in the stainless steel screw (C)
to hold fixture in place. Insert plastic
screw cover (B) into screw hole
9. Turn ON your electricity after the
installation has been completed
10. Turn ON power switch (if power
switch is not on, the light will NOT
cycle ON or OFF)
CAUTION
Plastic Cover
(Quantity: 1)
Stainless
Steel Screw
(Quantity: 1)
Gasket (optional)
(Quantity: 1)
Light Fixture
(Quantity: 1)
Wire nut
(Quantity: 3)
Grounding Wire
(Quantity: 1)
Stainless Steel
Mounting Screws
(Quantity: 2)
Grounding
Screw
(Quantity: 1)
Cross Bar
(Quantity: 1)
** Silicon Sealant recommended
**
(not included)


