51
50
6.6.2 Disassembly
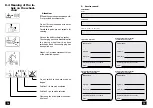
To detach the anti-tip castor holders,
press the spring-loaded pins on the un-
derside of the tubes in to an extent that
allows the anti-tip castor holders to be
pulled out of the tubes of the bumper
holder.
!
Attention:
Never drive without anti-tip castors.
– A danger of the wheelchair tipping
over to the rear exists if the anti-tip
castors are not correctly attached.
• Anti-tip castors do not provide suffi-
cient protection against tipping over
in certain situations.
Therefore, do not:
▲
Lean the upper body far to the rear.
▲
Start off abruptly, especially when
driving uphill.
☞
Note:
Observe the
'Safety Information for
Electric Vehicles'
!
6.6 Anti-tip castors
6.6.1 Assembly
Insert both anti-tip castor holders, with
the tube ends pointing to the front and
the spring-loaded pins pointing down,
into the tubes below the bumper until
the spring-loaded pins latch. Check that
the anti-tip castor holders are securely
fixed in the tubes.
6.5 Suspension, adjust-
able
The suspension is adjusted to the weight
of the driver. This requires the adjusting
lever supplied with the wheelchair and
a 13 mm open-end spanner.
6.5.1 Adjusting the spring ten-
sion
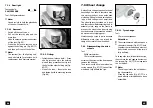
Slacken the clamping screw (Fig. 73/
➀
), insert the adjusting lever (Fig. 73/
➁
) and adjust the spring tension by turn-
ing the setting cylinder.
For a correct spring tension, use a ruler
or measuring tape to set the dimension
➂
as follows:
at 60 – 80 kg = 28 mm,
at 80 – 100 kg = 38 mm,
at 100 – 120 kg = 48 mm.
Tighten the clamping screw (Fig. 73/
➀
).
☞
Note:
The complete spring unit may only
be replaced by a specialist dealer
because it is under extreme tension.
73


