background image

50

SIDE CUSHIONS

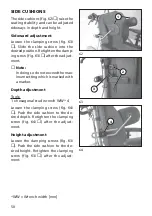
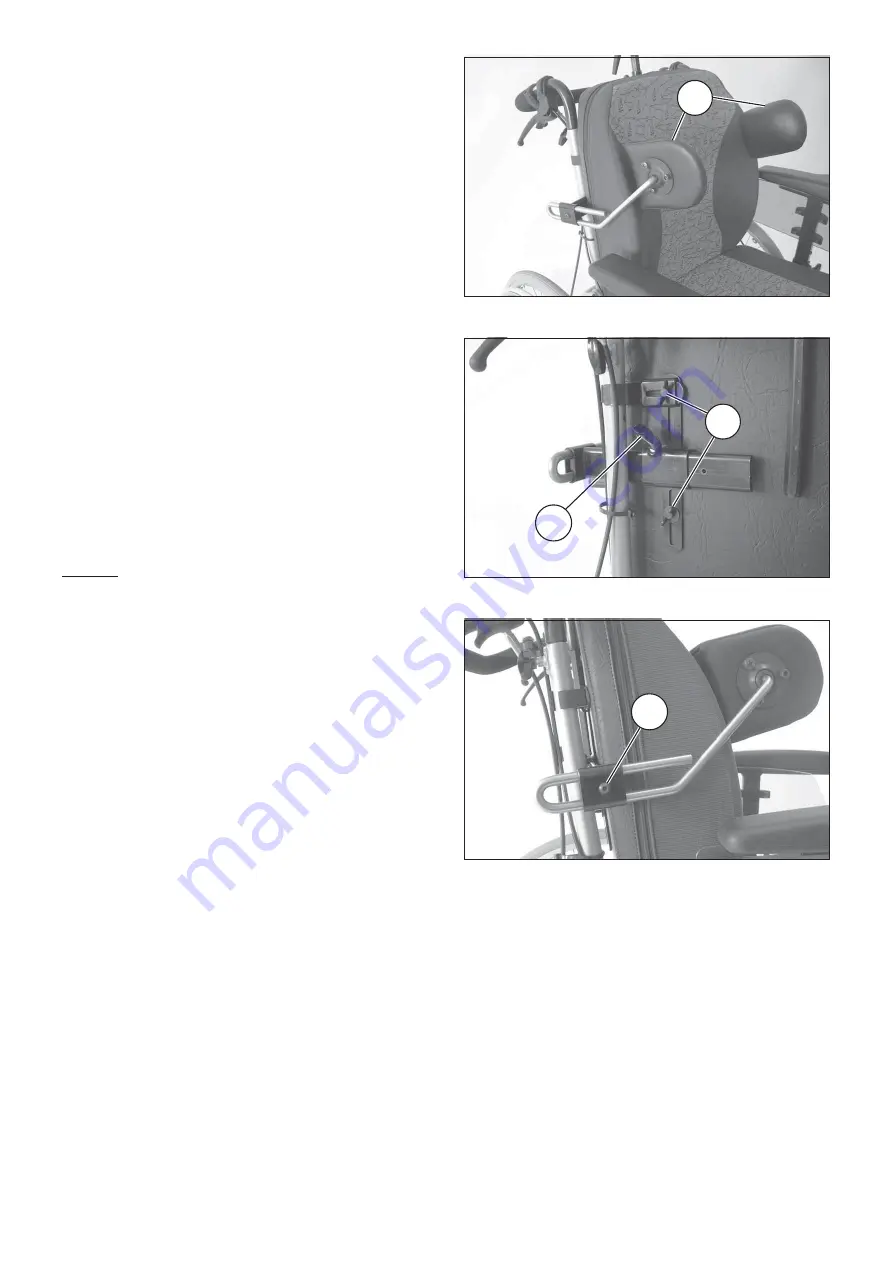
The side cushions (fig. 62/ 

) raise the

seating stability and can be adjusted
sideways in depth and height.

Sideward adjustment

Loosen the clamping screw (fig. 63/

). Slide the side cushion into the

desired position. Retighten the clamp-
ing screw (fig. 63/ 

) after the adjust-

ment.

Note:

In doing so do not exceed the max-
imum setting which is marked with
a marker.

Depth adjustment

Tools:
1 x hexagonal stud wrench WW* 4

Loosen the clamping screw (fig. 64/

). Push the side cushion to the de-

sired depth. Retighten the clamping
screw (fig. 64/ 

) after the adjust-

ment.

Height adjustment

Loosen the clamping screws (fig. 63/

). Push the side cushion to the de-

sired height. Retighten the clamping
screw (fig. 63/ 

) after the adjust-

ment.

64

63

62

*WW = Wrench width [mm]

1

2

3

4

Summary of Contents for solero 9.072

Page 1: ...1 Operating manual Mobilisation Wheelchair Solero Model 9 072 Making life easier GB...

Page 2: ...2...

Page 3: ...t in handicapped transport automobile 13 Product liability instructions 14 Safety instructions 14 Components 15 Armrests 15 Adjusting the seat width 15 Remove the armrest 16 Height adjustment of the a...

Page 4: ...ion 26 Remove the back cushion 26 Mount the back cushion 26 Seat cushion 27 Adjusting the seat depth 28 Seat angle 29 Adjustment of seat angle 29 Backrest with angle adjustment 30 Adjusting the angle...

Page 5: ...ort castors 44 Height adjustment 45 Correct support castors length 45 Options 46 Headrest 46 Back extension 47 Lap belt 48 Strapping on the lap belt with lock 49 Putting on the lap seatbelt with velcr...

Page 6: ...ng aid holder 54 Securing the walking aid 54 Maintenance 55 Care 55 Desinfection 55 Maintenance 56 Maintenance instructions 57 Repair 58 Customer Service 58 Spare parts 58 Reinstallment 58 Disposal 58...

Page 7: ...manual are intended for use in conjunction with the book let safety instructions for mechani cal wheelchairs to help you to fa miliarise yourself with the operation of the wheelchair and to prevent ac...

Page 8: ...rom an upholstered seat and an angle adjustable upholstered back rest the wheelchair offers a seat depth adjustment as well as a stepless seat angle of 8 as an aid for getting up to 25 The wheelchair...

Page 9: ...cked for cor rect locking before the start of each drive Never leave children adolescents in wheelchairs unsupervised For smaller obstacles e g small ledges slopes always move slowly and at a right an...

Page 10: ...for seat angle adjustment 14 Headrest 15 Back extension 16 Support castors 17 Drive wheel 18 Drumbrake lever for attendant The components shown in the follow ing illustrations may not be identical to...

Page 11: ...wheelchair remove the armrests fig 3 the legrests fig 3 and the backrest fig 3 Fold the securing ring fig 4 over Then pull out the folding cotter pin fig 5 toward the side with the securing ring Atte...

Page 12: ...is correctly installed and securely fastened Check that components are correctly positioned Check the correct seating of the components Note The securing ring of the cotter pin has to be folded over...

Page 13: ...ated straps Note Before transporting the wheelchair ask your car specialist dealer how to secure it without risk to the ex isting fixtures or other safety fit tings Suitable fixing points can usually...

Page 14: ...dam ages or other possessions that oc curred through the transport in a handicapped transport automo bile Safety instructions When transporting a person make sure that there are no objects jammed unde...

Page 15: ...ate parking brakes This pre vents the wheelchair from rolling away accidentally Loosen the clamping screws fig 8 so far that no damage to the coating occurs during the adjustment After loosening the c...

Page 16: ...For height adjustment of the armrest loosen the clamping screw fig 9 so far that no damage to the coating occurs during the adjustment Push the armrest at the desired height and then tighten the clam...

Page 17: ...rew out the two attachment screws fig 10 After reposition ing the armrest to position or screw in and tighten the attachment screws fig 10 Height adjustment of the clothes guard Loosen the clamping sc...

Page 18: ...rking brakes are to be en gaged before all assembly work This prevents the wheelchair from rolling away accidentally Folding up the footplates The footplates fig 12 are to be folded up for entry into...

Page 19: ...is swivelled away by 90 the 90 lock engages fig 13 For further swivelling slightly lift the legrest out of the lock Note When the legrests are swivelled away farther than 90 fig 14 the can be swivell...

Page 20: ...5 Remove the legrests By lifting the legrest it can be swiv elled away or be removed toward the top fig 15 Note Watch that the tube of the legrest does not jam in the guide rail For this lift it sligh...

Page 21: ...ice Adjusting the entry width The legrest receptacle on the side frame can be adjusted sideways through which the entry width can be adjusted to the user Loosen the clamping screws fig 16 so far that...

Page 22: ...Folding up the footplates For entry into exiting the wheelchair or scuttling forward motion of the wheelchair with the feet the foot plates fig 16 1 are to be folded up first and the calf plates fig...

Page 23: ...r fig 18 Attention Do not let the legrest drop on its own weight Danger of squash ing 2 Have the legrest lifted to the de sired level by an attendant and retighten the clamping lever fig 18 To lower t...

Page 24: ...icating max imum extension Tighten the clamping screw fig 19 Angle adjustment of the foot plates After loosening the clamping screw fig 20 pull out the dovetail con nection and adjust the angle of the...

Page 25: ...ent of the calf plates The depth adjustment is effected by displacing the attachment screws fig 22 Retighten the clamping screw fig 22 after the adjustment Adjusting the distance of the calf plates Op...

Page 26: ...ing away accidentally Push the securing clamps fig 25 inward fig 26 after loosening the respective wing crews fig 25 Then remove the back cushion by jerk ing it forward Mount the back cushion Insert t...

Page 27: ...er legrests Loosen the clamping screw fig 27 on each side so that no damage oc curs to the coating during the adjust ment Pull the seat cushion with the legrest frame forward as far as possible Slight...

Page 28: ...k so that the seat surface can be freely moved at the back cushion Then adjust the desired seat depth by repositioning the seat surface fig 28 direction of the arrow After the adjustment retighten the...

Page 29: ...lchair from rolling away accidentally For stepless adjustment of the seat angle the right lever fig 30 on the push bar is to be pushed down Use the push bar as a lever to adjust the angle of the seat...

Page 30: ...akes This pre vents the wheelchair from rolling away accidentally Push the left lever fig 31 on the push bar down Utilise the push bar as a lever and ad just the angle of the backrest accord ingly Rel...

Page 31: ...osen the clamping screws so far that no damage to the coating occurs during the adjustment Adjust the push bar to the desired height After the adjustment retighten the clamping screws fig 32 1 Note Wh...

Page 32: ...e brochure safety instructions for mechanical wheelchairs The wheelchair is fir with two brake levers each for the user fig 33 Addi tionally 2 drumbrake levers are option ally available for the attend...

Page 33: ...f parking brake Operating brake The braked of the wheelchair can be achieved over the handrims The slow down phase can also be braked with the operating brake Press the two brake levers evenly only sl...

Page 34: ...ention For operational readiness the brake levers must be disengaged Do not leave wheelchairs with puncture proof PU tyres over long er periods of time with the knee lever brakes engaged Danger during...

Page 35: ...front of the drive wheel Secure the clamping screw fig 37 tightly Adjust the opposite knee lever brake as described Adjust the knee lever brakes equally under consideration of tread of the drive wheel...

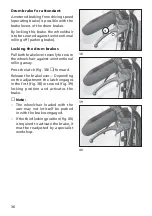
Page 36: ...evers evenly to secure the wheelchair against unintentional rolling away Press the latch fig 38 forward Release the brake lever Depending on the adjustment the latch engages in the first fig 38 or sec...

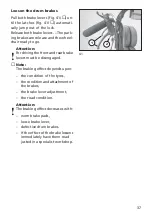
Page 37: ...For driving the front and rear brake levers must be disengaged Note The braking effect depends upon the condition of the tyres the condition and attachment of the brakes the brake lever adjustment th...

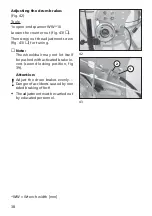
Page 38: ...ustment screw fig 43 for tuning Note The wheelchair may not let itself be pushed with activated brake le vers second locking position fig 39 Attention Adjust the drum brakes evenly Danger of accidents...

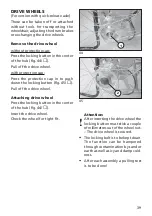
Page 39: ...ection cap in to push down the locking button fig 45 Pull off the drive wheel Attaching drive wheel Press the locking button in the center of the hub fig 44 Insert the drive wheel Check the wheel for...

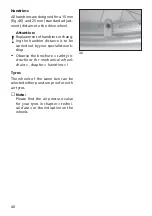
Page 40: ...he handrim distance is to be carried out by your specialist work shop Observe the brochure safety in structions for mechanical wheel chairs chapter handrims Tyres The wheels of the same size can be se...

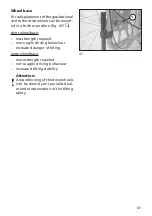
Page 41: ...short wheelbase less strength required more agile driving behaviour increased danger of tilting large wheelbase more strength required not so agile driving behaviour increased tilting stability Attent...

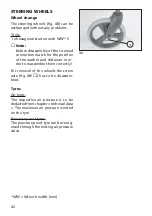
Page 42: ...ition of the washer and distancer in or der to reassemble them correctly For removal of the wheels the screw axle fig 48 has to be disassem bled Tyres Air tyres The respective air pressure is to be de...

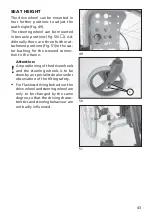
Page 43: ...tions fig 51 in the cas tor bushing for the screwed connec tion to the frame Attention A repositioning of the drive wheels and the steering wheels is to be done by an specialist dealer under observati...

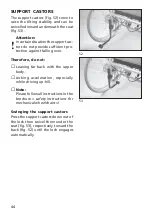
Page 44: ...on against falling over Therefore do not Leaning far back with the upper body Jerking acceleration especially while driving up hill Note Please follow all instructions in the brochure safety instructi...

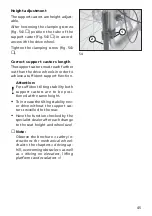
Page 45: ...eve a sufficient support function Attention For sufficient tilting stability both support castors are to be posi tioned at the same height To increase the tilting stability nev er drive without the su...

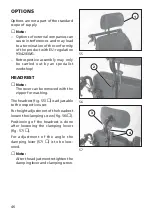
Page 46: ...out by an specialist workshop HEADREST Note The cover can be removed with the zipper for washing The headrest fig 55 is adjustable to the respective user For height adjustment of the headrest loosen...

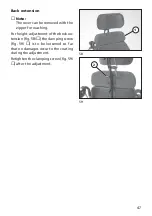
Page 47: ...the zipper for washing For height adjustment of the beck ex tension fig 58 the clamping screw fig 59 is to be loosened so far that no damages occur to the coating during the adjustment Retighten the...

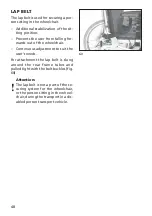
Page 48: ...rds out of the wheelchair Continuous adjustment to suit the user s needs For attachment the lap belt is slung around the rear frame tubes and pulled tight with the belt buckles fig 60 Attention The la...

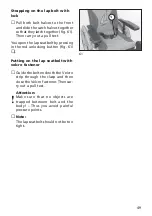
Page 49: ...eatbelt by pressing in the red unlocking button fig 61 Putting on the lap seatbelt with velcro fastener Guide the belt end with the Velcro strip through the clasp and then close the Velcro fastener Th...

Page 50: ...ust ment Note In doing so do not exceed the max imum setting which is marked with a marker Depth adjustment Tools 1 x hexagonal stud wrench WW 4 Loosen the clamping screw fig 64 Push the side cushion...

Page 51: ...e Do not place any hot objects onto the therapy table Do not drive with the therapy ta ble attached when there are loose objects or containers with fluids on it Mount the therapy table The guide rod o...

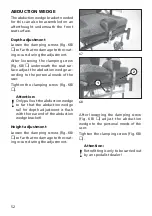
Page 52: ...o the personal needs of the user Tighten the clamping screw fig 68 Attention Only pull out the abduction wedge so far that the abduction wedge rail for depth adjustment is flush with the rear end of t...

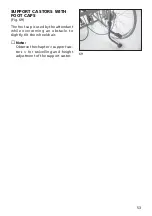
Page 53: ...H FOOT CAPS Fig 69 The foot cap is used by the attendant while overcoming an obstacle to slightly tilt the wheelchair Note Observe the chapter support cas tors for swivelling and height adjustment of...

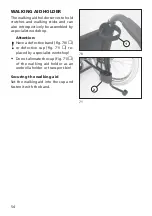
Page 54: ...sembled by a specialist workshop Attention Have a defective band fig 70 or defective cup fig 71 re placed by a specialist workshop Do not alienate the cup fig 71 of the walking aid holder as an umbrel...

Page 55: ...e leather care emulsion from Sonax In doing so the manufacturers instructions are to be observed Note Do not use aggressive cleaning agents e g solvents or hard brush es etc Washing instructions If it...

Page 56: ...il to all moving parts see also maintenance instruc tions will ensure that your wheelchair will give you many years of service Chassis The chassis and wheels can be cleaned damp with a mild detergent...

Page 57: ...nd secure lock Every 8 weeks depending on frequency of use Check all moveable parts for func tion and practicability Provide the following parts with a few drops of oil Mobile parts of the lock Before...

Page 58: ...on the type plate Whenever a wheelchair change mod ification is carried out by the special ist dealer the supplementary informa tion e g assembly operating instruc tions must be attached to the operat...

Page 59: ...2 without drum brake 69 cm Height frame 1 without backrest extension headrest on seat height 41 cm 90 cm with back extension without headrest 100 cm with headrest 117 to 137 cm Height frame 2 without...

Page 60: ...ith seat cushion 43 to 50 cm Wheels Steering wheel air tyres 8 air pressure 2 5 bar puncture proof 6 puncture proof 8 Driving wheel 22 air tyres air pressure 2 5 bar 24 air tyres air pressure 2 5 bar...

Page 61: ...ests legrests 774 and drive wheels Transport weight frame 1 21 kg Transport weight frame 2 22 kg without armrests legrests backrest and drive wheels Note The permitted overall weight is calculated fro...

Page 62: ...the guaranty in all cases is the designated use of the prod uct the use of original spare parts by the specialist dealer as well as the reg ular conduction of maintenance and inspection Guaranty is n...

Page 63: ...63 Fz I Nr view type plate Guarantee Date of delivery Delivery note no Model designation GUARANTEE COUPON Fill in the details If necessary copy and return Stamp of the specialist dealer...

Page 64: ...2003 378 Internet www ortopedia de e mail info ortopedia de Ident Nr 205 308 001 Status 11 2003 Wemovepeople AcompanyoftheMEYRA group Our products are subject to technical modification Our printed mat...

Reviews: