background image


- 7 - 


Osada Apit 11 is an electronic root canal measuring device. It measures the root canal length by the 

impedances between the electrodes of the file holder cord and lip clip in the root canal. 


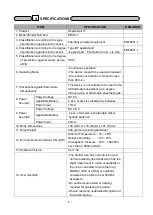
ADJ. 


SET 


ON/OFF 

(Push-Push) 


ADJ. Switch 


Start-up Position of 

Intermittent Buzzer 

Sound 

Volume of   

Buzzer 

  Sound 

Set Icon 

Auto- 

Winding   


Auto 

Adjustment 

Icon 

Manual 

Adjustment 

Icon 

Zero   

Adjustment 

Icon 

Working 

Length 

Icon 

Apical Foramen 

Icon 

Battery Level 

Icon 


Warning/Caution 

Consult 

accompany- ing 

documents


Warning/Caution 

Consult 

accompany- ing 

documents


Type“BF” 

Applied Part 

Dry Battery 

Indication 

CE 

Marking 

Authorised 

Representative 

in the European 

Community 


Manufacturer 

Date of Manu-   

facture 

Serial 

Number 

Not to be Disposed 

of as Household 

Waste


Temperature 

Limitation 

Humidity 

Limitation 


Atmospheric 

pressure 

Limitation 

Fragile , handle 

with care 

Keep dry 


3    SYMBOL DEFINITIONS 

2    PURPOSE OF UTILIZATION   

0123 

50°C 

-10°

700

hPa


1060

hPa


10%


90%


Summary of Contents for APIT 11

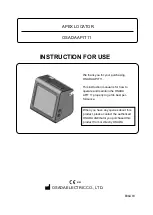
Page 1: ...A APIT 11 This instruction manual is for how to operate and maintain the OSADA APIT 11 properly to get its best per formance When you have any queries about this product please contact the authorized OSADA distributor you purchased this product from or directly OSADA INSTRUCTION FOR USE ENGLISH ...

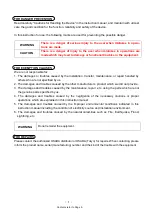
Page 2: ...us 2 The damages and troubles caused by the other manufacturer s product which we did not provide 3 The damages and troubles caused by the maintenance repair etc using the parts which are not the genuine parts specified by us 4 The damages and troubles caused by the negligence of the necessary cautions or proper operations which are explained in this instruction manual 5 The damages and troubles c...

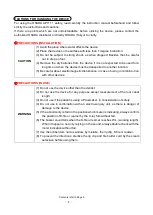
Page 3: ...eful about electromagnetic disturbance in case of using in combina tion with other devices PRECAUTIONS IN USE 1 Do not use the device other than the dentist 2 Do not use the device for any purpose except measurement of the root canal length 3 Do not use if the patient is using a Pacemaker in consideration of safety 4 Do not use in combination with an electro surgery unit as there is danger of dama...

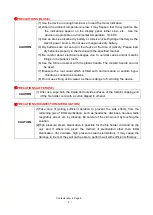
Page 4: ...le can not be used 7 Measure the root canal which is filled with normal saline or sodium hypo chlorite as conductive solutions 8 Do not use strong acidic water as there is danger of corroding the device PRECATIONS AFTER USE 1 After use wipe both the inside and outside surfaces of the metallic clipping end of the file holder cord with a cotton dipped in ethanol PRECATIONS DISINFECTION STERILIZATION...

Page 5: ...xchange for new batteries when the battery power indication shows one level out of 3 levels 4 First check the device under 6 2 Checkup and then use it when the device is not used frequently When the device gets out of order do not try to repair by yourself after indicating about it properly call for the authorized Osada distributor PRECAUTIONS STORAGE 1 Storage conditions are as follows Ambient Te...

Page 6: ...E DEVICE 2 1 FEATURE 6 2 PURPOSE OF UTILIZATION 7 3 SYMBOL DEFINITIONS 4 SPECIFICATIONS 8 5 NAME OF THE PARTS 9 6 OPERATIONS 12 7 CLEANING DISINFECTION AND STERILIZATION 24 8 EXPENDABLE ITEMS 26 9 WARRANTY PERIOD EXCEPT EXPENDABLE ITEMS 10 HIGH PRESSURE STEAM STERILIZER 27 11 REFERENCES 28 ...

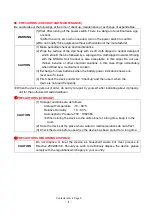
Page 7: ...efore A part of the file holder cord which can be put in the mouth is10mm longer so to approach the molar has become easier The metal clipping end has become 0 5mm thinner so the length of the K file or reamer is used efficiently 4 Reliable and Safe Treatment 1 The checker function is incorporated so the device actuation can be checked periodically and safely operated 2 The measuring current is le...

Page 8: ...n Zero Adjustment Icon Working Length Icon Apical Foramen Icon Battery Level Icon Warning Caution Consult accompany ing documents Warning Caution Consult accompany ing documents Type BF Applied Part Dry Battery Indication CE Marking Authorised Representative in the European Community Manufacturer Date of Manu facture Serial Number Not to be Disposed of as Household Waste Temperature Limitation Hum...

Page 9: ...thetic gas 8 Power Source Power Voltage DC 6 V Applicable Battery 4 pcs of AA size alkaline dry batteries Power Input 15mA 9 Power Source Power Voltage DC 4 8 V Applicable Battery 4 pcs of AA size rechargeable nickel hydride batteries Power Input 20mA 10 Body Dimensions 100 W mm x 79 D mm x 101 H mm 11 Body Weight 420 grams excluding batteries 12 Environmental Conditions IN USE Ambient Temperature...

Page 10: ...O NAME QTY REMAKRKS Osada Apit 11 Body 1 Probe Cord Auto Winding Module 1 Probe Cord inside the module 1 Expendable item File Holder Cord 1 Expendable item Lip Clip 2 Expendable item AA size Dry Battery 4 Instruction for Use 1 5 NAME OF THE PARTS ...

Page 11: ...al and the ADJ switch is depressed the meter needle on the display panel falls on ADJ it means zero adjustment was made Buzzer Switch Adjusts the volume of the buzzer sound Set Switch Changes the start up position of the intermittent buzzer sound For details refer to Page 14 Checker Switch Checks functions of the body For details refer to Page 23 Probe Auto Winding Button Is used for winding the p...

Page 12: ...on Shown when start up position of the intermittent buzzer sound is set by the set switch being depressed Auto Adjustment Mode Icon Shown when the auto adjustment mode is selected Manual Adjustment Mode Icon Shown when the manual adjustment mode is selected ADJ adjustment Icon Shown when zero adjustment is made W L working length Icon Shown when the tip of the K file or reamer reaches the working ...

Page 13: ...s danger of the batteries heating up the liquid leaking and or the batteries exploding due to the difference in characteristics 2 Take out used up batteries immediately from the device If the used up batteries are left in the device for a long time there is danger of the batteries heating up liquid leaking out the batteries exploding and or damage the device due to the gas generated by its high el...

Page 14: ...al clip of the file holder cord is not corroded or dirtied Confirm if the meter needle swings out when lip clip and the metallic clipping end of the file holder cord is in contact 4 Checking Before Use After Long Storage 1 Confirm standard components Provide Osada Apit 11 body auto winding module file holder cord and lip clip 2 Confirm the connection Confirm if the auto winding module file holder ...

Page 15: ...Minimum Sound Maximum Return 3 The buzzer volume can be adjusted in three 3 levels as above by pressing the buzzer switch repeatedly MANUAL ADJUSTMENT MODE AUTO ADJUSTMENT MODE CHANGE Buzzer Switch Set Switch Power Swtich 1 First turn off the power switch and then depress the power switch again while depressing the buzzer switch and set switch on the side of Osada Apit 11 body at the same time 2 B...

Page 16: ...essed within the range shown in the right figure and the start up position of the buzzer sound can be changed When keep depressing the meter needle moves faster 3 After the start up position of the buzzer sound intermittent is set release the set switch on the side of Osada Apit 11 body start up position is inputted and the set mode icon will disappear from the display panel after three seconds Do...

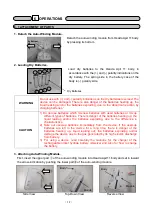
Page 17: ... sufficient accuracy of measurement can not be gained 2 Insert the plug of the file holder cord and lip clip fully into the socket 3 To prevent infections sterilize the lip clip and file holder cord by steam autoclave before use 3 Turning on the Power and Confirming the Setup 1 Turn on the power by depressing the power switch on top of Osada Apit 11 body 2 Confirm the adjustment mode When changing...

Page 18: ...o the metallic clipping end of the file holder cord 2 Contact the lip clip with the metallic part of the K file or reamer and confirm that the meter needle on the display panel swings into the right side beyond the APEX position In case of the auto adjustment mode the zero adjustment may take place automatically when contacting the lip clip with the metallic part of the K file or reamer In this ca...

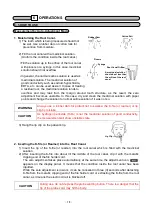
Page 19: ...lip by mistake As hydrogen perioxide H2O2 is not the medicinal solution of good conductivity the measurement will show unstable state 3 Hang the lip clip on the patient s lip 2 Inserting the K file or Reamer into the Root Canal 1 Insert the tip of the K file or reamer into the root canal which is filled with the medicinal solution 2 After inserting the K file into about till the middle of the root...

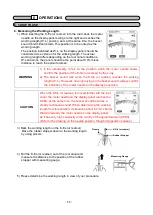
Page 20: ...verflows accurate measurement is not possible When gutta percha etc remains in the root canal the meter needle does not swing and the accurate measurement is not possible Measurements of Manual Adjustment Mode 4 Moisturizing the Root Canal Refer to 6 5 1 Moisturizing the Root Canal of Page 18 5 Inserting the K file or Reamer into the Root Canal 1 Insert the tip of the K file or reamer into the roo...

Page 21: ...rking length W L However not only relying on the buzzer sound always confirm the indication of the meter needle on the display panel also CAUTION When the K file or reamer is moved farther into the root canal the meter needle on the display panel reaches the APEX at the same time the buzzer sound becomes a steady continuous sound When determining the working length from this position it should be ...

Page 22: ... is not possible 3 Measuring the Working Length of the Tooth with a Residual Root Condition Wipe the cavity margin between the root canal interior and the gingival with cotton balls to insulate the tooth and prevent leakage of electricity and then measure the root canal If the cavity margin is wet the meter needle swings out and the accurate measurement is not possible When measuring the working l...

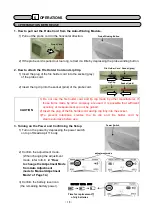
Page 23: ... the file holder cord from the socket grey of the probe cord 2 Pull out the lip clip from the socket pink of the probe cord 3 How to store the Probe Cord to the Auto Winding Module 1 Store the probe cord to the auto winding module by depressing the probe winding button The probe cord is stored to the auto winding module automatically Always hold the probe cord with your fingers when storing it by ...

Page 24: ... checker switch to the ADJ position Press the ADJ switch set on the body and confirm if the meter needle on the display panel is pointing within 2 scale range from the ADJ position as shown in the right figure 4 Next move the checker switch to the W L position and confirm the meter needle on the display panel if it points within 2 scale range from the W L position on the display panel as shown in ...

Page 25: ... 25 Every time after use wipe off the foreign particles such as body fluids tissues etc with moistened gauze with dehydrated alcohol or alcohol for disinfection 70 to 90 CAUTION Medicinal solutions mentioned below cannot be used for wiping 1 Halogen compound especially sodium hypochlorite Do not use as it causes metal corrosion 2 Aldehydes or phenols Do not use as it causes plastic discoloring or ...

Page 26: ...toclaved up to two hundred fifty 250 times CAUTION Always put in a sterilization bag when Steam Autoclave is given Do not utilize the drying process 7 3 METHOD FOR CLEANING DISINFECTION AND STERILIZTION REFERENCE CHART METHOD ITEM CLEANING DISINFECTION STERILIZATION WIPING WITH NEUTRAL DETERGENT OR WATER WIPING WITH ETHANOL STEAM AUTOCLAVE Osada Apit 11 Body O X X Auto Winding Module O X X Probe C...

Page 27: ... warranty period 1 The damages and troubles caused by the installation shifting and repairs done by people who are not specified by us 2 The damages and troubles caused by the other manufacturers products or parts which were not provided by us 3 The damages and troubles caused by the repair parts which are not our genuine parts or not specified by us 4 The damages and troubles caused by the neglig...

Page 28: ... to get higher temperature than specified temperature temperature in the chamber 3 When giving steam autoclave sterilization keep instruments in the sterilization bag It prevents the transfer of the rust to instruments from the equipment 4 Use distilled water or purified water for steam autoclave sterilization Depending on the area water contains different quantity of chlorine iron and other varia...

Page 29: ... returns to the left completely Change the auto winding module into the new one or change the probe cord of the manual winding module into the new one NO Stop using the device and call for repair The set icon appears on the display panel and the meter needle blinks Wait for three 3 seconds The set icon disappears and the meter needle stops blinking NO The lip clip and metallic clipping end of the ...

Page 30: ...ip and the metallic clipping end of the file holder Change the auto winding module into the new one or change the probe cord of the manual winding module into the new one YES NO Stop using the device and call for repair NO The meter needle does not point within 2 scale range when confirming the positions of the ADJ and W L with the checker switch Stop using the device and call for repair YES NO Th...

Page 31: ... intended for the use in the electromagnetic environment specified in the next page The customer or the user of the product should assure that it is used in such environment 11 4 ELECTROMAGNETIC EMISSIONS EMISSIONS TEST COMPLIANCE ELECTROMAGNETIC ENVIRONMENT GUIDANCE Field Intensity EN 60601 1 2 2007 CISPR11 2009 A 2010 Group 1 Class B The Osada Apit 11 uses RF energy only for its internal functio...

Page 32: ... EN 60601 1 2 2007 IEC61000 4 5 2005 0 5kV 1 0kV 2 0kV Common Mode 0 5kV 1 0kV Normal Mode N A 2 Refer to 2 Voltage Dips Short Interruptions and Voltage Variations on Power Supply Input Lines EN 60601 1 2 2007 IEC61000 4 11 2004 Dips 5 UT 0 5 Cycle 5 UT 0 5 Cycle 5 UT 0 5 Cycle Instant Stop 0 UT 5 sec UT is for a rated voltage of the device N A 2 Refer to 2 Power Frequency 50 60Hz Magnetic Field E...

Page 33: ... as determined by an electro magnetic site survey should be less than the compliance level in each frequency range Interference may occur in the vicinity of device marked with the following symbol 1 At 80 MHz and 800MHz the higher frequency range applies 2 These guidelines may not apply in all situations Electromagnetic propagation is affected by absorption and reflection from structures objects a...

Page 34: ... Gotanda 5 chome Shinagawa ku Tokyo 141 8517 Japan TEL 81 3 3492 7651 FAX 81 3 3779 0976 MT Promedt Consulting GmbH Altenhofstrasse 80 D 66386 St Ingbert Germany Tel 49 0 6894 581020 Fax 49 0 6894 581021 20160105 07 ...

Reviews: