5 - TABLE OF PARAMETERS (RO 22)
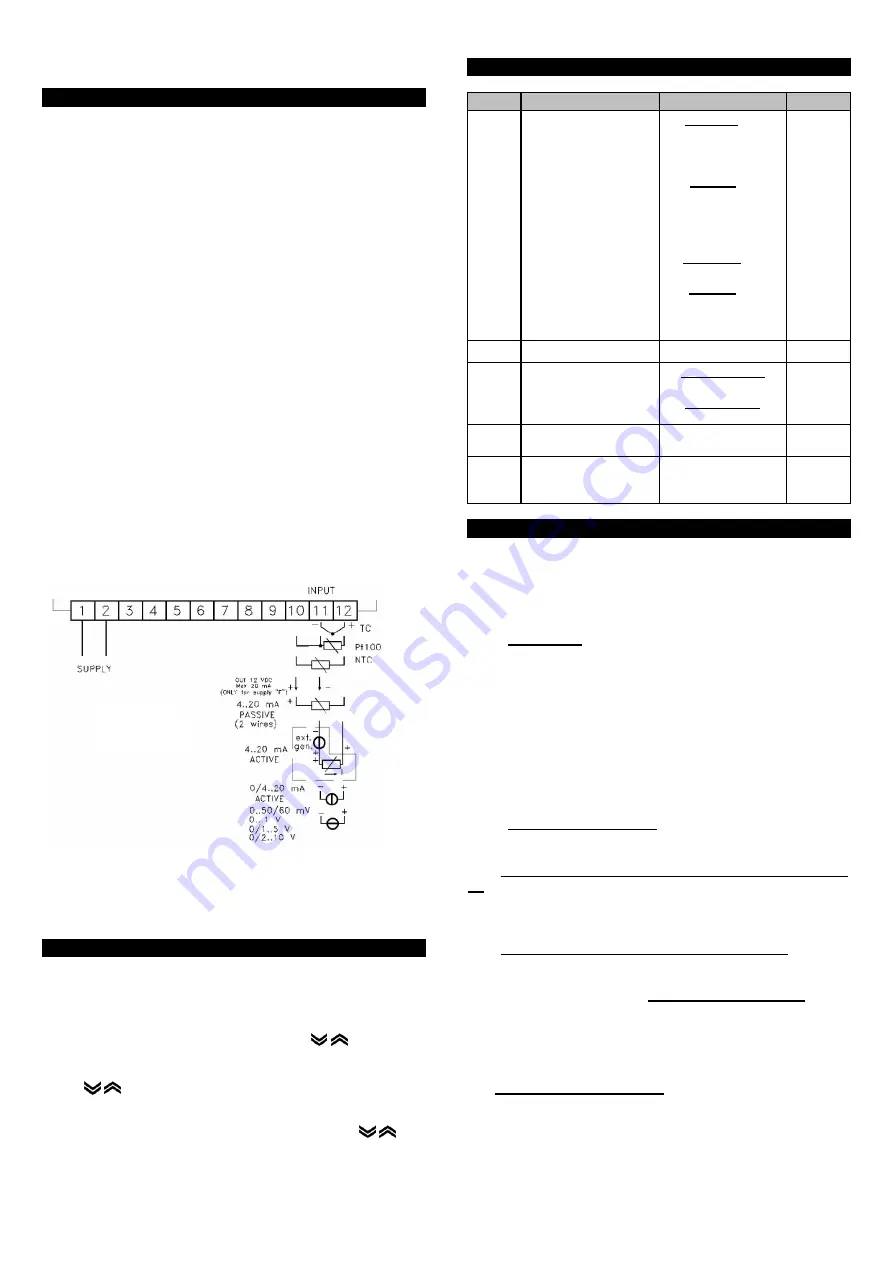
3 - INSTALLATION
Pair.
Description
Rank
Def.
SEnS
Signal selection
input (Probe)
PT input:
J / CrAL / S / Ir.J /
Ir.CA / Pt1 / 0.50 /
0.60 / 12.60
Input 0:
J / CrAL / S /
Ir.J / Ir.CA /
ntc / 0.50 / 0.60 /
12.60
MA input:
0.20 / 4.20
Input V:
0.1 /
0.5 / 1.5 / 0.10 /
2.10
MECHANICAL ASSEMBLY
: The instrument, in 33 x 75 mm
housing, is designed for panel mounting inside a housing.
Make a 29 x 71 mm hole and insert the instrument, fixing it with
the appropriate bracket provided.
It is recommended to mount the appropriate gasket to obtain the
declared degree of frontal protection.
Avoid placing the internal part of the instrument in places
subject to high humidity or dirt that may cause condensation or
introduce conductive parts or substances into the instrument.
Install the instrument as far as possible from sources that
generate electromagnetic interference such as motors, relays,
solenoid valves, etc.
OFSt
Measure deviation
- 1999 ÷ 9999
0
ELECTRICAL CONNECTION
: Make the connections by
connecting a single conductor per terminal and following the
indicated diagram, checking that the supply voltage is that
indicated for the instrument and that the load on the actuators
connected to the instrument does not exceed the maximum
admissible current. The instrument, designed to be
permanently connected inside a panel, is not equipped with a
switch or internal devices to protect against excess current, it is
recommended to adequately protect all the circuits connected
to the instrument with devices (eg fuses) suitable for the
circulating current. It is recommended to use cables with
appropriate insulation for the running voltages and
temperatures and to position so that the input cable of the
probe is distant from the power cable and other power cables.
dP
Number of digits -
summits
Pt1 / Ptc / ntc:
0..1
normal signal:
0..3
one
SSC
Lower limit scale
mA / V signal input
- 1999 ÷ FSC
0
FSC
Upper limit scale
the input signal
mA / V
SSC ÷ 9999
0
6 - DESCRIPTION OF PARAMETERS (OI 22 mA, V)
The parameters presented in the table above are described
below. Some of them are not displayed on the instrument since
the equipment is not equipped to have them or because the
instrument automatically disables them, if they are not used.
SEnS - Ticket type:
Depending on the model we have, we can
select the following probe inputs:
- Thermoresistances: Pt100 IEC (Pt1)
- Thermistors: PTC KTY81-121 (Ptc) or NTC 103AT-2 (ntc)
- Signals in mV: 0..50 mV (0.50), 0..60 mV (0.60), 12..60 mV
(12.60)
- Current signals: 0..20 mA (0.20) or 4..20 mA (4.20)
- Voltage signals: 0..1 V (0.1), 0..5 V (0.5), 1..5 V (1.5), 0..10 V (0.10)
or 2..10 V (2.10).
- Thermocouple: J (J), K (CrAL), S (S) or for infrared sensors
OSAKA IRS series J (Ir.J) or K (Ir.CA)
OFSt - Measure compensation
: positive or negative
compensation that we will use to correct small deviations of the
input probe.
SSC - Lower limit of input range for analog signals (mA, mV,
V):
Value that the instrument must show on the display when
the signal at the input coincides with the minimum value of the
ranges (0/4 mA, 0/12 mV, 0/1 V or 0/2 V).
FSC - Upper limit of input range for analog signals:
Value that
the instrument must show on the display when the signal at the
input coincides with the maximum value of the ranges (20 mA,
50 mV, 60 mV, 1V, 5 V or 10 V). Examples of SSC and FSC: If we
have a 4..20 mA signal, we can establish a display range of
0..100, where the value "0" will coincide with a signal of 4 mA
(SSC) and where the value "100" will coincide with a 20 mA
signal (FSC).
dP
-
Number of decimal places:
Allows you to set the
resolution of the measurement, 1 (0), 0.1 (1), 0.01 (2), 0.001 (3).
For Pt100, PTC and NTC temperature probes the maximum
resolution is 0.1 ° (1).
4 - PARAMETER PROGRAMMING (OI 22)
To access the operating parameters menu, hold down
the “Set” key for approximately 2 seconds until “OPEr”
appears on the display. Press the "Set" key and the
"InP" parameter folder will appear. Press the "Set" key
again to enter the folder and use the keys
to
scroll through the parameters. For
modify a parameter press the "Set" key and use the
keys
to increase or decrease the value of said
parameter. Press the "Set" key again to confirm. If you
want to modify another parameter, proceed in the
same way. If you want to exit, keep one of the keys
pressed until you exit completely (the measurement
value will be displayed).
OSAKA
- OI 22-NTC, PT, JKS, mA, V - USER MANUAL - v2.0K - PA
G.
2


