background image

13

Grounding Instructions

05

This product must be grounded. If it should malfunction or break down, grounding 
provides  a  path  of  least  resistance  for  the  electric  current  to  reduce  the  risk  of 
electric shock. This product is equipped with a cord with an equipment-grounding 
conductor  and  a  grounding  plug.  The  plug  must  be  plugged  into  an  appropriate 
outlet that is properly installed and grounded in accordance with all local codes and 
ordinances.

Danger-Improper connection of the equipment-grounding conductor can result in a 
risk of electric shock. Check with a qualified electrician or service technician if you 
provided with the product-if it will not fit the outlet, have a proper outlet installed by 
a qualified electrician.

This product is for use on a nominal 120V circuit and has grounding plug that looks 
like that plug illustrated below. Make sure that the product is connected to an outlet 
having  the  same  configuration  as  the  plug.  No  adapter  should  be  used  with  this 
product.

Grounded Outlet Box

Grounding Pin

Grounded Outlet

Summary of Contents for OS5000

Page 1: ...Instruction Manual OS5000...

Page 2: ...chair please read the contents of this instruction manual and refer to it when needed Features 2 Safety Precautions 3 7 Chair Components 8 Chair Installation Moving 9 12 Grounding Instructions 13 Chai...

Page 3: ...intensity Narrow or wide back massage adjustment Extended footrest adjusts to fit user s height Automatic angle adjustment in backrest and footrest User friendly LCD controller with graphic interface...

Page 4: ...uctions before using A massage chair should never be left unattended when plugged in Unplug from the outlet when it is not in use and before putting on or taking off parts Close supervision is necessa...

Page 5: ...Check the skin in contact with the heated area of the appliance frequently to reduce the risk of blistering Burns may result from improper use Do not crush avoid sharp folds Keep children away from ex...

Page 6: ...han 5 minutes at a time as this may result in excessive stimulation and may have adverse effects Do not insert your hand or foot along the paths of the massage rollers during use as this may cause inj...

Page 7: ...apabilities or lack of experience and knowledge unless they have been given supervision or instruction or instruction concerning use of the massage chair by a person responsible for their safety Child...

Page 8: ...essionally serviced or repaired Do not attempt to disassemble or repair the massage chair yourself without being below guidance of professional technicians 6 Things to Note About the Power Plug and Co...

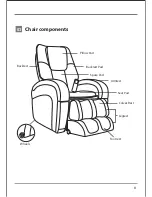
Page 9: ...03 Chair components 8 Pillow Pad Wheels Backrest Backrest Pad Calves Rest Legrest Footrest Armrest Seat Pad Spare Pad...

Page 10: ...e feet of space in front of the footrest Step 2 Lift the backrest then lower the backrest into the seat brackets Securely lock the flat head bolts into sides of the seat Note Carefully unwrap the armr...

Page 11: ...1 and PIC 2 A Connecting rod on the backrest B U stay fork of reclining actuator on the seat C Flat head rivet D Split pin Step 3 Insert the wire plugs into the corresponding place in the seat accord...

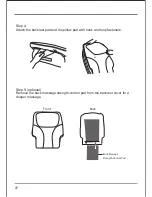
Page 12: ...al Remove the back massage strength control pad from the backrest cover for a deeper massage Step 4 Attach the backrest pad and the pillow pad with hook and loop fasteners Back Massage Strength Contro...

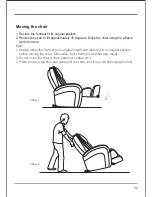
Page 13: ...hair using the wheels as the fulcrum Note 1 Always return the footrest to its original length and restore it to its original position before moving the chair Otherwise injury during movement may resul...

Page 14: ...l local codes and ordinances Danger Improper connection of the equipment grounding conductor can result in a risk of electric shock Check with a qualified electrician or service technician if you prov...

Page 15: ...ription Specifications OS5000 120V 60Hz 250W 15 minutes Shipping dimention 52 x 35 4 x 34 3 Reclined dimention 81 5 x 33 8 x 34 3 Upright dimentions 56 3 x 33 8 x 49 2 Net weight 163 lbs Gross weight...

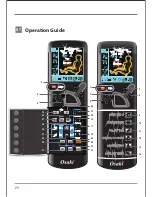
Page 16: ...15 Operation Guide 07 1 3 4 9 15 20 16 23 21 24 25 26 27 29 31 22 17 18 30 28 32 33 19 10 11 12 13 14 2 5 7 8 6...

Page 17: ...ely by pressing this four key to enjoy more ideal massage no matter whether the massage machine is running or not Press referring button continuously to adjust the backrest and leg to a comfortable po...

Page 18: ...his function Press the speed button to adjust the speed of massage while the kneading function is activated 17 TAPPING Tapping Function Start Stop Control Button Press this key once to activate the ta...

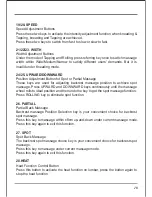
Page 19: ...spot massage Press UPWARD and DOWNWARD keys continuously until the massage wheel rolls to ideal position and then undo the key to get the spot massage function Press ROLLING key to eliminate spot func...

Page 20: ...on Press this key to activate feet air squeezing key for comfortable squeezing massage Press this key again to exit the function 32 CALVES Calves Air Squeeze Control Button Press this key to activate...

Page 21: ...en ON again 1 Check to see that the plug is well connected and working 2 Make sure that the massage chair switch is turned to the I position The massage chair is connected to the power supply but is n...

Page 22: ...Wipe off dust and dirt from the massage with a dry soft clean cloth after each use This product can be cleaned thoroughly with a slightly damp cloth Do not iron the upholstery Do not wash the upholst...

Page 23: ...22 3 Cleaning the Controller Use only a clean dry cloth to clean the controller Caution Do not use a wet cloth to clean the controller This may result in malfunction...

Reviews: