background image

7

04

Chair installing

When installing the chair, please leave 31.5” of space behind

the back-rest to allow free reclining.

Unplug from outlet when installing parts of the massage chair.

Before installing, please check all the parts in the following list.

1

2

3

4

5

7

8

9

10

11

12

13

14

15

16

17

18

6

Massage chair part

Side panel

Backrest pad

Controller holder

Power supply wire

Pillow pad

Backrest

Back massage

strength-control pad

Flat head rivet

φ6*18*2 Gasket×4

Phillips screwdriver

φ6*20*2 Nylon spacer

φ6 Spring washer×4

Allen driver

M4*10 Pan head screws×4

φ4*9*1 Gasket×4

M6*55 Hex screws×4

Split pin

Summary of Contents for OS6000

Page 1: ...User Manual OS6000...

Page 2: ...air please read the contents of this instruction manual and refer to it when needed Features 2 Safety Precautions 3 4 Chair Components 5 6 Chair installing 7 13 Preparation for Use 14 Operation Guide...

Page 3: ...l of the human thumb thereby enhancing the massage experience Fifty one air bags around the neck shoulder back seat arms palms calves soles for extra comfort as it cradles the body like a glove for in...

Page 4: ...lectricity comes back on Never plug unplug the power cord plug socket with wet hands Close and continuous supervision is necessary when the massage chair is used by on or near children or disabled per...

Page 5: ...DO NOT use the massage chair for more than 30 minutes at a time DO NOT use the massage chair where aerosol spray products are being used or where oxygen is being administered This massage chair is a...

Page 6: ...Chair Components Footrest Massage pillow pad Anti slip pillow pad Shoulder massage pads Backrest cushion Backrest Controller Armrest Power switch Power jack Seat cushion Side panel Leg rest Castor wh...

Page 7: ...6 Massaging Position 8 air bags 10 air bags 2 hammer 6 air bags 1 hammer 10 air bags 14 air bags...

Page 8: ...please check all the parts in the following list 1 2 3 4 5 7 8 9 10 11 12 13 14 15 16 17 18 6 Massage chair part Side panel Backrest pad Controller holder Power supply wire Pillow pad Backrest Back m...

Page 9: ...rated in PIC 2 2 Adjust the side panel to make the holes aligned lock the hex screws as demonstrated in PIC 3 Note 1 Please be careful to avoid scratching during installation 2 The hex screws gaskets...

Page 10: ...off the packing material of the backrest actuator where both of them are located underneath the seat pad PIC 2 PIC 3 15 16 17 X X A B C C D D PIC 4 Step 4 Repeat step 2 and step 3 to install the other...

Page 11: ...ter installment A A B Step 7 Attach the connecting rod A and the U stay fork of the reclining actuator B with a flat head rivet C and secure with a split pin D then connect the air pipe and the audio...

Page 12: ...e chair may happen PIC 7 Step 9 Attach the backrest pad and the pillow pad 1 Attach the backrest pad and the pillow pad using the magic tape 2 Attach the backrest pad with the zipper and magic tapes P...

Page 13: ...ones in the side panel as demonstrated in PIC 11 Lock the screws which are with flat pad when holes C D E F are corresponding to hole C D E F Note 1 The A and B in PIC 11 are corresponding to PIC 10...

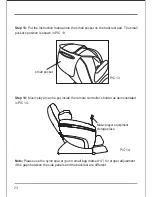
Page 14: ...in PIC 13 Step 14 Music player can be put inside the remote controller s holder as demonstrated in PIC 14 Note Please use the nylon spacer put in small bag marked 4 for proper adjustment if the gaps b...

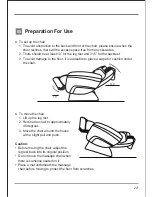
Page 15: ...amage to the floor it is advisable to place a carpet or cushion under the chair To move the chair 1 Lift up the leg rest 2 Recline the chair to approximately 45 degrees 3 Move the chair around the hou...

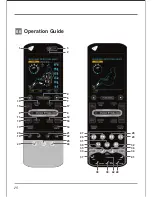
Page 16: ...15 06 Operation Guide 1 5 8 9 6 7 10 11 15 16 17 18 13 19 23 20 22 26 30 33 37 38 39 40 42 41 34 35 36 32 31 27 29 28 24 25 21 14 12 3 2 4...

Page 17: ...assage function buttons now to begin your massage session at a default time of 15 minutes Press again All functions will stop and massage rollers will return to original position 2 Timer The Timer but...

Page 18: ...ng the Up Down buttons until the rollers reach your preferred position Auto Control LED Music Section 7 LED This button controls the LED light on the side panel Press once to turn off the LED light Pr...

Page 19: ...multiple massage modes with air pressure massage to improve the user s vitality The default massage session is 8 minutes 11 Full Air This button engages the Full Body Air Pressure Auto Program Press...

Page 20: ...r back and calves with Air Kneading Rolling and Tapping massage modes The default massage session is 15 minutes 15 Anti Stress This button engages the Full Body Anti Stress Auto Program Press once to...

Page 21: ...and footrest will move to a horizontal reclining position or an upright sitting position Press again to stop the product at your preferred angle 21 22 Footrest Extension These buttons control the foo...

Page 22: ...djusted to fit 3 widths and 5 speeds Press once to activate the Tapping Mode 1 for a continuous full back massage at medium speed Press again to enter Tapping Mode 2 for an interval full back massage...

Page 23: ...idth This button controls the width of the rollers Select a massage function and press to adjust between Narrow Normal and Wide widths It can be used to activate the Tapping Shiatsu and Rolling massag...

Page 24: ...ssage mode at your Shoulders Press once to start press again to stop 39 Back Seat This button allows you to activate the air pressure massage mode at your Back and Seat Press once to start press again...

Page 25: ...e chairs Zero Gravity Position 2 provides a full zero gravity position that raises the lower body even higher This allows the product to deliver a more intense massage experience 2 Massage intensity Y...

Page 26: ...an be replaced to reduce the massage intensity Note When you receive the chair the inner cushion has already been placed inside the backrest cover 3 Head massage Small and big pillows have been provid...

Page 27: ...When you start the Stretching button 12 be sure that you are in the correct seating position In particular tuck your hands into the armrest air bags 6 Operations First connect the chair power plug to...

Page 28: ...l local codes and ordinances Danger Improper connection of the equipment grounding conductor can result in a risk of electric shock Check with a qualified electrician or service technician if you prov...

Page 29: ...ower supply wire 71 Audio wire 25 6 Environment temperture 10 40 Contrasting humidity 30 85RH Storage temperture 20 60 Storage humidity level 30 85RH Equipped with overheated and power surge safety pr...

Page 30: ...nd let it cool down for 60 minutes before you use it again Unplug the appliance remove the excessive weight if it is still on the appliance again and switch it on You have used the appliance continuou...

Page 31: ...n between the gaps of leg rest please press ON OFF button to stop and then get your body part out rapidly as demonstrated PIC 2 If you have to rise from the chair to stop accident injury or damage to...

Page 32: ......

Reviews: