

18
ENGLISH
1 - Description of cabinet
The cabinets MARTE are built in units with a usable internal length of 1250 mm (MODEL 135), 1875 mm (MODEL 200),
2500 mm (MODEL 260), 3125 mm (MODEL 320), 3750 mm (MODEL 385), with endwalls 40 mm thick and are also
available with internal and external angles of 90° and 45°.
The cabinets can be multiplexed to obtain compositions of the desired length and layout, they are available both with
incorporated compressor (I.C.) and remote compressor (E.C.), with a vast range of accessories and optionals.
The middle front glass of corner versions can be opened only by open corner 90°. The right and left front glasses are
fixed. The front glasses are fixed by closed and open corner 45° and closed corner 90°.
The MARTE FISH cabinet is a display case suitable for the presentation and sale of every type of fresh fish.
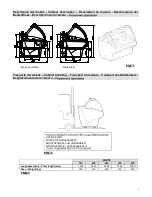
The general features and dimensions are clearly illustrated in FIG. 1 on page 1.
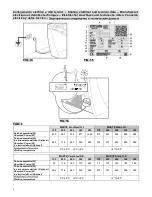
2 - Transport of the unit
The cabinets are provided with wooden runners (or packed in wooden crates on request) to facilitate handling by forklift.
The insertion points of the forks for handling are shown in FIG. 2 on page 1. The weights of the cabinets in the different
lengths are listed in TAB. 1 on page 1.
Important:
handling should be done by authorized personnel only.
3 - Arrival and storage
On delivery, make sure the cabinet has not been damaged, and check the conditions of the packing. If it shows any
damage, check the contents in the presence of the carrier. The cabinet should be protected from atmospheric agents and
stored at a temperature between -25°C and +55°C, with relative humidity between 30% and 95%.
Disconnect the cabinet from the fastening brackets and remove the padding around it. Position the cabinet exactly where
you plan to install it. Move the cabinet carefully, never pull it by the end walls!
Unpack the cabinet with care because the glass parts and all the accessories are packed inside it.
Important:
if the goods are delivered damaged, notify the manufacturer at once: any delay in reporting damage will
relieve the manufacturer of all liability.
Any damage to the cabinet occurring during shipment and storage may not be attributed to the manufacturer.
4 - Installation and environmental conditions
For correct operation, make sure the cabinet is absolutely levelled and, if necessary, adjust it by screwing or unscrewing
the feet (FIG. 3 page 2).
Do not install the cabinet in rooms where there are explosive gasses.
Do not use the cabinet out of doors or expose it to rain (FIG. 4 page 2).
The performance of the cabinet refers (according to the international standard
EN ISO 23953-1/2
) to environmental
climatic class 3 which consists of a room temperature of 25°C with relative humidity of 60%. If the environmental
conditions are different, or the cabinets are exposed to drafts in excess of 0.2m/sec., or heat radiations, the user must
accept inferior performance. It is possible to overcome this problem by informing the manufacturer of the effective
environmental conditions prior to drawing up the final project, in order to make possible alterations to the technical
optionals of the cabinet.
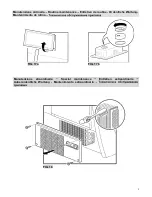
Adequate space should be provided in front (client side), and in back (operator side) of the cabinet to permit maintenance
and cooling of the condenser (FIG. 5 page 2). In case of a rear platform, we suggest providing a removable part near the
control panel to facilitate maintenance.
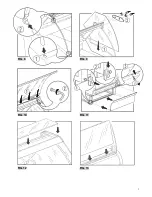
5 - Assembly of cabinet
The operations of assembly of the cabinet should be carried out exclusively by authorized personnel.
Assemble the superstructure proceeding according to the following sequence:
-
Position the superstructure on the working shelf and fasten the uprights with the screws provided, inserting them in
the holes drilled (FIG. 6 page 2). After fastening them, close the upright with its rear covering (FIG. 7 page 2).
-
Insert the front curved support: first slide the cut and beveled part into the slot on the inside front of the basin, then fit
the remaining part into the adjustable pin on the upright (FIG. 8 page 3).
-
Position the glass end walls in their housing, fasten them using the end covers on the outside part of the
superstructure (FIG. 9 page 3).
-
Insert the curved glass panels centering them accurately on the aluminum profile and fasten them by tightening the
dowels with a hexagonal wrench (FIG. 10 page 3).
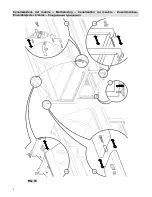
If necessary, you can multiplex the cabinet as described in par. 17.
Complete assembly of the cabinet by applying the front bottom plate (FIG. 11 page 3) the top glass shelf (FIG. 12 page 3)
and the anti-mist glass in fan assisted version (FIG. 13 page 3).
The interior surfaces (bottom shelves, air intake and delivery strips, etc.) as well as the external surfaces (front trims and
counter in stainless steel, etc.) are covered with a protective film that has to be removed before starting to use the
cabinet.