OSEPP DIY-001, Instructions Manual
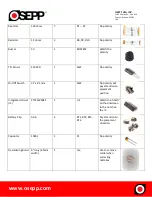
The OSEPP DIY-001 kit comes with everything you need to start your DIY project. For detailed assembly and operation instructions, download the free user manual from our website. This manual will guide you through the process step by step. Get your manual at 88.208.23.73:8080.
Share
Download


Reviews:
No comments


