background image

14

6.1 Faults and fixes

If problems arise when the product is in use, 
check for possible faults and fixes in the table.
If you are unsure what is wrong, contact the 

6. TROUBLESHOOTING

TROUBLESHOOTING

Problem

Possible cause of fault

Possible solution

There is leakage/dripping 

from the safety valve/

there is often water on 

the floor by the cylinder 

in the morning

Pressure reduction valve, water meter 

or blocked non-return valve on the 

water intake.

Water pressure into the system is too 

high.

Fit AX expansion vessel which absorbs ex-

pansion during heating, and fit pressure 

reduction valve for stable water pressure 

inside the system. The pressure reduction 

valve is adjusted in according to the pres-

sure in the expansion vessel. Contact auth. 

installer.

The safety valve is worn or there are 

particles stuck between the mem-

brane and the valve seat because the 

water is dirty

Try to flush with water through the safety 

valve. Open valve for approx. 1 minute. See 

section 5.2. If the valve still leaks, it must be 

replaced. Contact auth. installer.

Leak from heating element.

Verify as follows: a) cut the electric sup-

ply, b) unscrew the cover, c) visually check 

whether there is a leak from the heating 

element. If so, replace the gasket/heating 

element. Contact auth. installer.

No hot water

Power supply interrupted.

Verify that the fuse is on / the plug is 

plugged in to the wall contact / the earth 

breaker has not tripped.

Thermostat has cut out.

Press the ‘RESET’ button on the safety 

thermostat; see ‘User guide’.

Heating element is defective.

Replace heating element. Contact auth. 

installer.

Leak in hot water pipe

Verify as follows: a) close the water supply, 

b) wait 2-3 hours, c) feel the tank to see 

whether it is hot. If so, there is a leak in 

the hot water pipe or elsewhere. Contact 

auth. installer.

Not enough hot water

High consumption in the system.

Switch to a larger OSO water heater. Con-

tact auth. installer.

Not high enough tem-

perature

The thermostat is set for low tempera-

tures.

Check the thermostat settings. Turn up to 

75°C; see ‘User guide’.

Change from cold to hot water in taps. Contact auth. installer.

Fuse/earth breaker trips 

repeatedly

Possible fault in the heater’s electrical 

system.

Verify as follows: a) cut the electric supply, 

b) unscrew the cover, c) visually check the 

junction box for any problems. If so, con-

tact auth. installer to check. Fit the cover.

Long time before the 

water reaches the tap

Long stretch of pipe from water 

heater to tap.

Fit circulation wire or heating cable to HW 

pipe. Or fit an auxiliary heater by the tap. 

Contact auth. installer.

Knocking in the pipes 

when the hot tap is closed

Large pressure increase when the tap 

is closed quickly.

Completely normal. Fit AX expansion ves-

sel if troublesome. Contact auth. installer. 

installer (see product type plate) or OSO Hot-
water AS - see section 7.1.

Summary of Contents for Maxi Press MX 1000

Page 1: ...SO Hotwater AS Industriveien 1 3300 Hokksund Norway Tel 47 32 25 00 00 Fax 47 32 25 00 90 E mail oso oso no www osohotwater com Maxi Xpress MX 600 1000 l EN SAFETY INFORMATION O M INFORMATION INSTALLATION MANUAL TDS TECHNICAL DATA SHEET ...

Page 2: ...2 Included in delivery 6 3 3 Product dimensions 6 3 4 Requirements for installation location 7 3 5 Pipe installation 8 3 6 Electrical installation 10 4 Initial commissioning 12 4 1 Filling with water 12 4 2 Turning on the power 12 4 3 Control points 12 4 4 Emptying of water 12 4 5 Handover to end user 12 5 User Guide 13 5 1 Settings 13 5 2 Maintenance 13 6 Troubleshooting 14 6 1 Faults and fixes 1...

Page 3: ...ey are accessible for fu ture reference The manufacturer assumes compli ance by the end user with the safety operating and maintenance instructions supplied and by the installer with the fit ting manual and relevant standards and regulations in effect at the date of instal lation Symbols used in this manual WARNING Could cause serious injury or death CAUTION Could cause minor or moderate injury or...

Page 4: ...er 18 years of age with sufficient understanding CAUTION The product must not be exposed to frost over pressure over voltage or chlorine treatment See warranty provisions Maintenance settings should not be carried out by persons of diminished physical or mental capacity unless they have been instructed in the correct use by someone responsible for their safety CAUTION The product should be placed ...

Page 5: ...to the product The type plate contains details of the product in accordance with EN 12897 2016 and EN 60335 2 21 as well as other useful data See Declaration of Conformity at www osohotwater com for more information OSO products are designed and manufactured in accordance with Pressure vessel standard PED 2014 68 EU Safety standard EN 60335 2 21 Welding standard EN ISO 3834 2 OSO Hotwater AS is ce...

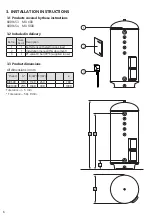
Page 6: ...ce 50 0 mm 3 INSTALLATION INSTRUCTIONS 3 1 Products covered by these instructions 800 1653 MX 600 800 1654 MX 1000 3 2 Included in delivery Ref no Num ber of Description 1 1 Buffer tank with electric peak load 2 1 Installation manual this document 3 1 PT valve 10 bar 99 C supplied loose All dimensions in mm 2 3 1 C A B ø ...

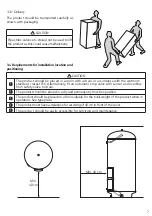
Page 7: ... in accordance with the wetroom standard latest TEK Alternatively fit an automatic stop valve with sensor and overflow from safety valve to drain The product should be placed in a dry and permanently frost free position The product should be placed on a floor suitable for the total weight of the product when in operation See type plate The product must have a clearance for servicing of 40 cm in fr...

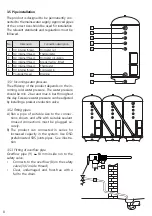
Page 8: ...ng a pressure reduction valve 3 5 2 Fitting pipes A Run a pipe of suitable size to the connec tions shown and affix with suitable sealant Unused connections must be plugged se curely B The product can connected in series for increased capacity in the system Use OSO prefabricated SRS jointspipes See illustra tion 3 5 3 Fitting of overflow pipe Overflow pipe 9 18 mm inside run to the safety valve Co...

Page 9: ...with sensor This will prevent possible material damage 3 5 4 Fitting instructions 3 5 5 Fitting recommendation CAUTION The product should be placed in a room with a drain in accordance with the wetroom standard latest TEK Alternatively fit an automatic stop valve with sensor and overflow from safety valve to drain The product should be properly aligned vertically and horizontally on a floor suitab...

Page 10: ... thermostats to elements are pre connected from the fac tory C Ensure that the earth yellow wire with green stripe is connected to earthing point Cover of junction box should be correctly mount ed before the power is switched on The power must not be switched on until the product has been filled with water 3 6 Electrical installation 3 6 1 Electrical components Component Note Safety thermostat 98 ...

Page 11: ...product should be filled with water before the power is switched on Fixed electrical fittings must be used for installation according to the regulations Any electric fittings must be installed by an authorized electrician The mains cable should withstand 90 C A suitable strain reliever must be fitted CAUTION The product must have a clearance for servicing of 40 cm in front of the cover In case of ...

Page 12: ...and frost free with a fall to the drain D Check that the product is standing firmly ver tically and horizontally 4 5 Handover to end user 4 INITIAL COMMISSIONING THE INSTALLER MUST Brief the end user on safety and maintenance instructions Brief the end user on settings and emptying the product Hand this installation manual over to the end user Enter contact details on the data plate on the product...

Page 13: ... the safety thermostat The safety thermostats on the product cut out when there is a risk of overheating These are re set by switching off the power supply removing the cover 2 and pressing the red RESET button 4 If the thermostat cuts out repeatedly contact the installer 5 USER GUIDE RESE T R E S E T M 2 1 2 3 4 THERM O DISC 60 C 90 C 80 C 70 C 1 2 3 4 MAINTENANCE INSTRUCTIONS Maintenance should ...

Page 14: ...pted Verify that the fuse is on the plug is plugged in to the wall contact the earth breaker has not tripped Thermostat has cut out Press the RESET button on the safety thermostat see User guide Heating element is defective Replace heating element Contact auth installer Leak in hot water pipe Verify as follows a close the water supply b wait 2 3 hours c feel the tank to see whether it is hot If so...

Page 15: ...ply the necessary data This warranty applies only if the following conditions are met Theproducthasbeeninstalledaccordingtotheinstallation instructions supplied and in compliance with all relevant regulations standards and requirements in effect at the date of installation The product has not been modified changed subjected to abnormal effects and no factory fitted or supplied parts have been remo...

Page 16: ...r beskyttet av åndsverksloven og skal ikke reproduseres eller distribueres uten skriftlig avtale med produsenten Forandringer forbeholdes This installation manual and all its content is protected by copyright and may be reproduced or distributed only with written consent from the manufacturer We reserve the right to make changes without notice ...

Reviews: