Remove all parts from carton, separate by part numbers indicated on parts list, and verify part quantities.
STEP 1
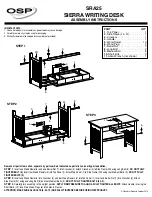
Insert one Wood Dowel (5) and one Barrel Nut (7) into Crossbar (3). Attach Crossbar (3) to Side Frame (2R) using Long Bolt (8),
DO NOT FULLY
TIGHTEN BOLT (8)
.
Insert four Wood Dowels (5) into Top Panel (1). Attach Top Panel (1) to Side Frame (2R) using four Medium Bolts (9),
DO NOT FULLY
TIGHTEN BOLTS (9)
.
STEP 2
Insert one Wood Dowel (5) into Crossbar (3) and four Wood Dowels (5) into Top Panel (1). Insert one Barrel Nut (7) into Crossbar (3). Attach
Side Frame (2L) using one Long Bolt (8) and four Medium Bolts (9),
DO NOT FULLY TIGHTEN BOLTS (8 & 9).
STEP 3
Carefully turn assembly to the upright position,
APPLY FIRM PRESSURE TO ALIGN & FULLY TIGHTEN ALL BOLTS
. Attach Handle (4) using two
Short Bolts (10). Insert two Wood Plugs (6) into holes in Frames.
ATTENTION: MAKE SURE ALL BOLTS (8, 9 & 10) ARE FULLY TIGHTENED BEFORE USING THIS PRODUCT.
SRA25
SIERRA WRITING DESK
ASSEMBLY INSTRUCTIONS
PART QTY
1.
Top Panel . . . . . . . . . . . . . . . . . . 1
2.
Side Frame (L & R) . . . . . . . . . . . 1
3.
Crossbar . . . . . . . . . . . . . . . . . . . 1
4.
Handle . . . . . . . . . . . . . . . . . . . . . 1
5.
Wood Dowel . . . . . . . . . . . . . . . 10
6.
Wood Plug . . . . . . . . . . . . . . . . . . 2
7.
Barrel Nut . . . . . . . . . . . . . . . . . . 2
8.
Long Bolt . . . . . . . . . . . . . . . . . . . 2
9.
Medium Bolt . . . . . . . . . . . . . . . . . 8
10.
Short Bolt . . . . . . . . . . . . . . . . . . 2
11.
Allen Wrench (not shown) . . . . . 1
STEP 1
© Office Star Products October 2013
IMPORTANT NOTE:
1. Use hand tools only for assembly as power tools may cause damage.
2. Carefully remove any staples used for packaging.
3. Phillips Screwdriver also needed for assembly (not provided).
STEP 2
STEP 3
10
9
6
6
4
8
2L
3
8
7
7
3
5
5
5
2R
1
5
1
9


