www.traxontechnologies.com | www.osram.us/traxon
©2020 TRAXON TECHNOLOGIES - AN OSRAM BUSINESS. ALL RIGHTS RESERVED. TRAXON™, TX CONNECT®, ARE TRADEMARKS OF TRAXON TECHNOLOGIES. U.S. PATENTS, E.U. PATENTS, JAPAN PATENTS, OTHER PATENTS
PENDING. SPECIFICATIONS ARE SUBJECT TO CHANGE WITHOUT NOTICE.
Installation Guide
IG0110EN V1.0 12/20
P. 10 of 25
2.
INSTALLATION
2.1 Points to Consider
Plan your installation before mounting ProPoint Kontour RGB / RGBW / Static White.
The following should be considered for a successful installation:
•
Weather conditions and ambient temperature of installation site.
•
Installation distances and appropriate cable lengths. Please consult your local Traxon™ office or authorized
agent for necessary aid.
•
The number of ProPoint Kontour and Data Injectors and appropriate power sources.
•
DMX512 controller to be used to control the ProPoint Kontour.
•
Distance between each ProPoint Kontour for thermal expansion.
•
Proper surge protection.
•
If not beginning installation at the Data Injector, ensure that the layout of the luminaire input and output
connections are in the correct orientation.
2.2 Pre-Installation Checks
2.2.1
Installation Checklist
1.
Perform visual check of
ProPoint
Kontour. Take care not to damage cables/connectors during pre-installation
checks.
2.
Prepare cables and all necessary accessories (mounting brackets, temporary waterproof end caps etc).
3.
Connect the luminaires, data injectors and power supplies in accordance with the wiring diagram.
4.
Report any functional defect found to your nearest Traxon Technologies office. DO NOT attempt to install a
ProPoint
Kontour with functional defects on-site.
5.
Ensure all pre-installation checks laid out below have been followed.
6.
If this installation is to be left in an incomplete state overnight, ensure that all connectors and cables are
properly protected using dust/end caps as required. Any unused materials should be left in an indoor
environment.
a. Ensure that all connected ProPoint Kontour fixtures/data injectors outdoors with an open connector are
secured with an end cap (purchased separately) to keep all ports sealed.
b. Ensure all of the Interconnection Cables, ProPoint Kontour, and Data Injectors are initially stored in a dry
area to guarantee the complete sealing of the system from water before installation.
2.2.2
Cable Bending
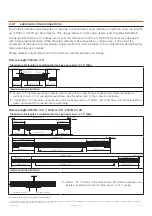
Cable bend radius must NOT be less than the Minimum Bending Radius (4 x Cable Diameter) as
specified by cable manufacturer and the Non-Bendable Length of 5cm near the connector end MUST
be adhered to. In addition to the Minimum Bending Radius, ensure that 5cm of cable at the connector
junction is kept straight – see image below:
To reduce stress induced on ProPoint Kontour, please adhere to the Minimum Bending Radius of 50.4
mm (2”) and the Non-Bendable Length of 50.4mm (2”) near the connector. It is recommended to install
lead cables through conduits/trunking.

