13 / 120
2018-02-13
Climatix HERU® 400-2400
Scope of assembly/installation instructions
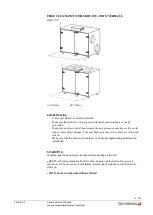
FREE CLEARANCE FOR SERVICE AND OVERHAUL
HERU T/S
A=500 mm
B=1200 m
BEFORE STARTING
-
Ensure that HERU® is correctly installed.
-
Make sure that all ducts, water pipes and electrical connections are correctly
assembled.
-
Make sure no objects or dirt have entered the unit during construction, as this could
lead to injury and/or damage to the unit. Make sure that service doors are closed and
locked.
-
Make sure that the connection cable has not been damaged during assembly and
installation.
STARTING
Carefully read the operating instructions before starting up the unit.
•
HERU
®
will start automatically (after a few
minutes’
delay) when the power is
turned on. In the event of a power failure, always check to make sure that the unit
starts up.
•
NOTE: Never run the unit without a filter!
Summary of Contents for HERU 400-2400 S
Page 1: ...U S E R M A N U A L E N H E R U 4 0 0 2 4 0 0 T S HERU T HERU S...
Page 2: ......
Page 14: ...14 120 Climatix HERU 400 2400 2018 02 13 Scope of assembly installation instructions...
Page 45: ...45 120 2018 02 13 Climatix HERU 400 2400 External components basic unit...
Page 97: ...97 120 2018 02 13 Climatix HERU 400 2400 Miscellaneous Menu structure Menu overview...
Page 98: ...98 120 Climatix HERU 400 2400 2018 02 13 Miscellaneous Start page Main index Unit...
Page 104: ...104 120 Climatix HERU 400 2400 2018 02 13 SERVICE HERU...
Page 111: ...111 120 2018 02 13 Climatix HERU 400 2400 SERVICE HERU...
Page 118: ...118 120 2017 11 03 Climatix HERU 400 2400 Troubleshooting...
Page 119: ......
Page 120: ......

