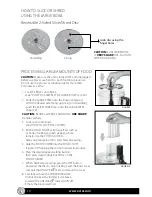
background image

www.oster.com

12

HOW TO KNEAD DOUGH

Never try to process dough that is too stiff to knead 
comfortably by hand.

CAUTION: 

make sure the unit is turned OFF and unplugged 

before use. Do not use the food processor continuously for 
more that 3 minutes at a time.
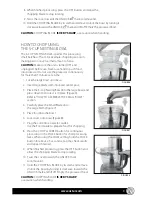
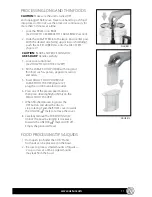
Use the Dough Blade for kneading bread and pizza dough and 
for mixing batters and cake mixtures.

1.   Lock large bowl into base  

(See “HOW TO ASSEMBLE THE LARGE BOWL” section)

2.  Slide the LARGE STEM onto the bowl center post. 
3.  Grab the Dough Blade by its center and slide it down onto 

the LARGE STEM. Ensure the Dough Blade is placed in 
position, with graphics facing up “ THIS SIDE UP”. 
(Figure 13)

4.   Place all the dry ingredients into the large bowl
5.  Lock cover onto bowl (see how to lock the cover section)
6.  Place food pusher into the feed tube
7.  Plug the cord into an electric outlet
8.   Press the CHOP button to continuously run ingredients 

or press the PULSE button for short processing tasks, 
pressing for about 2-3 seconds at a time.

9.  Check results and repeat if needed

10.   When finished processing, press the OFF button and allow 

the dough blade to stop rotating

CAUTION: 

All solid and liquid ingredients should be added 

through the food chute while the unit is processing. Keep 
hands and utensils away from moving blades or discs while 
processing, to reduce the risk of severe injury to persons or 
damage to the food processor. A scraper may be used but 
must be used only when the food processor is not running.

NOTE: 

Add liquid in a slow, steady stream for even distribution. 

It is important to add enough liquid to make the dough soft 
enough to knead. Kneading dough that is too stiff can strain 
the unit.

FIGURE 13

Summary of Contents for FPSTFP5273-DFL

Page 1: ...eam Products Inc doing business as Jarden Consumer Solutions All rights reserved Distributed by Sunbeam Products Inc doing business as Jarden Consumer Solutions Boca Raton Florida 33431 Sunbeam Produc...

Page 2: ...defining innovation power and durability Some say our line of uniquely designed and built appliances last forever The Oster Designed for Life Series is the next generation of innovative products that...

Page 3: ...r table edges or counters 9 Do not use your food processor if any part is broken 10 Do not use outdoors 11 Keep hands and utensils away from moving blades or discs while processing food to reduce the...

Page 4: ...ping over a longer cord An extension cord may be used if care is exercised in its use If an extension cord is used the electrical rating of the cord must be at least as great as the electrical rating...

Page 5: ...tment on the back of the unit Your new Oster 14 Cup Food Processor will be the best kitchen assistant you ve ever had helping you slice chop mince shred grate crumb and knead with precision and speed...

Page 6: ...CESSOR A Small Food Pusher B Large Food Pusher C Bowl Lid D Large Stem E Large Bowl F Motor Base G Reversible Slice Shred Disc H Small Chopping Blade I Small Bowl J Small Stem K Kneading Hook L Choppi...

Page 7: ...n low speed until OFF button is pressed 4 Off Processor should always be left in the OFF position when not in use NOTE When kneading use the CHOP button Before Using Your Oster Food Processor When unp...

Page 8: ...base and bowl as illustrated in Figure 1 Align the bowl handle with the UNLOCK mark on the base Turn the bowl counter clockwise until it clicks onto the base The bowl handle should now align with the...

Page 9: ...n for about 2 3 seconds at a time check results and repeat if desired HOW TO INSERT THE FOOD PUSHERS 1 Lock the lid see HOW TO LOCK THE LID section 2 Insert LARGE FOOD PUSHER into the bowl lid opening...

Page 10: ...to prepare food for chopping 8 Press the CHOP or SHRED button for continuous processing or the PULSE button for short processing tasks When using the PULSE setting hold the PULSE button for about 2 3...

Page 11: ...ng push the SLICE SHRED disc onto the LARGE STEM Figure 9 CAUTION BLADE and PROCESSING DISC ARE SHARP Handle carefully 3 Lock cover onto bowl See HOW TO LOCK THE COVER 4 Fill the FOOD CHUTE with large...

Page 12: ...ll the LARGE FOOD PUSHER with long and thin food such as potato pepperoni carrots and celery 5 Insert SMALL FOOD PUSHER into LARGE FOOD PUSHER Figure 12 plug the cord into an electric outlet 6 Press o...

Page 13: ...ck the cover section 6 Place food pusher into the feed tube 7 Plug the cord into an electric outlet 8 Press the CHOP button to continuously run ingredients or press the PULSE button for short processi...

Page 14: ...brush will also help prevent from coming in contact with the blades and the reversible slice shred disc If washing in a dishwasher place removable parts on the top rack only and small parts in the ut...

Page 15: ...e ones and add to bowl Pulse to desired fineness Nuts chopped 2 cups 300ml Add to bowl and pulse to chop Onions chopped Up to 2 large Quarter add to bowl Pulse 1 or 2 times to coarsely chop For green...

Page 16: ...ons Halve and fill Chute positioning onions upright for coarsely chopped results Peaches Pears Halve and core Position upright in Chute and slice using light pressure Peppers Green Yellow Red etc Halv...

Page 17: ...tee or condition Except to the extent prohibited by applicable law any implied guarantee or condition of merchantability or fitness for a particular purpose is limited in duration to the duration of t...

Page 18: ...ffers and promotions from Jarden Consumer Solutions Street Apt No City State ZIP Code E mail Address Last Name Initial Married Single 2 Your Date of Birth 3 Marital Status 4 Date of Purchase Month Mon...

Page 19: ...www oster com 18 Notes...

Page 20: ......

Reviews: