background image


ENGLISH -1

Thank you for purchasing the Oster

®

 Column Fan, a high-tech, safe and efficient product. It is very 

important to read this instruction manual carefully, the information contained herein will help you to 

better take advantage of all the functions of the product and use it safely. Please keep this manual 

for future reference. 

Important: The materials used in the packaging of this product may be recycled. When 

discarding them, separate them to be recycled.

• Read all instructions before using this appliance.
• In order to avoid accidents. After unpacking the product, keep the packaging material and the 

product out of the reach of children.

• Make sure that the voltage in your outlet is the same as the voltage indicated  on the appliance.
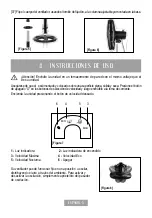
• Use fan only for purposes described in the instruction manual. 
• Keep the product and the power cord away from heat, sunlight, moisture and sharp or similar 

surfaces.

• Do not connect the product to adaptors with multiple devices connected to it or overloaded power 

extension cords, as overcharging may damage the product and cause accidents. Avoid using an 

extension cord. Electrical power extension cords may overheat and cause fire hazard.

• To avoid fire hazard, NEVER place the cord under rugs or any parts near an open flame, cooking 

or other heating appliance.

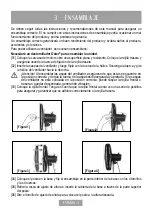
• Do not operate fan until fully assembled with all parts properly in place.
• The use of attachments not recommended or sold by the appliance manufacturer may cause 

hazards.

• Do not operate any appliance with a damaged cord or plug after the appliance malfunctions, or 

has been dropped/damaged in any manner. Discard fan or return to an authorized service facility 

for examination and/or repair.

• The invoice and the warranty insert that came with the product are important documents and 

should be kept for if you ever need to claim repairs under warranty.


• This appliance is not intended for use by persons (including children) with reduced physical, 

sensory or mental capabilities, or lack of experience and knowledge, unless they have been given 

supervision or instruction concerning use of the appliance by a person responsible for their safety. 

Children should be supervised to ensure that they do NOT play with the appliance.

• Close supervision is necessary when any appliance is used by or near children.
• Do not modify this product in any way. Use it only as described in this manual. Any other use not 

recommended by the manufacturer may cause fire, electric shock, or injury to persons.

1 - IMPORTANT SAFEGUARDS

Attention! When using electrical appliances, basic safety precautions should always be 

followed, including the following:

Summary of Contents for OSF816

Page 1: ...OSF816 Instruction Manual STAND FAN READ ALL INSTRUCTIONS BEFORE USING THIS APPLIANCE Manual de Instrucciones VENTILADOR DE PEDESTAL LEA TODAS LAS INSTRUCCIONES ANTES DE USAR ESTE APARATO MODELO MODEL ...

Page 2: ...ueden sobrecalentarse y causar riesgo de incendio Para evitar descargas eléctricas NUNCA coloque el cable debajo de alfombras cerca de flamas abiertas ni cerca de aparatos para cocinar ni de aparatos calentadores No haga funcionar el ventilador hasta que esté completamente ensamblado y con todas las piezas colocadas en su lugar correspondiente El uso de accesorios no recomendados o vendidos por el...

Page 3: ... objetos extraños entre las rejillas del producto ya que esto puede causar accidentes o daños al producto No se opere en presencia de gases explosivos y o inflamables Desconecte el aparato del contacto de pared cuando no esté en uso cuando lo mueva de un lugar a otro antes de quitarle o ponerle partes o antes de limpiarlo Para desconectar nunca jale del cable jale directamente de la clavija Nunca ...

Page 4: ...lla 3 Aspas del ventilador 4 Tuerca de fijación de la rejilla trasera 5 Rejilla trasera 6 Pin de oscilación 7 Carcasa del motor 8 Perilla de ajuste vertical 9 Cubierta de la base 10 Columna 11 Tornillos 4 12 Tuercas 4 13 Base 1 2 3 4 5 6 7 8 9 10 11 12 13 ESPAÑOL 3 ...

Page 5: ...ga la tuerca y gire la hélice del ventilador hacia la derecha 03 Coloque la rejilla frontal Tenga en cuenta que la rejilla frontal cuenta con una serie de pestillos para asegurar y garantizar que se adhiere correctamente a la rejilla trasera Figura 1 Figura 2 Figura 3 Figura 4 04 Coloque el poste en la base y fije el ensamblaje en la parte inferior de la base con los 4 tornillos y las 4 tuercas 05...

Page 6: ...locidad Máxima 4 Velocidad Eco 5 Velocidad Nocturna 6 Apagar Su ventilador puede funcionar fijo en una posición u oscilar distribuyendo el aire a través del ambiente Para activar y desactivar la oscilación simplemente apriete tire del pasador de oscilación 07 Fije el cuerpo del ventilador usando el tornillo de fijación a la columna ajustable ya montada en la base Figura 5 Figura 6 Figura 8 Atenció...

Page 7: ...lemente en su empaque original El cable de alimentación no debe estar torcido estirado o enrollado alrededor de la unidad para evitar rupturas de los cables internos Si el cable de alimentación está torcido enderécelo antes de usar o guardar el producto NOTA la actualización de partes y componentes de los artefactos se realiza de forma continua Por lo tanto algunas de las instrucciones e imágenes ...

Page 8: ...the cord under rugs or any parts near an open flame cooking or other heating appliance Do not operate fan until fully assembled with all parts properly in place The use of attachments not recommended or sold by the appliance manufacturer may cause hazards Do not operate any appliance with a damaged cord or plug after the appliance malfunctions or has been dropped damaged in any manner Discard fan ...

Page 9: ...dents or damage to the product Do not operate in the presence of explosive and or flammable fumes Unplug from outlet when not in use when moving fan from one location to another before putting on or taking off parts and before cleaning To disconnect grip plug and pull from wall outlet Never yank on cord Never carry the product by electric cable When transporting or storing store in a cool dry plac...

Page 10: ...Front grill 2 Blade nut 3 Fan blades 4 Rear grill attaching nut 5 Rear grill 6 Motor housing screw 7 Motor housing 8 Height adjustment thread 9 Base cover 10 Column 11 Screws 4 12 Nuts 4 13 Base ENGLISH 3 1 2 3 4 5 6 7 8 9 10 11 12 13 ...

Page 11: ...he blade nut Hold the nut and turn the fan blade clockwise 03 Place the front grill Please note that the front grill has a series of latches to secure and guarantee it attaches properly to the rear grill Figure 1 Figure 2 Figure 3 Figure 4 04 Position the column on the base and secure the assembly to the bottom of the base to the base with the 4 screws and 4 nuts 05 Remove the height adjustment th...

Page 12: ... Speed 4 Eco Mode 5 Nocturnal Mode 6 Power off Your fan can operate fixed in one position or oscillate distributing the air through the environment To turn on and off the oscillation simply tighten pull the oscillation pin 07 Attach the fan body using the fixing screw to the adjustable column already mounted on the base Figure 5 Figure 6 Figure 8 Attention Plug unit to a wall electric outlet with ...

Page 13: ... the internal wires If the power cord is twisted untwist it before using or storing the product NOTE The updating of parts and hardware components is done continuously Therefore some of the specific instructions and images of this manual might differ slightly from your unit Correct disposal of materials This symbol indicates that the product should not be eliminated with other domestic waste The i...

Page 14: ...acteristics of series models Voltaje Voltage Frecuencia Frequency Potencia Power 127 V 60 Hz 45 W 220 V 60 Hz 45 W 220 V 50 60 Hz 45 W XXX en donde X es cualquier numero entre 0 y 9 o cualquier letra entre A y Z XXX where X is any number between 0 and 9 or any letter between A and Z OSF816 LAXXX Impreso en China Printed in China P N 200592 2019 Sunbeam Products Inc Todos los derechos reservados Ga...

Reviews: