background image

English - 4

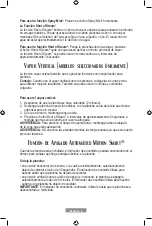
To use Vertical Steam:

1.   Make sure that the iron has heated up (2 minutes).

2.    Hold the iron in a vertical position, with the iron close to but not touching the fabric 

you want to steam.

3.   With your other hand, pull the fabric tight.

4.    Press the Shot of Steam

®

 button in approximately 3-second intervals as you move the 

iron across the wrinkled area.

WARNING: To prevent the risk of burns, keep your hand away from the area being 

steamed.

WARNING: DO NOT steam garments while wearing them; this may result in injuries.

Motion Smart® Auto-Off Feature

When the iron is plugged in, the Power Indicator will light steadily, indicating that there is 

power to the iron.
If you leave the iron:

•    in a horizontal position without moving it, or accidentally tip the iron over, it will 

automatically stop heating after 30 seconds. The Power Indicator will blink to let you 

know that the iron has stopped heating. 

•    in a vertical position (on its heel rest) without moving it, the iron will automatically turn 

off after 8 minutes. The Power Indicator will blink to let you know that the iron has 

stopped heating.

IMPORTANT: The Power Indicator will continue to blink until the iron is unplugged  

or reset.
To reset the iron: Move the iron back and forth and allow it to reheat until the indicator 

ready light turns green. The indicator will stop blinking and the iron will start heating 

again.

WARNING: Motion Smart

®

 Auto-Off is a safety feature, not a recommended means for 

turning your iron off. See “Caring for Your Iron After Use” for information on turning off 

your iron and storing it safely between use.
Retractable Cord (select models only) allows you to safely retract your power cord 

without a whipping effect.

1.    Select the amount of cord desired before plugging into an electrical outlet. Do not pull 

cord past red indicator.

2.    To retract the cord press the retraction button. Hold the iron with one hand and use 

the other hand to grab the end of the cord. (failure to hold plug may cause plug to fly)

3.    The cord reel is compact for multi-layer winding of the cord. In case cord is not fully 

rewound, pull out the cord and steer cord evenly on the reel.

4.   In case the cord is not pulled out easily, pull cord firmly.

5.   Do not allow children to use retractable cord feature as the cord may cause injury.

Summary of Contents for STEAM MASTER GCSTBSRC-202-013

Page 1: ...VAPOR STEAM MASTER CON CABLE RETR CTIL LEA TODAS LAS INSTRUCCIONES ANTES DE USAR ESTE APARATO Instruction Manual STEAM MASTER IRON WITH RETRACTABLE CORD READ ALL INSTRUCTIONS BEFORE USING THIS APPLIA...

Page 2: ...erca de l No deje la plancha sin vigilancia mientras est enchufada encendida o sobre una tabla de planchar Se pueden producir quemaduras por contacto con las partes de metal calientes el agua caliente...

Page 3: ...lectricista calificado No intente anular esta caracter stica de seguridad CARACTER STICAS DE SU PLANCHA OSTER 1 Accionador de SPRAY MIST 2 Orificio para Cargar Agua con Tapa 3 Perilla Selectora de Tel...

Page 4: ...Nota Mientras que la Palanca de Vapor est en la posici n Dry Seco Disco Select o de Telas este fijo en lana algod n o lino usted todav a puede usar las funciones SHOT OF STEAM o SPRAY MIST Por favor a...

Page 5: ...aya calentado 2 minutos 2 Sostenga la plancha en posici n vertical con la plancha cerca de la tela que desea vaporizar pero sin tocarla 3 Con la otra mano mantenga tensa la tela 4 Presione el bot n Sh...

Page 6: ...ede causar lesiones Cuidado de Su Plancha Despu s del Uso Apagado de Su Plancha 1 Ponga la palanca de vapor en Dry Seco y la perilla de selecci n de telas en Off Apagado 2 Desenchufe la plancha del to...

Page 7: ...e no tocar las superficies calientes de la plancha 6 Mueva la palanca de auto lavado hacia la derecha y mant ngala El agua comenzar a gotear de los respiraderos del vapor Balancee la plancha lentament...

Page 8: ...Espa ol 7 NOTA...

Page 9: ...appliance being used by or near children Do not leave iron unattended while plugged in or on an ironing board Burns can occur from touching hot metal parts hot water or steam Use caution when you turn...

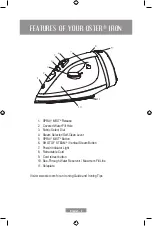
Page 10: ...al 4 Steam Selector Self Clean Lever 5 SPRAY MIST Button 6 SHOT OF STEAM Vertical Steam Button 7 Power Indicator Light 8 Retractable Cord 9 Cord retract button 10 See Through Water Reservoir Maximum F...

Page 11: ...o a 127 Volt AC outlet 3 Turn the Fabric Select Dial to the fabric setting you desire Allow the iron to heat for 2 minutes While the iron is heating make sure it is sitting on its heel rest on a stabl...

Page 12: ...k to let you know that the iron has stopped heating IMPORTANT The Power Indicator will continue to blink until the iron is unplugged or reset To reset the iron Move the iron back and forth and allow i...

Page 13: ...ge the finish Run the iron over an all cotton cloth to remove any residue Using The Self Cleaning Feature You should use the Self Cleaning feature once a month to maintain the optimal performance of y...

Page 14: ...English 6 NOTE...

Page 15: ...English 7 NOTE...

Page 16: ...o por favor consulte los detalles en el inserto 2018 Sunbeam Products Inc All rights reserved Distributed by Sunbeam Latin America LLC 5200 Blue Lagoon Drive Suite 860 Miami FL 33126 One year limited...

Reviews: