background image

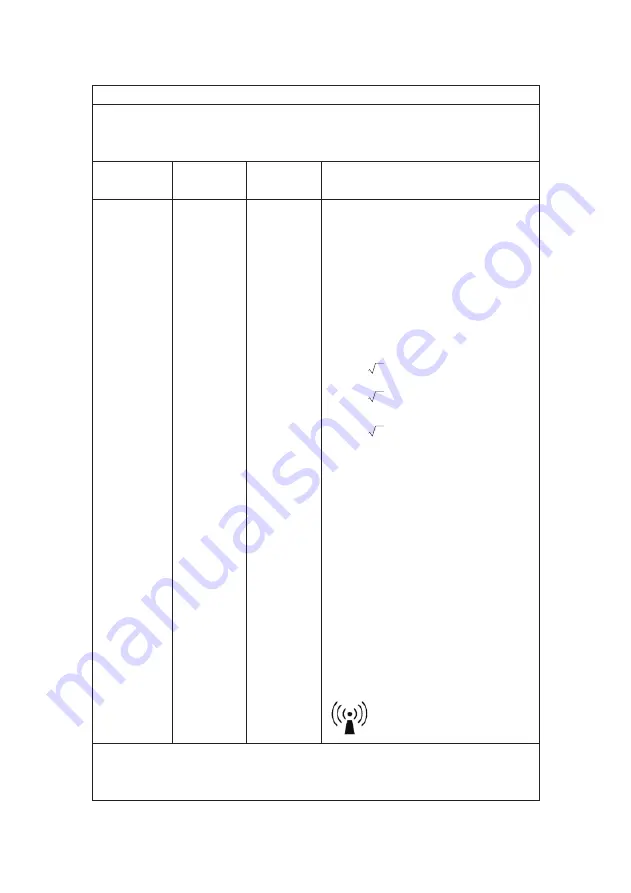
The Electrical Foot Massager and Nerve Stimulator is intended for use in the electromagnetic 
environment specified below. The customer or the user of the Electrical Foot Massager and 
Nerve Stimulator should assure that it is used in such an environment.

Electrical Foot Massager and 

Nerve Stimulator

Guidance and manufacturer’s declaration – electromagnetic immunity

Immunity test IEC 60601

test level

Compliance
level

Electromagnetic environment – guidance

Conducted
RF
IEC
61000-4-6

Radiated RF
IEC
61000-4-3

3 Vrms
150 kHz to 
80MHz

3 V/m
80 MHz to 
2.5GHz

3 Vrms

3 V/m

Portable and mobile RF communications 
equipment should be used no closer to any 
part of the 

, including cables, than the 

recommended separation distance
calculated from the equation applicable to 
the frequency of the transmitter. 
Recommended separation distance

Where P is the maximum output power rating 
of  the  transmitter  in  watts (W)  according  to 
the  transmitter  manufacturer  and  d  is  the
recommended  separation

distance  in 

meters (m). 

Field  strengths  from  fixed  RF  transmitters, 
as  determined  by  an  electromagnetic  site 
survey,

a

should be less than the compliance 

level in each frequency range.

b

Interference may occur in the vicinity of 
Equipment marked with the following 
symbol:

NOTE 1 At 80 MHz and 800 MHz, the higher frequency range applies.
NOTE 2 These guidelines may be unavailable in all situations. Electromagnetic propagation

               is affected by absorption and reflection from structures, objects and people.

Page 35 of 37

d= 1,2 P

d= 1,2 P

d= 2,3 P

80 MHz to 800 MHz

80 MHz to 800 MHz

Summary of Contents for AST-300H

Page 1: ...ompany Limited No 43 Longfeng Road Xinsheng Community Longgang Street Longgang District 518116 Shenzhen City Guangdong Province China Consult instructions for use AST 300H Electrical Foot Massager and Nerve Stimulator Email osito_info 163 com ...

Page 2: ... 1 3 Device Components 1 4 Panel Keypad 1 5 Treatment Modes 1 6 Specifications 3 USING INSTRUCTIONS 16 3 1 Operation 16 3 2 Electrode pads guidelines 20 3 3 Mode Selection 20 3 4 Intensity Selection 26 3 5 Auto Functions 26 4 CLEANING AND MAINTENANCE 27 13 13 13 13 13 15 16 5 STORAGE 28 6 TROUBLE SHOOTING 28 7 DISPOSAL 30 8 WARRANTY CARD 30 9 LABEL SYMBOLS 31 10 SAFETY EMC BIOCOMPATIBILITY 32 10 1...

Page 3: ...oss the intact surface of the skin via the self adhering conducting pads namely electrodes In many cases this stimulation will greatly reduce or eliminate the pain sensation felt by patients Pain relief varies by individual patients mode selected for therapy and the type of pain Electrical stimulators EMS imposes current load on human muscle tissue for the initial purpose of muscles strengthening ...

Page 4: ...odule has the operating elements of ON OFF Switch Display screen Mode Selection Key and Intensity Modification Key The LCD display screen shows the selected mode output intensity of body and foot and time remaining of the application mode The device is equipped with accessories of electrode pads electrode wire adapter remote controller The electrode wire is used to connect the pads on the main uni...

Page 5: ...Page 5 of 37 Adapter wire jack Electrode wires jack Left View of Device Right View of Device Back View of Device ...

Page 6: ...6 of 37 1 3 Device Components 1 3 1 Main Unit 1 3 2 Accessories 1 LCD Screen 2 Foot Conductive Rubbers 3 Button 4 Handle 5 Electrode wires X 2 6 Electrode pads X 4 7 Power adapter X 1 8 Remote controller X 1 ...

Page 7: ...OOT Remaining Time Output Intensity of Body Selected Mode Output Intensity of Foot 1 4 Control Panel Keypad Explanation and operating instructions of the LCD panel and keypad of Main Unit and keypad of Remote Controller are as followings LCD panel and keypad of Main Unit Keypad of Remote Controller FOOT FOOT FOOT FOOT ...

Page 8: ...arts atMode 1 Intensity 0by default When other mode is selected the intensity will be set to level 0 again Press the FOOT button to increase the intensity of foot by 1 level 99 levels in all Press the button to decrease FOOT intensity to level 0 or press the MODE button to set the FOOT intensity to level 0 When the stimulator is switched on press the FOOT button each time to decrease the FOOT inte...

Page 9: ...e intensity of electrode pads by 1 level until level 0 BODY BODY 1 5 Treatment Modes Users can choose Mode 1 8 to stimulate healthy muscles in order to improve and facilitate muscle performance Users can choose Mode 9 25 for temporary relief of pain associated with sore and aching muscles at the shoulder waist back nape arm leg and foot due to strain from exercise or normal household work by apply...

Page 10: ...Display Indicate the following information Power on off Intensity level selected mode time remaining of an application mode Time Range minutes 25 Main Unit Weight 1 364kg Weight of accessories Adapter 62g Electrode 45g Remote Controller 24g Main Unit Dimension 410mm x 410mm x 140mm Electrode Pads Size Foot Conductive Rubber 254mm 98mm 13mm 99 27 cm2 Small 90mm 60mm 3 2mm 54 cm2 Electrode Wires Len...

Page 11: ...Ω 110V 2ΚΩ 122V 10ΚΩ Maximum Output Current 10 144mA 500Ω 55mA 2ΚΩ 12 2mA 10ΚΩ Net Charge per pulse 0µC 500Ω Maximum Phase Charge 12 78µC 500Ω Maximum Average Current 0 968mA 500Ω Maximum Current Density 0 235mA cm 500Ω Maximum Power Density 1 38mW cm 500Ω Pulse Duration 440µs Pulse Cycle 52 8ms Frequency 18 94Hz Contraction and Relaxation time Adjustable due to different modes Contraction time 20...

Page 12: ... on off the device Select mode and the intensity of output 25 Modes Description MODE Pattern 1 2 3 4 5 6 7 8 9 10 11 12 13 14 15 16 17 18 19 20 21 22 23 24 25 Accupuncture Pushing Accupuncture Accupuncture Kneading Accupuncture Tapping Scrapping Squeezing Massage Pushing Massage Pushing Squeezing Accupuncture Squeezing Accupuncture Hammering Kneading Thumping Scrapping Pressing Cupping Body Shapin...

Page 13: ...e to strain from exercise or normal household work activities by applying current to stimulate nerve 2 2 Targeted Users 1 The Health Expert Electronic Stimulator is mainly used for adults not for any children 2 The Stimulator is not used for patient during pregnancy 2 3 Contraindications For the following patients they only can use the stimulator after consulting doctors otherwise it may lead to a...

Page 14: ...timulation device is in use 12 Do not apply stimulation when in the bath or shower 13 Do not apply stimulation while sleeping 14 Do not apply stimulation while driving operating machinery or during any activity in which electrical stimulation can put you at risk of injury 15 Do not use the device on children 16 Do not apply stimulation over the carotid sinus nerves particularly in patients with a ...

Page 15: ... or hypersensitivity due to the electrical stimulation or electrical conductive medium gel 9 If you have suspected or diagnosed heart disease you should follow precautions recommended by your physician 10 If you have suspected or diagnosed epilepsy you should follow precautions recommended by your physician 11 Do not use the device in the following circumstances a When there is a tendency to hemor...

Page 16: ...ctrodes are removed If the redness does not disappear after 30 minutes from the removal of electrodes do not use the stimulator again until the excessive redness has disappeared 2 6 Adverse Reactions 1 You may experience skin irritation and burns beneath the stimulation electrodes applied on your skin 2 You should stop using the device and consult your physicians if you experience adverse reaction...

Page 17: ... electrical stimulation to the knees shoulders back or arms The device is equipped with 4 electrode pads in total and each two of them is fitted with 1 electrode wire 1 Connect electrode pads on the electrode wires Note One end of each electrode wire has a red and a white connector pin the colors indicate positive and negative The connection between electrode pads and connector pin is arbitrarily ...

Page 18: ...the FOOT or BODY intensity please start at lower levels for shorter periods of time before increasing the intensity and always keeping the intensity below the level of discomfort TIPS You can use the machine only for foot stimulation without electrode pads or use electrode pads separately or use both foot stimulation and electrode pads at the same time You are free to use it as you like How long s...

Page 19: ...tery cover 4 The functions of buttons on the remote controller are the same as those on the main unit See 2 4 for details If you feel pain or discomfort please do as below Remove one or both feet from the foot conductive rubbers to stop the stimulation Press FOOT button on the control panel or remote controller to decrease the intensity level then re put your feet on OSITO to use it again ...

Page 20: ...select MODE After selecting the mode the default intensity is set to 0 Please press FOOT BODY and FOOT BODY button to increase decrease the intensity of body or foot The charts below are merely a suggestion for where to place the electrodes what mode to choose and how long to stimulate but only after the user has gone through the starting procedure above and is familiar with the device Usage Figur...

Page 21: ...r Arm Apply the electrode pads on shoulder arm It is intended to stimulate healthy muscles in order to improve and facilitate muscle performance of the shoulder arm For 25 minutes twice or 3 times a day Stimulate Muscle at Waist Leg Apply the electrode pads on waist leg It is intended to stimulate healthy muscles in order to improve and facilitate muscle performance of the waist leg For 25 minutes...

Page 22: ...aching muscles in the shoulder due to strain from exercise or normal household activities For 25 minutes twice or 3 times a day Relief Pain at Waist Find the pain area and apply the electrode pads on the waist To be used for temporary relief of pain associated with sore and aching muscles in the waist due to strain from exercise or normal household activities Mode 11 for 25 minutes twice or 3 time...

Page 23: ...n associated with sore and aching muscles in the waist leg due to strain from exercise or normal household activities For 25 minutes twice or 3 times a day Relief Pain at Leg Find the pain area and apply the both electrode pads on one leg To be used for temporary relief of pain associated with sore and aching muscles in the leg or thigh due to strain from exercise or normal household activities Fo...

Page 24: ...s Find the pain area and apply the electrode pads on the shoulder To be used for temporary relief of pain associated with sore and aching muscles in shoulder feet due to strain from exercise or normal household activities For 25 minutes twice or 3 times a day Relief Pain at Waist Foot Put the feet on the foot conductive rubbers Find the pain area and apply the electrode pads on the waist To be use...

Page 25: ...Foot Put the feet on the foot conductive rubbers Find the pain area and apply the electrode pads on the same arm To be used for temporary relief of pain associated with sore and aching muscles in back of the arm feet due to strain from exercise or normal household activities For 25 minutes twice or 3 times a day Relief Pain at Waist Leg Foot Put the feet on the foot conductive rubbers Find the pai...

Page 26: ... and FOOT BODY you can increase decrease the intensity by one step It is recommended to choose a low Intensity Level when starting out You may set different intensity levels for body or foot exercises adjusted to the individual levels you feel most comfortable with after you have become familiar with the device and the feel for the stimulation Note Once the mode is reset the intensity will be retu...

Page 27: ... put them under high temperature and direct sunshine 3 For protection of the electrode pads please always put it on to the electrode pads protector after use 4 Do not touch the gel of the pads by your figure or it may reduce the gel and lose its function 5 Do not clean the electrode pads with hot water or any chemical 6 If the electrode pads are dirty the adhesive power may decrease and the skin m...

Page 28: ...eep increasing the intensity up to a maximum of 99 until you feel the stimulation Moisturize the soles of your feet to improve conductivity and stimulation and try the procedure again You may also have to increase the intensity level Drink plenty of water before and after using the device The device uses your body to create the electrical circuit Water is an excellent conductor of electricity and ...

Page 29: ...pressing the MODE MODE button and increase intensity by pressing the FOOT BODY button Move the device out of the field until the stimulation becomes strong Therapy time is automatically fixed at 25 minutes Clean with the wet cloth then use again Clean the electrode pads Shut off the device and have the adapter checked by the manufacturer Shut off the device and only use the power supply recommende...

Page 30: ...l defects for one year from the day of purchase without any charge for accessory or maintenance provided that the product is used correctly as instructed in the operation and instructions 2 We charge for accessory cost only when the components are required to replace over 1 year and do not charge for maintenance 3 Please send the malfunction product to the manufacturer and we will pay immediate at...

Page 31: ... is as following drawings Its vertical height shall not be less than 5mm clearly visible clear durable the CE conformity assessment procedures are made by a Notified Body the Notified Body registration number should be the side of CE mark Usually in the bottom right The diameter of the CE marking should be not less than the 5MM semicircle of the two makes up the XXXX at the lower right corner is t...

Page 32: ...0601 1 2 2001 A1 2006 standard for both immunity and emissions The parameters of basic characteristics Power Source Method of Line Current Isolation Patient leakage current Average DC current through electrodes when device is on but no pulses are being applied Number of channels Number of modes Output Intensity Level Output Intensity Indicator Display Treatment Time and output specification Wavefo...

Page 33: ...t specified below The customer or the user of the Electrical Foot Massager and Nerve Stimulator should assure that it is used in such an environment The Electrical Foot Massager and Nerve Stimulator uses RF energy only for its internal function Therefore its RF emissions are very low and are not likely to cause any interference in nearby electronic equipment The Electrical Foot Massager and Nerve ...

Page 34: ...UT 95 dip in UT for 0 5 cycle 40 UT 60 dip in UT for 5 cycles 70 UT 30 dip in UT for 25 cycles 5 UT 95 dip in UT for 5s 5 UT 95 dip in UT for 0 5 cycle 40 UT 60 dip in UT for 5 cycles 70 UT 30 dip in UT for 25 cycles 5 UT 95 dip in UT for 5s Main power quality should be that of a typical commercial or hospital environment In case of main power down or failure the current of the Electrical Foot Mas...

Page 35: ...les than the recommended separation distance calculated from the equation applicable to the frequency of the transmitter Recommended separation distance Where P is the maximum output power rating of the transmitter in watts W according to the transmitter manufacturer and d is the recommended separation distance in meters m Field strengths from fixed RF transmitters as determined by an electromagne...

Page 36: ...n help prevent electromagnetic interference by maintaining a minimum distance between portable and mobile RF communications equipment transmitters and the Electrical Foot Massager and Nerve Stimulator as recommended below according to the maximum output power of the communications equipment Guidance and manufacturer s declaration electromagnetic immunity Recommended distances between portable and ...

Page 37: ...hours Transparent PET silicone Surface contacting device skin Maximum 25 minutes 24hours Foot Massage Roller ABS plastic Surface contacting device skin Maximum 45 minutes 24hours Unit Housing ABS plastic Surface contacting device skin Maximum 45 minutes 24hours Host keypads ABS plastic Surface contacting device skin Maximum 45 minutes 24hours The body contact is surface skin contact and the contac...

Page 38: ...Manufacturer SHENZHEN OSTO TECHNOLOGY COMPANY LIMITED ADD No 43 Longfeng Road Xinsheng Community Longgang Street Longgang District 518116 Shenzhen City Guangdong Province China Email osito_info 163 com ...

Reviews: