background image

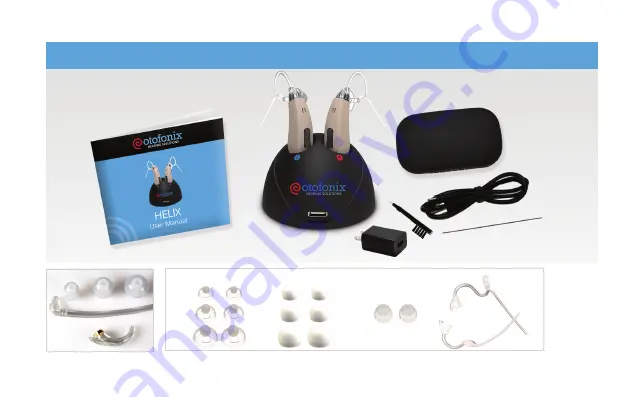
Earhook

Kit

What’s In the Box

Open Domes

Closed Domes

5

Magic Domes

Sound Tubes

Summary of Contents for HELIX

Page 1: ...User Manual ...

Page 2: ... I had no idea how much of life I was missing out on I can hear the birds chirping again on my daily walks outside I m amazed at the difference it has made Sally N ...

Page 3: ...guide and assist you with any questions you may have Please review this user guide to get the most out of your Helix hearing device For best results use the original charger and adapter Please feel free to reach out to us here at Otofonix for any FREE support at 704 380 0508 or Otofonix com Copyright 2021 Otofonix All rights reserved 1 ...

Page 4: ...allow for low frequency sounds to pass though the dome with minimal amplification and a more natural sound It eliminates the occlusion effect which is similar to putting your fingers in your ear and hearing yourself talk On the negative side open domes are the most prone to feedback whistling A Close Style Dome has no vent holes This allows the device to more aggressively boost the sound levels as...

Page 5: ...effect and reduces feedback making them more comfortable than the closed domes These domes are recommended for those with a mild to moderate hearing loss ZipTip domes are the best hybrid domes that we have found to date They provide a superb fit and use a single 3mm vent hole which reduces the occlusion effect while increasing amplification and providing for the most comfortable fit We highly reco...

Page 6: ... has been included in your package The Earhook and thicker tubing provides 6 8 dB of increased sound output Earhook Power Kit Attach Earhook to am plifier body Turn hook clockwise 3 4 rotations The Earhook should be flush with the amplifier body Insert ear dome onto thick tubing connector Assemble thick tube and dome ...

Page 7: ...Cut the tube at the marked line Push the cut end of the tube onto the Earhook Place the amplifier with the attached Earhook over the ear and the assembled thick tube with dome into the ear canal Trim the tube as illustrated and insert the cut end into the Earhook ...

Page 8: ...lly your brain will learn to turn down some sounds like crumpling paper while turning up the sounds you want to hear like conversations with loved ones The process can take up to 21 days to become fully adjusted to your new hearing device Start by first wearing them for 20 30 minutes at a time in a more private quiet setting Avoid noisy areas like restaurants at first Gradually start wearing your ...

Page 9: ...ning 16 Helpful Tips 18 Ordering Replacements 19 Table of Contents Using the Telephone 20 Protection Plan 21 Troubleshooting Your Hearing Device 22 If Sound is Distorted or Intermittent 23 If Device Makes a Whistling Sound 24 If Device has a Weak or No Sound 25 Warranty and Repairs 26 Return Policy 27 Warning to Hearing Aid Dispensers 28 Important Notice for Users 30 X ray MRT CT PET Scanning Elec...

Page 10: ...orite is available at waxBgone com 4 waxBgone is a Professional Grade Earwax Removal System Designed by a Board Certified ENT Physician What makes this product unique is the SoftSpray Irrigation Tip which makes ear wax irrigation safer more effective and more comfortable Irrigation is the safest in home method of removing ear wax Get 10 off with coupon code otofonix10 Please avoid using cotton swa...

Page 11: ...Earhook Kit What s In the Box Open Domes Closed Domes 5 Magic Domes Sound Tubes ...

Page 12: ...Dome Stabilizer Bar Microphone Microphone Multi Function Button Volume Control On Off Charging Indicator Light Volume Program Control Charging Port Sound Tube Features 6 ...

Page 13: ... Quick and thorough response to questions Very accessible and eager to provide excellent customer service So far pleased both with the product and the company Jonathan ...

Page 14: ...e Helix Step 2 Turn Helix On Step 3 Place On Ear Step 4 Volume Control 8 To Identify Left Right Helix Hold an aid upright in each hand with controls facing you The tips tubing point toward each other when in the correct hand Blue Characters Left Helix Right Helix Red Characters ...

Page 15: ...Solid BLUE light when charging Solid GREEN light when charged Voltage Status Indicator Step 1 How to Charge the Helix 9 ...

Page 16: ... L R Place your hearing device into the charging base Connect the adapter to the power Voltage Status Indicator Contact Point Charging Port L R Plug the small end of the cable into the charging port of the charging base Charger Assembly 1 2 3 4 10 ...

Page 17: ...ll shine blue when charging and it will shine green when both units are fully charged 3 Always turn off and put your hearing devices into the charging station when not in use 4 To extend the overall life of your battery DO NOT store your Helix for more than 1 month without charging Helpful Videos Check out our library of videos for helpful tips Otofonix com Resources Charger Information 11 ...

Page 18: ...y function which allows you time to put the device on your ear To POWER OFF press and Hold the upper portion of the rocker switch for about 3 seconds When the device is turned on it will flash green and when the device is turned off it will flash blue Turning Off Flashes Blue Turning On Flashes Green Step 2 How to Power On Off 12 ...

Page 19: ...ice behind the ear Tuck stabilizer bar into outer bowl of the ear so ear dome stays in place Insert ear dome into ear canal with gentle pressure until snugly seated in ear canal Step 3 How to Place on Your Ear 1 2 3 13 ...

Page 20: ...ch is used to control the volume level Press and quickly release the upper portion of the rocker switch to increase the volume while the lower portion reduces the volume As you increase decrease the volume you will hear a single beep that will indicate an increase or decrease in volume When you are at the lowest volume level and the highest volume level you will hear 3 beeps 14 ...

Page 21: ...en changing volume programs approach the device from behind your ear rather from the top Support the bottom of the device with thumb when pressing rocker switch Otofonix com Resources Videos Program Beeps Best For 1 Conversation 1 Beep Low noise reduction everyday listening quiet family time 2 Restaurant Directional MIC 2 Beeps Medium noise reduction conference or church 3 TV 3 Beeps Medium noise ...

Page 22: ... brush daily to clear ear dome of wax Clean sound tube often and anytime amplification stops or seems reduced Remove sound tube Turn base of tube counter clockwise and body of device clockwise Remove ear dome from sound tube by inverting ear dome and pulling straight off Insert wire through base of sound tube and pull out the opposite end 1 Care and Cleaning 2 3 4 16 ...

Page 23: ...er ear Only the thin sound tubing is ear specific Red markings under the stabilizer bar is for the right and the blue marking is for the left Tubing can be ordered at Otofonix com Reattach the sound tube Turn base of tube clockwise and body of device counter clockwise so it is flush with the body 5 6 17 ...

Page 24: ...ryer l Do not expose your Helix to excessive heat or moisture use a hearing aid dehumidifier each night if you live in a humid climate l Keep sound tubes and domes clean Even the smallest piece of ear wax can obstruct the sound tube and prevent sound from reaching your ear canal See page 16 17 for instructions on cleaning the sound tube with the included filament wire Helpful Tips 18 ...

Page 25: ...eaning your tubing and tips you should also replace them every three 3 months Over time these items wear out and may become stiff affecting both fit and sound quality Regular replacement will keep your Helix sounding and feeling like new Visit Otofonix com or call 704 380 0508 to order tips tubing and other accessories ...

Page 26: ...If whistling occurs while using the phone try various positions to align the phone s audio output and Helix s microphone until you find what works best for you Using the Telephone 20 ...

Page 27: ...covered by the standard Warranty water damage battery corrosion or stepping on the hearing amplifier Items not covered include Loss or theft of the amplifier and unauthorized repairs The damaged device must be returned to claim credit Accessories e g tubing domes etc are not included Protection Plan is only good for a one time replacement Protection Plan 21 ...

Page 28: ...o Sound Static or Hissing Turn Helix On 4 Adjust Volume 4 4 Charge Helix 4 4 4 Use Dehumidifier 4 4 4 Clean Tubing Tip 4 4 4 Clean Ear Canal 4 4 4 Change Tubing Tip 4 4 4 Please see the pages 22 25 for more detailed troubleshooting tips Troubleshooting Your Hearing Device 22 ...

Page 29: ...nd tube from Helix body and increase volume level to max volume If you hear feedback the Helix is working properly Clean the sound tube pg 16 l Clean the ear canal Replace the tubing tip if they appear worn For optimal performance tubing and tips should be replaced every three 3 months To order replacements and additional cleaning accessories visit Otofonix com or call 704 380 0508 If Sound is Dis...

Page 30: ...occurs when raising the volume you should try closed domes or ZipTips to reduce feedback and increase amplification l Wax or debris in ear canal or sound tube can cause whistling Clean tubing tip see page 16 17 and ear canal and replace tubing tip if they appear worn Please note When an object hand hat person wall etc comes close to your ear while wearing hearing aids you may experience whistling ...

Page 31: ...lix is charged If unsure turn Helix off and charge until blue light turns green Turn Helix back on l Remove tubing from see page 16 and increase volume to max volume If you hear feedback the Helix is working properly Clean the sound tube l Clean ear canal Replace tubing tip if they appear worn If you are still having difficulty please contact us at 704 380 0508 or Info otofonix com 25 ...

Page 32: ...re or sweat excessive wax build up or tampering with the device all of which void the warranty For added coverage see page 21 for the Otofonix Protection Plan If you require Warranty or Repair Service please contact us for a Return Merchandise Authorization RMA number and instructions For customer service please e mail us at info otofonix or call 704 380 0508 Monday to Friday 9 00 am to 5 30 pm ES...

Page 33: ...lude a Return Merchandise Authorization RMA number for proper process ing Products returned without an RMA number will incur a twenty percent 20 No RMA Fee To receive an RMA number and return instructions please call Customer Service 704 380 0508 Monday to Friday 9 00 am to 5 30 pm EST You must contact customer service for an RMA number before mailing Days From Invoice Amount Refunded With RMA Wit...

Page 34: ...of the following conditions Acute or chronic dizziness or vertigo Pain or discomfort in the ear Visible congenital or traumatic deformity of the ear History of active drainage from the ear within the previous 90 days History of sudden or rapidly progressive hearing loss within the previous 90 days Unilateral hearing loss hearing loss in both ears of sudden or recent onset within the previous 90 da...

Page 35: ...ed in selecting and fitting a hearing aid whose maximum sound pressure level exceeds 132 decibels because there may be a risk of impairing the remaining hearing of the user A hearing aid will not restore normal hearing or prevent or improve a hearing impairment resulting from organic conditions In most cases infrequent use of a hearing aid does not permit a user to fully benefit from it The use of...

Page 36: ...st or a hearing aid dispenser as appropriate for a hearing aid evaluation The audiologist or hearing aid dispenser will conduct a hearing aid evaluation to assess your ability to hear with and without a hearing aid The hearing aid evaluation will enable the audiologist or dispenser to select and fit a hearing aid to your individual needs If you have reservations about your ability to adapt to ampl...

Page 37: ...e your hearing devices in these types of situations to prevent any damage to them Explosion Hazard Under normal conditions hearing device batteries do not cause any fires Hearing devices were not tested for compliance with international standards in explosion conducive atmospheres Do not use your hearing devices in explosion hazard areas X ray MRT CT PET Scanning Electro therapy 31 ...

Page 38: ... 90 126 123 HFA OSPL 90 dB SPL 115 113 Peak Gain dB 43 38 HFA full on Gain dB 35 32 Total Harmonic Distort 4 e 500Hz 2 2 800Hz 2 2 1600Hz 2 2 EQ Input Noise dB 26 26 Battle 1 1 3 IEC118 7 2005 2CC Coupler Dimensions 1 02x 58x 29 inches 32 ...

Page 39: ... longer have to pretend to hear what others are saying and miss out on conversa tions with my family and friends Every word sounds crystal clear It s restored my confi dence and given me my life back Bill K ...

Page 40: ... 704 380 0508 Monday Friday 9 00am 5 30pm EST Info Otofonix com Otofonix com FREE Customer Support ...

Reviews: