All electrical connections must be performed by
a certified electrician following all national and
local codes and regulations.
Electrical Connections
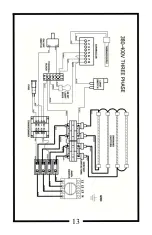
208-240 volt single phase units must be hardwired to your electrical
system utilizing an external circuit breaker and shut off mounted as
close as possible to the oven.
380-400 volt 3 phase units are provided with a 16A-6h plug and 8’ of
VDE rated cord. The oven must be connected to an external circuit
breaker and shut off mounted as close as possible to the oven.
7
External Circuit Breaker and Shut Off Required
208-240 Volt Single Phase
Oven
Model
Actual
Amperage
Recommended
Circuit Breaker
5A 6B
20 Amp
30 Amp
7C
23 Amp
30 Amp
8D-2
59 Amp
70 Amp
8E
39 Amp
50 Amp
380-400 Volt Three Phase
Oven
Model
Actual Amperage
Per Phase
Recommended
Circuit Breaker
5A 6B
8 Amp
Check
7C
9 Amp
Local and
8D-2
23 Amp
National
8E
16 Amp
Regulations
8
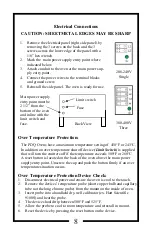
1. Remove the electrical panel (right side panel) by
removing the 3 screws on the back and the 3
screws across the lower edge of the panel with a
1/8” hex wrench
2. Mark the main power supply entry point where
indicated below.
3. Attach conduit to the oven at the main power sup-
ply entry point.
4. Connect the power wires to the terminal blocks
and ground screw.
5. Reinstall the side panel. The oven is ready for use.
CAUTION: SHEETMETAL EDGES MAY BE SHARP
Electrical Connections
Main power supply
entry point must be
2 1/2” from the
bottom of the oven
and inline with the
limit switch and
fuse.
Limit switch
Fuse
Back View
The PDQ Ovens have a maximum temperature setting of 450°F or 243°C.
In addition an over temperature shut off device
(Limit Switch)
is supplied
that will turn the emitters off if the temperature exceeds 500°F or 260°C.
A reset button is located on the back of the oven above the main power
supply entry point. Unscrew the cap and push the button firmly if an over
temperature situation occurs.
Over Temperature Protection:
Over Temperature Protection Device Check:
1. Disconnect electrical power and ensure the oven is cool to the touch.
2. Remove the devices’ temperature probe (short copper bulb and capillary
tube not the long chrome probe) from the mount on the inside of oven.
3. Insert probe into a handheld dry-well calibrator (ex. Hart Scientific
9100S) and heat the probe.
4. The device should trip between 500°F and 525°F.
5. Allow the probe to cool to room temperature and reinstall in mount.
6. Reset the device by pressing the reset button on the device.
208-240V
Single
380-400V
Three

