Oven Setup
5
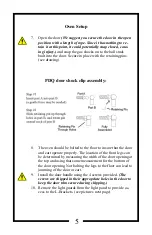
7. Open the door
(We suggest you secure the door in the open
position with a length of rope. Since it has nothing to re-
tain it at this point, it could potentially snap closed, caus-
ing injury.)
and snap the gas shocks on to the ball studs
built into the door. Secure in place with the retaining pins.
(see drawing)
PDQ door shock clip assembly:
8. The oven should be bolted to the floor to insure that the door
and cart operate properly. The location of the front legs can
be determined by measuring the width of the door opening at
the top and using that same measurement for the bottom of
the door opening. Not bolting the legs to the floor can lead to
jamming of the door or cart.
9. Install the door handle using the 4 screws provided.
(The
screws are shipped in their appropriate holes in the door to
keep the door trim secure during shipping.)
10. Remove the light guards from the light panel to provide ac-
cess to the L-Brackets. (see pictures next page)
10
Oven Controls Operation
The
TEMPERATURE CONTROLLER
is located on the control panel on
the front of the oven. To set the temperature of the oven, press and hold the
left hand (
) button and either increase the set point using the right hand
(▲) button, or decrease the set point using the middle (▼) button.
Routine adjustments
View set point
▲ Increase set point
▼ Decrease set point
The
MAIN SWITCH
is located on the control
panel on the front of the oven. Rotate the knob to
the ON position to enable oven use.
OFF
ON
380-400 Volt Ovens:
The
OVEN CONTROL SWITCH
is located on
the control panel on the front of the oven. Rotate
the knob to the
ON
position to enable oven use.
208-240 and 380-400 Volt Ovens:
OFF
ON
The
FAN CONTROL KNOB
is located on the
control panel on the front of the oven. Rotate the
knob all the way to the left to turn the fan OFF and
gradually rotate the knob to the right until the de-
sired fan speed is achieved.

