EN-3
8800-1209 Rev B.
Search terms: Sutron Linkcomm
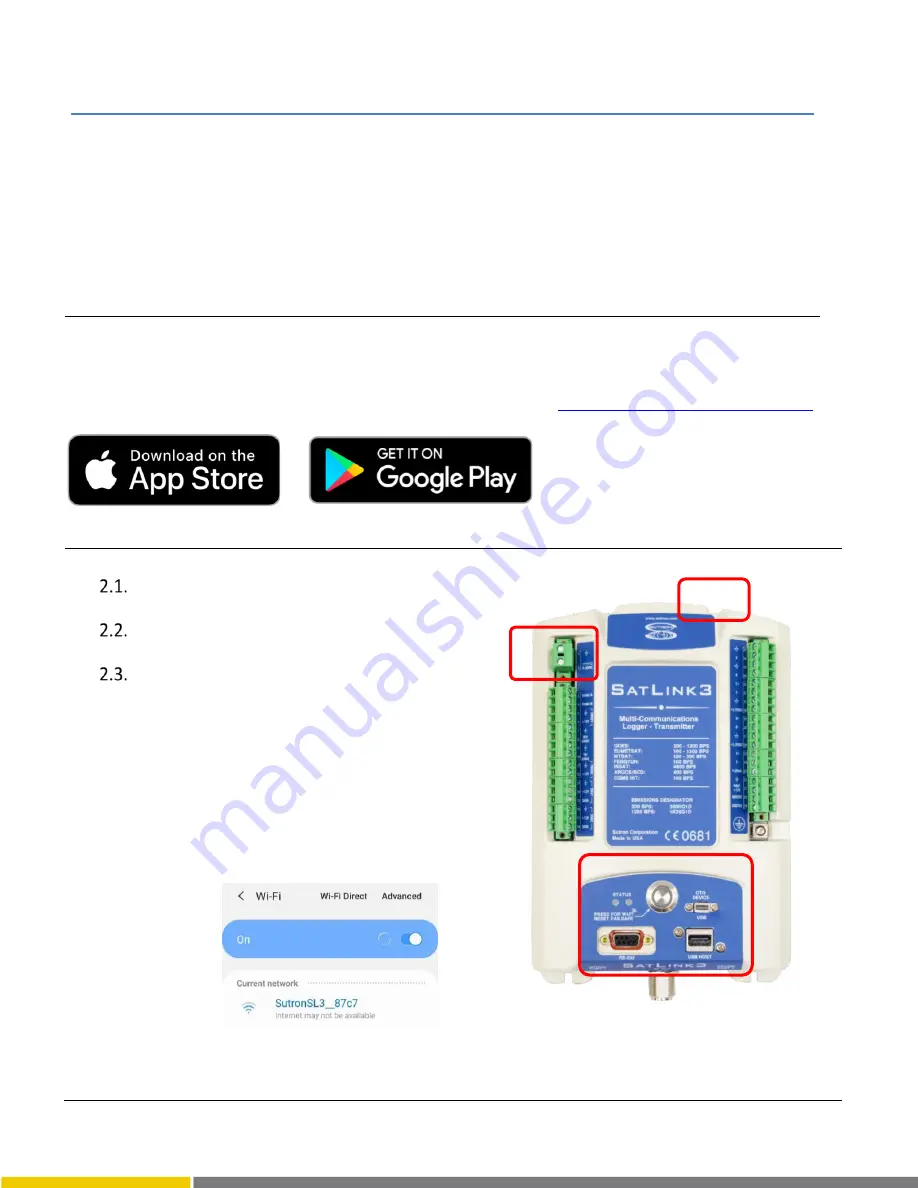
2. Prepare Connection to SATLINK 3
Connect GPS:
Connect the GPS antenna to the
GPS port on SATLINK 3.
Connect power:
Connect a battery or power
source (9
–
20 VDC) across terminals 1 and 2
Connect to a PC via USB, or RS-232, or Wi-Fi:
1.
USB
- A micro USB cable between PC and (1)
“
OTG Device
” port on
SL3-1, or (2)
“USB” port on
SL3-LITE or SL3-XMTR-1.
2.
RS-232
–
A DB9 cable between PC and RS-232
port on SATLINK 3.
3.
Wi-Fi
–
Press the Wi-Fi button on the unit to turn
on SATLINK 3 hotspot; On the PC, select the Wi-Fi
network from Network Connections.
Note: SatLink
3 will name its hotspot SL3_xxxx_aaaa, where xxxx is the
station name, and aaaa is a unique number.
Android and Google Play are registered trademarks of Google LLC
Apple, App Store and OS X are trademarks of Apple Inc., registered in the U.S. and other countries
.
SATLINK 3 Quick Start Guide
In this guide, SATLINK 3 refers to any variant within the product family, unless otherwise stated.
This quick start guide will show steps on how to
•
Install LinkComm software
•
Connect SATLINK 3 to a PC
•
Connect an example SDI-12 sensor such as Lufft WS400-UMB sensor
•
Setup measurement intervals and transmission content
•
Setup transmissions on GOES satellite
1. Install LinkCOMM Software
Android™: App is available on
Google Play™
Apple®: download from
Apple App Store®
PC or Mac OS X®: download from
www.sutron.com/product/linkcomm/
Note
: For Windows 7, install the
driver from LinkComm menu.
Newer versions of Windows do not
require the driver.
2.1
2.2
2.3


