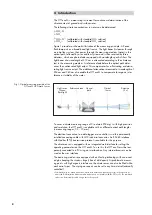
8 Maintenance
8.1 Cleaning the OTT ecoN
Recommended interval: every 12 months
With problematic local measuring point conditions
(organic interference or water turbidity):
Every 4 to 6 months as required. Tip: After initial instal-
lation, check the sensor at short intervals and adjust the
cleaning interval according to specific requirements.
Required equipment:
soft brush, sponge
mild soap solution
if required: Citric /acetic acid solution (10 %)
if required: Oxalic /ascorbic acid solution (5 %)
lint free cloth / paper cloth / optical wipe
Acetone
Ultra pure water
Risk of damage to the OTT ecoN
Do not use any chemicals other than those specified here.
Do not use abrasive cleaning agents or objects.
Clean the measuring window with the utmost care.
Protect the M12 socket on the connecting cable from moisture!
CAUTION Risk of injury to the skin/eyes/respiratory system due to acetone
and acids
Improper handling of acetone and acid can lead to
minor
to
moderately
severe injuries
, particularly damage to
– Skin: Dryness (acetone: degreasing effect) skin changes, skin damage,
chemical burns;
– Eyes: Cornea damage, irritation, chemical burns;
– Respiratory system (inhalation): Irritation, fatigue, headaches, dizziness, nau-
sea/vomiting, acetone in higher doses has an anaesthetic effect
Wear laboratory gloves and protective goggles to perform cleaning.
Ensure adequate ventilation and do not inhale acetone vapour!
Uninstall the OTT ecoN.
Clear adherent dirt: Soak the OTT ecoN in a mild soap solution for several
hours.
If required: Remove any residual dirt with a soft sponge or brush.
For lime scale deposits: Place the OTT ecoN in a 10 % citric acid or acetic acid
solution for approx. 15 ... 30 minutes.
For brown deposits (iron or manganese oxide): Place the OTT ecoN in a 5 %
oxalic acid or 10 % ascorbic acid solution for approx. 15 ... 30 minutes.
Thoroughly rinse the OTT ecoN with tap water.
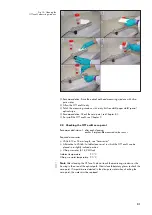
Clean the measuring windows: Soak a lint free cloth/paper cloth/special opti-
cal wipe with a few drops of acetone (see "Accessories") and carefully wipe off
both measuring windows; see Figure 10.
20


