>
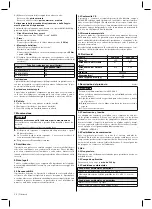
Recommended tools and materials:
710D4 torque wrench, 719R3 tube cutter, 718R1 tube deburrer,
degreasing cleaning agent (e.g. 634A3 Acetone)
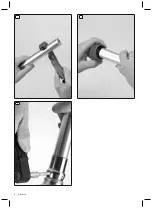
1) Use the tube cutter to shorten the tube according to the patient's
measurements.
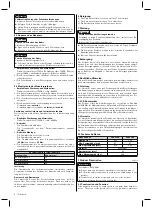
2) Deburr the inside and outside of the cut edge with the tube debur
rer.
5.2 Installation in the modular prosthesis
>
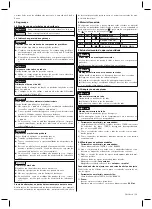
Recommended tools and materials:
710D4 torque wrench, 636K13 Loctite®
1) Connect the connecting component to the tube adapter as
described in the connecting component's instructions for use.
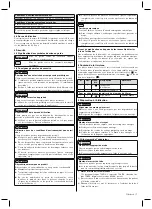
2) Position the pyramid receiver of the tube adapter distally in the
prosthesis.
3) Align the clamping slot of one tube clamp adapter:
Tube clamp adapter:
anterior
Tube clamp adapter, sliding:
anterior
or
medial
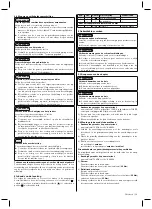
Connecting the pyramid adapter and pyramid receiver
The pyramid adapter is fixed with the set screws of the pyramid receiv
er.
>
Required tools and materials:
710D4 torque wrench, 636K13 Loctite®
1)
Trial fitting:
Screw in the set screws.
Use the torque wrench to tighten the set screws (
10 Nm
).
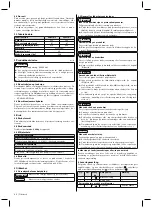
2)
Definitive mounting:
Use Loctite® to secure the set screws.
Screw in the set screws.
Pre-tighten the set screws with the torque wrench (
10 Nm
) and
then tighten them (
15 Nm
)
3) Replace any set screws that are protruding or recessed too much
with suitable ones (see selection table).
Selection table for set screws
Reference number
Length (mm)
506G3=M8X12-V
12
506G3=M8X14
14
506G3=M8X16
16
Alignment
The set screws in the pyramid receiver can be used to make static
adjustments during alignment, trial fittings and after the prosthesis is
finished.
Replacement and disassembly
The set position of the prosthetic component can be maintained dur
ing replacement or disassembly. In order to do this, unscrew the two
set screws that are screwed in the furthest and located next to each
other.
6 Cleaning
1) Clean the product with a damp, soft cloth.
2) Dry the product with a soft cloth.
3) Allow to air dry in order to remove residual moisture.
7 Maintenance
CAUTION
Failure to follow the maintenance instructions
Injuries due to changes in or loss of functionality and damage to the
product
►
Observe the maintenance instructions.
►
The prosthetic components should be inspected after the first 30
days of use.
►
Inspect the entire prosthesis for wear during normal consultations.
►
Conduct annual safety inspections.
8 Disposal
This product may not be disposed of with regular domestic waste in
all jurisdictions. Disposal that is not in accordance with the regula
tions of the country where the product is used may have a detrimental
impact on health and the environment. Please observe the information
provided by the responsible authorities in the country of use regarding
return, collection and disposal procedures.
6 | Ottobock
9 Legal Information
All legal conditions are subject to the respective national laws of the
country of use and may vary accordingly.
9.1 Liability
The manufacturer will only assume liability if the product is used in
accordance with the descriptions and instructions provided in this
document. The manufacturer will not assume liability for damage
caused by disregard of this document, particularly due to improper
use or unauthorised modification of the product.
9.2 CE Conformity
This product meets the requirements of the European Directive 93/42/
EEC for medical devices. This product has been classified as a class I
device according to the classification criteria outlined in Annex IX of
the directive. The declaration of conformity was therefore created by
the manufacturer with sole responsibility according to Annex VII of the
directive.
9.3 Warranty
The manufacturer warrants this device from the date of purchase. The
warranty covers defects that can be proven to be a direct result of
flaws in the material, production or construction and that are reported
to the manufacturer within the warranty period.
Further information on the warranty terms and conditions can be
obtained from the competent manufacturer distribution company.
10 Technical data
Reference number
2R49=AL
2R50=AL
Weight [g]
255
155
Min. system height [mm]
97
97
Max. system height [mm]
472
232
Material
Aluminium
Diameter [mm]
30
Max. body weight [kg]
136
1 Description du produit
Français
INFORMATION
Date de la dernière mise à jour : 2015-04-21
►
Veuillez lire attentivement l’intégralité de ce document avant
d’utiliser le produit.
►
Respectez les consignes de sécurité afin d’éviter toute blessure
et endommagement du produit.
►
Apprenez à l’utilisateur à bien utiliser son produit et informez-le
des consignes de sécurité.
►
Conservez ce document.
1.1 Conception et fonctionnement
Les adaptateurs tubulaires sont utilisés comme composants pour les
prothèses de jambe modulaires. Ils relient le pied prothétique aux
composants proximaux. Des associations d’adaptateurs permettent de
procéder à des réglages contrôlés des angles et des mouvements de
translation sur les plans sagittaux et frontaux et d’ajuster la rotation in
terne et externe. Les présentes instructions d’utilisation s’appliquent
aux adaptateurs tubulaires suivants :
•
2R49=AL, 2R50=AL
1.2 Combinaisons possibles
Ce composant prothétique fait partie du système modulaire Ottobock.
Selon sa construction, il peut être associé à d’autres composants pro
thétiques du système modulaire. Les éventuelles restrictions sont indi
quées dans ce chapitre. En cas de questions, contactez le fabricant.
2 Utilisation
2.1 Usage prévu
Le produit est exclusivement destiné à l’appareillage prothétique des
membres inférieurs.
2.2 Domaine d’application
Admis pour les patients dont le poids
n’excède pas 136 kg
.
2.3 Conditions d’environnement
Conditions d’environnement autorisées
Plage de température de fonctionnement -10°C à +60°C
Summary of Contents for 2R49 AL
Page 2: ...1 2 3 2 Ottobock...


