background image

11

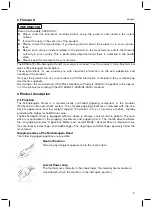
3)  (

see fig. 5

) If extra reinforcement is required, use double-sided adhesive tape to affix carbon

fibre cloth to the first layer of the Perlon stockinette as a frame structure.

4)  Pull the second layer of Perlon stockinette downwards over the carbon fibre cloth.

Check whether the Perlon stockinette is still in the proximal groove.

5)  Cut off 2 double-length layers of Perlon stockinette once more.
6)  Turn the Perlon stockinette inside out.
7)  (

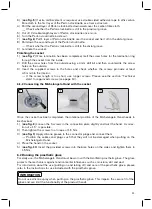
see fig. 6

) Pull 1 layer of Perlon stockinette over the socket and tie it off in the distal groove.

8)  Pull down the second layer of the Perlon stockinette.

Check whether the Perlon stockinette is still in the distal groove.

9)  Laminate the socket.

Finishing the socket

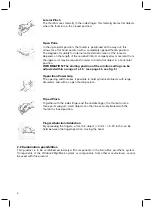
1)  (

see fig. 7

) Once lamination has been completed, melt the screw holes for the lamination ring

through the socket from the inside.

2)  Drill the screw holes from the outside using a 4 mm drill bit and then countersink the screw

holes on the outside.

3)  Insert  the  supplied  screws  in  the  holes  and  check  whether  the  screws  protrude  at  least

4.5 mm into the interior. 

If  the  screw  length  is  too  short,  use  longer  screws.  Please  see  the  section  "Technical
data" for approved screws (see page 13).

6.1.2 Connecting the Michelangelo Hand with the socket

8

9

10

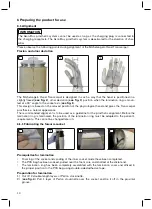
Once the socket has been completed, the rotational position of the Michelangelo Hand needs to
be checked. 
1)  (

see fig. 8

) Loosen the 5 screws in the connection plate slightly and twist the hand. A correc­

tion of ± 15 ° is possible.

2)  Then tighten the screws to a torque of 1.5 Nm.
3)  (

see fig. 9

) Apply silicone grease to the connector plugs and connect them.

Position  the  cables  and  plugs  such  that  they  will  not  be  damaged  when  putting  on  the
Michelangelo Hand.

4)  Place the hand on the socket. 
5)  (

see fig. 10

) Insert the provided screws into the bore holes on the sides and tighten them to

1.5 Nm.

6.2 Donning the prosthetic glove

For daily use, the Michelangelo Hand must be worn with the AxonSkin prosthetic glove. The glove
protects the mechanism against environmental influences such as moisture, dirt and dust.
For information about the use (putting on and taking off) and care of the prosthetic glove, please
refer to the instructions for use included with the prosthetic glove.

INFORMATION

Do not use silicone spray when putting on the prosthetic glove. This impairs the secure fit of the
glove and can limit the functionality of the product (hand).

Summary of Contents for Michelangelo Hand Transcarpal 8E550

Page 1: ...Instructions for use qualified personnel 3 Michelangelo Hand Transcarpal 8E550...

Page 2: ...2...

Page 3: ...GmbH the patient is the operat or of the product according to the IEC 60601 1 2005 A1 2012 standard 2 Product description 2 1 Function The Michelangelo Hand is a myoelectrically controlled gripping c...

Page 4: ...on setting can be adjusted within a range of 15 see page 11 see fig 8 Opposition Power Grip The opening width makes it possible to hold cylindrical objects with large diameters and with an open thumb...

Page 5: ...in the case of dysmelia of the forearm The patient must fulfil the physical and mental requirements for perceiving visual acoustic sig nals and or mechanical vibrations 3 4 Contraindications All cond...

Page 6: ...not open the power supply unit adapter plug or battery charger Do not expose the power supply unit adapter plug or battery charger to extreme loading conditions Immediately replace damaged power supp...

Page 7: ...to unexpected product behaviour Participation in an Ottobock product training course is mandatory prior to using the product During this product training course you will receive a password giving you...

Page 8: ...mperature range see page 13 CAUTION Penetration of dirt and moisture in the Axon Bus components Injury due to faulty control or malfunction of the Axon Bus prosthetic system Ensure that neither solid...

Page 9: ...rging plug on credit cards diskettes audio or video cassettes 5 Scope of Delivery and Accessories 5 1 Scope of delivery 1 pc 8E550 L R M Michelangelo Hand Transcarpal 1 pc 10S550 M lamination ring Inc...

Page 10: ...nd and gives the Transcarpal prosthesis a natural appearance The recommended alignment is to be used as a guideline for the prosthetic alignment Before the lamination ring is laminated the position of...

Page 11: ...o short use longer screws Please see the section Technical data for approved screws see page 13 6 1 2 Connecting the Michelangelo Hand with the socket 8 9 10 Once the socket has been completed the rot...

Page 12: ...riod This is the only way to maintain full warranty cover Additional services such as repairs may be provided in the course of maintenance These addi tional services may be provided free of charge or...

Page 13: ...on Reference number 8E550 L M or 8E550 R M Opening width 120 mm 4 72 inch Weight of Michelangelo Hand without prosthet ic glove approx 460 g 16 oz Length 12 mm in scope of delivery Length 14 mm in sco...

Page 14: ...authority pertaining to return and collec tion Declaration of conformity according to the applicable European directives Serial number YYYY WW NNN YYYY year of manufacture WW week of manufacture NNN s...

Page 15: ...15...

Page 16: ...th Korea KR 101 131 692 KR 101 169 834 KR 101 178 679 KR 101 178 646 USA US 7 867 287 US 8 016 969 US 8 257 446 US 8 188 835 US 8 579 991 Patents pending in Australia Brazil Canada China EPA Germany I...

Reviews: