background image

19 

n

ESSENTIAL INFORMATION 


Please read instructions before using your barbecue. 


BEFORE YOU USE YOUR BARBECUE (also see installation)


• 

Perform a leak test. This is the only safe and sure way to detect any gas leaking from joints and 
connections of the barbecue after assembly. Follow the leak test instructions. Check that the gas hose is 
free of any tension, twisting, cuts, or cracks. 

• 

Make sure your barbecue is in a safe place. It must be outdoors, on level ground and not below ground 
level. Ensure that the barbecue is at least 1 meter away from any flammable materials, including trees and 
fences and that there are no heat sources near the barbecue (cigarettes, open flames, spark etc.) 

• 

Check that you have the correct gas bottle and regulator for your barbecue (see recommendations in the 
Gas and Regulator section of this manual) and that the gas bottle is placed correctly in the gas bottle 
holder provided.  Never place the gas bottle directly underneath the barbecue.  


GETTING STARTED (also see operation)


• 

Open the hood of your barbecue. Never light your barbecue with the hood closed. Turn the gas regulator or 
gas bottle valve to the “On” Position. Push in the control knob of the burner you want to light and turn it anti 
clockwise until resistance is met. Wait 4 seconds and then continue turning the control knob until a click is 
heard. If the burner does not light, turn of the gas by pushing and holding in the control knob at the High 
position and turning to “Off”. The lighting sequence can then be repeated 4-5 times until the burner is lit. 
Ignite any of the remaining burners in any order, as needed. Confirm each burner is lit before igniting another 
burner. If any burner fails to ignite after following the above procedure, turn all the knobs to the “Off” position. 
Shut the gas off at the gas bottle or regulator. Wait 5 minutes before reattempting the above lighting 
procedure. If the barbecue still fails to light, please refer to the manual lighting instructions. 


• 

Once the burners are lit, turn all the burners to the high setting for 3-5 minutes to pre-heat the barbecue. This 
should be done before each session. When pre-heating is complete, cooking can begin taking extra care if 
the burners are used in the high position. 

• 

To prevent food sticking we recommend that you use a long handled brush to apply a light coat of cooking oil 
to the grills and griddles before each barbecue session. 

• 

Side Burner - Open the lid of the side burner. Never light the side burner with the lid closed. Turn the gas 
regulator or gas bottle valve to the ‘on’ position. Push the side burner control knob in and turn it to the high 
position. Push and hold in the igniter button in the centre of the control panel for 4 to 5 seconds to light the 
burner. IF THE BURNER FAILS TO LIGHT, TURN OFF THE GAS AT THE BURNER, WAIT 5 MINUTES 
AND TRY AGAIN. If the burner cannot be lit using the ignition system, turn to the manual lighting instructions. 

• 

If a fat fire should occur during cooking, and if safe to do so, turn off the burners and the gas at the gas bottle 
and wait for the fire to go out.  Do not pull out the drip tray or douse with water. 

• 

Never douse a barbecue with water.  

• 

Never move a barbecue when lit.  

• 

Never leave a lit barbecue unattended 

• 

Never handle hot parts with unprotected hands 

• 

Keep children, animals, and elderly people a safe distance from a lit barbecue. 


WHEN YOU HAVE FINISHED COOKING (also see Maintenance) 


• 

Turn all the burners to the high position for 3 to 5 minutes to burn off any food residue from the cooking 
surfaces and burners. When the barbecue has cooled, the burnt residue can be removed from the grills, 
griddle and flame tamers using a plastic scraper or plastic scouring pad. A brass wire brush can be used 
on the burners. 

• 

When the barbecue has cooled, scrape away any food and fat residue from the drip tray and discard.  
Empty and clean the Foil Liner. These routines must be completed after each session. 


STORAGE 


• 

Ensure the barbecue is properly cooled. 

• 

Always disconnect the gas bottle and store it in a safe place, never store a gas bottle indoors or on its side. 

• 

Store the barbecue in a cool dry place. The detachable side shelf can be removed to save space during 
storage. 

Summary of Contents for Excelsior 3

Page 1: ...Any modification of the appliance misuse or failure to follow the instructions may be dangerous and will invalidate your warranty This does not affect your statutory rights Retain these instructions for future reference Leak test your barbecue annually Check the hose connections are tight and leak test each time you reconnect the gas bottle FOR YOUR SAFETY If you smell gas 1 Shut off gas to the ap...

Page 2: ...ht Insert 1 C8 Left Front Leg 1 C9 Left Rear Leg 1 C10 Right Front Leg 1 C11 Right Rear Leg 1 C12 Bottom Slat Assembly 1 C13 Base Tray 1 C14 Gas Bottle Holder 1 C15 Trolley Foot 1 C16 Hubcap 2 C17 Wheel 2 C18 Axle 1 C19 Retaining Rod 1 C20 Gas Bottle Strap 1 C21 Side Shelf Hook 2 C22 Fixing Bracket 2 C23 Side Burner Grid 1 HARDWARE D1 M4x15 Bolt 4 D2 M5x15 Bolt 4 D3 Ø5 Washer 4 D4 M5 Nut 4 D5 M6x1...

Page 3: ... Specifications subject to change without prior notice For more details on hardware please see Hardware Reference Diagram B8 C2 B3 B4 B5 B2 C3 C5 C4 C1 A2 C12 B11 B9 C15 C14 C16 C17 D9 C18 C9 C8 C11 C20 C19 C7 C10 A4 A3 B1 C13 C21 B12 C22 B6 B7 B10 A1 C23 C6 B13 ...

Page 4: ...4 Hardware Reference Diagram Specifications subject to change without prior notice D1 D5 D2 D3 D4 D5 D6 D7 D8 ...

Page 5: ... body The inlet connection of the gas rail assembly on the BBQ body is lower than the body You must never allow the pipe to rest on the ground during assembly as serious damage could result We recommend the body is left sitting in the box until required for assembly to trolley Whilst every care is taken in the manufacture of this product care must be taken during assembly in case sharp edges are p...

Page 6: ...6 Attach the Bottom Slat Assembly C12 to the Base Tray C13 using the M6x15 Bolts D5 Attach the leg assembly to the Base Tray C13 using the M6x15 Bolts D5 4 3 ...

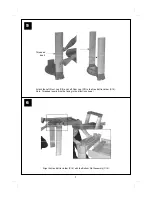
Page 7: ...Gas Bottle Holder C14 with the Bottom Slat Assembly C12 Attach the Left Front Leg C8 and Left Rear Leg C9 to the Gas Bottle Holder C14 Note Threaded inserts must be facing in the direction shown Threaded Insert 6 5 ...

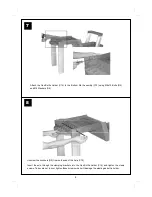
Page 8: ... both ends of the Axle C19 Insert the axle through the clamping brackets into the Gas Bottle Holder C14 and tighten the clamp screws Take care not to over tighten these screws which will damage the plastic gas bottle holder 8 7 Attach the Gas Bottle Holder C14 to the Bottom Slat Assembly C12 using M6x15 Bolts D5 and Ø6 Washers D6 ...

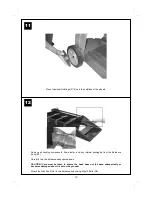
Page 9: ...9 Slide the Wheels C17 over each end of the axle Secure the wheels into place with the locknuts 10 9 Carefully turn the completed trolley over right side up ...

Page 10: ...refully turn the barbecue body upside down CAUTION Care must be taken to ensure the hood does not fall open unexpectedly or becomes damaged when it is set on the ground Attach the Side Shelf C6 to the barbecue body using M6x15 Bolts D5 12 11 Place the wheel Hubcaps C16 onto the outsides of the wheels ...

Page 11: ...11 Attach the Rear Left Endcap C4 to barbecue body using the M6x15 Bolts D5 14 13 Attach the Front Left Endcap C3 to barbecue body using the M6x15 Bolts D5 ...

Page 12: ...ble to stand on its own weight WARNING DO NOT RELEASE THE BARBECUE BODY WHILE THE BARBECUE HAS NOT BEEN PROPERLY SEATED THIS MAY RESULT IN INJURY OR DAMAGE TO YOUR BARBECUE 16 15 Carefully turn the Barbecue Body B1 over right side up CAUTION Care must be taken to ensure the hood does not fall open unexpectedly or becomes damaged when it is set on the ground ...

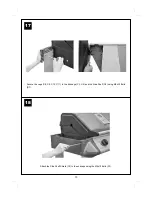
Page 13: ...13 Attach the Side Shelf Shield C2 to the endcaps using the M4x15 Bolts D1 18 17 Secure the Legs C8 C9 C10 C11 to the Endcaps C3 C4 and the Side Shelf C6 using M6x35 Bolts D7 ...

Page 14: ... 20 19 Attach the Side Shelf Hook C21 to the Side Burner Shelf C1 using the 1 4 20UNCx12 Bolts D8 Hook the side burner shelf to the endcaps Unscrew the retaining screws loosen the pre assembled Fixing Brackets C22 Hook the brackets to the barbecue side shelf shield retighten the screws ...

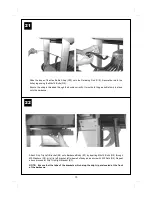
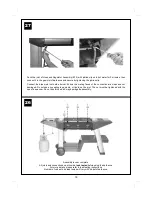
Page 15: ...e process for Drip Trip Right Bracket B7 NOTE Ensure that the tabs of the brackets which stop the drip trip are located at the front of the barbecue Slide the loops of the Gas Bottle Strap C20 onto the Retaining Rod C19 Secure the rod to the trolley legs using the M6x15 Bolts D5 Ensure the strap is threaded through the buckle correctly It must hold the gas bottle firmly in place onto the barbecue ...

Page 16: ...y Lay the Grills B9 B10 and Griddle B11 into place 3 burner model configuration Left Large Cooking Grill Middle Small Cooking Grill Right Small Griddle Plate NOTE Ensure that the flame tamer lies directly underneath the grills 23 24 Insert the Drip Tray B5 by sliding it underneath the barbecue body ...

Page 17: ...r Grid C23 onto side burner shelf as shown Insert the Warming Rack B13 into the hood and barbecue body Make sure that the swing legs fix to the body of the barbecue and the shorter fixed legs go through the holes in the hood 26 ...

Page 18: ...ing faces of the connection are clean and not damaged Do not use any sealing tape paste or liquid on the joint The nut must be tightened with the use of a spanner Do not use force which may damage the assembly Assembly is now complete All joints and connections must now be leak tested before using the barbecue For more details please refer to leak testing instructions Number of valves to be leak t...

Page 19: ... lit turn all the burners to the high setting for 3 5 minutes to pre heat the barbecue This should be done before each session When pre heating is complete cooking can begin taking extra care if the burners are used in the high position To prevent food sticking we recommend that you use a long handled brush to apply a light coat of cooking oil to the grills and griddles before each barbecue sessio...

Page 20: ...test each time you reconnect the gas bottle Always turn off the gas at the gas bottle when not in use Do not use aerosols near this barbecue GAS REGULATOR AND HOSE This barbecue hose and regulator if included are approved for use in the UK The barbecue is also approved for use in other countries as listed on the control panel and in the Technical Specifications included in the barbecue manual If t...

Page 21: ... than 50 of the cooking area as a solid plate this includes baking dishes If more than 50 of your cooking area is covered by a solid cooking surface the barbecue could overheat causing damage that is not covered by warranty Grill cooking The burners heat the flame tamer beneath the grill that in turn heats the food The natural juices produced during cooking fall onto the flame tamer and vaporise t...

Page 22: ...ing care to protect yourself from flames When the burner is lit turn the remaining burners from right to left Confirm that each burner is lit before turning on the next burner To light the side burner place the lighted end of a long match alongside the side burner Push and turn the side burner control knob anti clockwise to the high position taking care to protect yourself from flames If the right...

Page 23: ...a regular basis in addition to the following conditions Bringing the barbecue out of storage One or more of the burners do not ignite The burner flame pattern is significantly yellow The gas ignites behind the control panel To clean a burner remove it from the barbecue The outside of the burner can be cleaned with a wire brush Clean the portholes with a pipe cleaner or piece of wire Take care not ...

Page 24: ... required To prevent rusting wipe with cooking oil after rinsing and drying Wood Shelves and Wipe with a cloth wrung out in hot soapy water and dry shelf inserts Plastic Trolley excluding Wipe with a cloth wrung out in hot soapy water and dry Paint wooden shelving Excess fat and food debris can be removed from inside the Body body using a plastic or wooden scraper Do not use abrasives If rust appe...

Page 25: ...e in line with the burner with a gap of 3 to 4mm between the end of the electrode and the tag on the end of the collector box Realign the collector box as required Burner will not light LP gas bottle is empty Replace withfull gas bottle with a match Faulty regulator Have regulator checked or replace Obstructions in burners Clean burners Obstructions in gas jets Clean jets and gas hose or gas hose ...

Page 26: ...tback Excelsior 3 Burner 0359 359BR665 11 88kW 3 1 05mm 1 05mm 0 99mm 0 91mm Outback Excelsior 6 Burner 0359 359BR665 15 84kW 6 0 81mm 0 81mm 0 74mm 0 71mm Side Burner 0359 359BR665 2 5kW 1 0 80mm 0 80mm 0 74mm 0 69mm Gas Consumption Excelsior 3 Burner 855g hr Excelsior 6 Burner 1153g hr Side Burner 180g hr Countries of Use I3 28 30 37 BE CH CY CZ ES FR GB GR IE IT LT LU LV PT SK SI I3B P 30 BE CY...

Page 27: ... not been used for trade professional or hire purposes The product has not been subjected to misuse or neglect including fat fires and flare ups or use of a faulty or incorrect regulator The product has not sustained damage through foreign objects substances or accidents The care and maintenance instructions given in your Outback manual have been followed This warranty is offered as an extra benef...

Reviews: