background image

16

TO TURN OFF THE HEATER

1. Turn the variable control knob to PILOT position. 
2. Press and turn the variable control knob to OFF position.

3. Turn off the valve on the gas supply cylinder completely. 

Storage
1. Always close the gas valve of the gas cylinder after use or in case of a 
disturbance. 
2. Remove the pressure controller and the hose.
3. Check the tightness of the gas valve and for damage. If you suspect a damage, 
have it changed by your gas dealer. 
4. Never store liquid gas cylinder in a sub-terrain, or at places without adequate 
air ventilation.

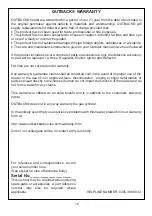
OFF:  the heater stop work
HI:   maximum temperature position
LO:   minimum temperature position
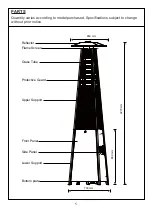
lgniter

Igniter

Variable control knob

Summary of Contents for OUT370665/PH300

Page 1: ...sh any open flame 3 If odor continues immediately call your gas supplier or your fire Department FOR YOUR SAFETY 1 Do not store or use gasoline or other flammable vapors and liquids in the vicinity of...

Page 2: ...must be installed and the gas cylinder stored in accordance with the regulations in force x Do not obstruct the ventilation holes of the cylinder housing x Do not move the appliance when in operation...

Page 3: ...Black Silicone Ring Side Panel Front Panel Block Belt Lower Support Control Box Assy Gas Hose Wheel Assembly Bottom Plate N O I T P I R C S E D T R A P Y T I T N A U Q 1 Flame Screen 1 L M N Gas Hose...

Page 4: ...own actual size AA BB Wing nut Qty 3 Small flat Qty DD EE JJ Qty 42 CC Stud Qty 3 Philips Qty 1 Qty 4 FF GG II Qty 4 Qty 1 HH Flange nut Qty 4 Qty KK Knob Qty 1 MM NN LL Qty 1 Chain Qty 1 Long Stem Li...

Page 5: ...ccording to model purchased Specifications subject to change without prior notice 2270 mm 900 mm 650 mm 730 mm Reflector Glass Tube Flame Screen Protective Guard Upper Support Front Panel Side Panel L...

Page 6: ...lange nut M6 x 4 x 4 Wrench x 1 Bolt M6 X 12 M6 Flange nut 2 1 Unscrew the switch button load small battery tighten the switch button 2 2 Insert the pins of the base to the holes of lower support pre...

Page 7: ...the front door using 2pcs screw M5X12 Hardware Used JJ x 1 Philips screwdriver GG x 2 Screw M5 X 12 4 Assemble the middle support Insert the 4pcs upper support to the lower support Secure them with 8p...

Page 8: ...ew 3 16 Hardware Used DD JJ x 8 Philips screwdriver 3 16 Screw x 1 Hardware Used 6 Assemble the reflector onto the flame screen Screw the 3pcs stud on the flame screen put 3pcs washer 6 onto the top o...

Page 9: ...the glass tube as illustrated Slide the glass tube through the hole of the lower plate cover and onto the middle plate Check and ensure that the glass tube is positioned properly and is completely co...

Page 10: ...rol knob is Hardware Used DD JJ x 18 Philips screwdriver 3 16 Screw x 1 10 Install the knob to M4x10 screw Hang the chain to the hole on the control box assy and put the pothook of front panel to the...

Page 11: ...d leak causing a fire After the cylinder is placed inside the heater secure the cylinder with block belt tightly 12 Leak Check 12 Regulator Cylinder Hose Regulator WARNING of the gas system is replace...

Page 12: ...solution of one part liquid detergent and one part water The soap solution can be applied with a spray bottle brush or rag Soap bubbles will appear in case of a leak x The heater must be checked with...

Page 13: ...If bubbles continue appearing should be returned to hose s place of purchase If leak is at Regulator Cylinder Valve connection disconnect reconnect and perform another leak check If you continue to s...

Page 14: ...al regulations x For connection of hose and regulator and connection of regulator and hose please refer to photo showed above x Remove plastic wrap from any part before lighting x Never cover a heater...

Page 15: ...Turn on the valve on the gas supply cylinder completely 2 Press and turn the variable control knob to PILOT position counter clockwise 90 3 Press down the variable control knob and hold for 60 seconds...

Page 16: ...he gas cylinder after use or in case of a disturbance 2 Remove the pressure controller and the hose 3 Check the tightness of the gas valve and for damage If you suspect a damage have it changed by you...

Page 17: ...t comply with the requirements of EN 16436 1 2014 Read the intructions before installation and use Keep the instructions for future reference APPLIANCE CATEGORY TYPES OF GAS Butane Propane GAS PRESSUR...

Page 18: ...a Loose connections Tighten connections Thermocouple bad Replace thermocouple Gas leak in line Check connections Lack of fuel pressure Tank near empty Refill LPG tank Burner will not light Pressure is...

Page 19: ...lector Fat fires are not covered under warranty Any warrany guarantee claims shall be rendered void in the event of improper use of the heater or the use of non approved fuels discolouration rusting o...

Reviews: