background image

Page | 13                   

www.outdoorrooms.com


 CF-1242 AU Rev-B 3/19/15 


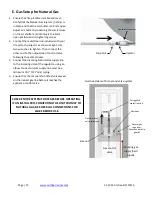
E. Gas Setup for Natural Gas 

1.


Ensure that fire pit table is stable and level. 
Verify that the Natural Gas Injector (5.2mm) is 
in place and that the air shutter is 5.0mm open. 
Adjust air shutter by loosening the small screw 
on the air shutter and rotating it to a 5mm 
open position and re-tightening screw.  

2.


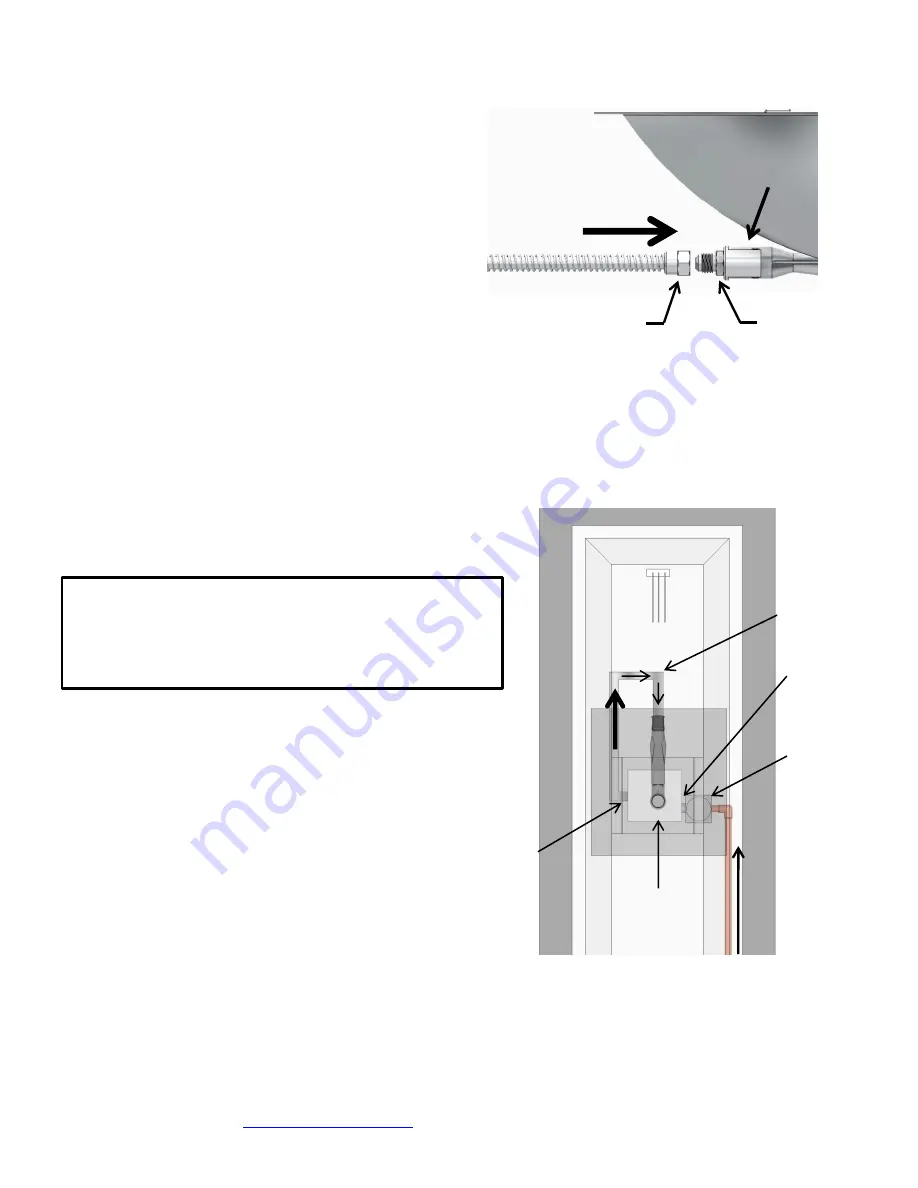
Connect the metal flex-line included with your 
fire pit to the injector as shown at right. Use 
two wrenches to tighten. Then connect the 
other end to the output side of control valve 
following the same process. 

3.


Connect the incoming Natural Gas supply line 
to the incoming side of the regulator, using an 
elbow connection. Gas supply line must be a 
minimum of ½” (12.7mm) piping. 

4.


Ensure that the manual shut-off valve is placed 
on the natural gas line before it reaches the 
appliance control valve.  


Flare Nut 

Injector 

Venturi/Air shutter

CHECK ENTIRE SYSTEM FOR LEAKS BEFORE OPERATING. 

IF AN INSTALLER IS CONVERTING THE UNIT FROM LP TO 

NATURAL GAS, RE-CHECK ALL CONNECTIONS FOR 

LEAKS BEFORE USE. 


Overhead view of burner and valve system 

Incoming gas 

supply (hard 

piped) 

Natural gas 

regulator 

(locate under drip 

guard) 

Gas control 

valve 

Corrugated 
metal flex-line  

Gas flow from 
valve to burner 

Gas out 

Gas input 

Summary of Contents for Crystal Fire CF-1242

Page 1: ...call the fire department Installation and service must be performed by a qualified installer service agency or the gas supplier HOT DO NOT TOUCH SEVERE BURNS MAY RESULT CLOTHING IGNITION MAY RESULT G...

Page 2: ...e fire pit burner you have selected is designed to provide the utmost in safety reliability and efficiency As the owner of an Outdoor GreatRoom Company fire pit you ll want to read and carefully follo...

Page 3: ...Operation 7 Troubleshooting 8 ServiceandMaintenance 9 ReferenceMaterials a ServicePartsList b DimensionalInformation c CheckingTestPointPressure d WiringDiagram e LimitedOneYearWarranty CF 1242AU N 30...

Page 4: ...er STANDARD AS4565 2004 AS4558 2011 Crystal fire burner has been tested in accordance with IAS requirements for Outdoor Gas Fireplaces AS4565 2004 AS4558 2011 and operation as described in these insta...

Page 5: ...r and the warranty will be voided by the following actions Installation and use of any damaged components Modification of the burner assembly Installation other than as instructed by the Outdoor Great...

Page 6: ...raffic areas WARNING 1 8M to overhang from top of metal bowl 6M 6M 1 8M If you are not using an Outdoor GreatRoom Company table with this burner be sure to mount to a non combustible surface maintaini...

Page 7: ...areas have been used in these figures the same principles apply to any other shaped area This appliance shall only be used in an outdoor area and shall not be used in a building garage or any other e...

Page 8: ...overhead cover Within a partial enclosure that includes an overhead cover and no more than two walls Within a partial enclosure that includes an overhead cover and more than two walls the following sh...

Page 9: ...Page 9 www outdoorrooms com CF 1242 AU Rev B 3 19 15...

Page 10: ...You must have easy access to the gas valve control knob after it is installed and connected to the gas supply LP Gas Models Make sure the valve is turned completely off before installing LP installat...

Page 11: ...f valve during any pressuretestingofthegassupplypipingsystemattestpressures equal to or less than 3 5 kPa C Gas Connection Note Have the gas supply installed in accordance with local building codes if...

Page 12: ...te the gas line not supplied and tighten securely to output valve fitting following the method described in step 2 4 Using two wrenches securely tighten the flare nut on the free end of the metal flex...

Page 13: ...ntrol valve following the same process 3 Connect the incoming Natural Gas supply line to the incoming side of the regulator using an elbow connection Gas supply line must be a minimum of 12 7mm piping...

Page 14: ...n may result causing property damage personal injury and or loss of life C Use only your hand to turn the gas control knob on gas supply if equipped never use tools If the valve won t turn by hand don...

Page 15: ...____________________________________________________________________ ______________________________________________________________________ WARNING FIRE RISK HIGH TEMPERATURES Keep combustible househo...

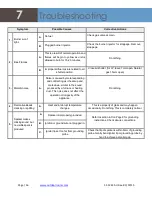
Page 16: ...s it heats up and cools down similar to the sound produced by a furnace or heating duct This noise does not affect the operation or longevity of the appliance Do nothing 4 Decorative Beads cracking or...

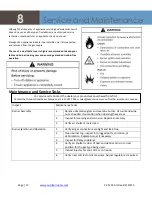
Page 17: ...ing used 5 Inspect injector for soot dirt or corrosion 6 Verify inlet and test point pressures Adjust regulator as required 8 Service and Maintenance Although the frequency of appliance servicing and...

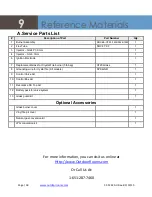
Page 18: ...burner 5lb bag CF20 Glass 1 8 Grounding wire for crystal fire All models SPK GND 1 9 Control Valve AU 1 10 Control Box AU 1 11 Decorative SS Top AU 1 12 Battery pack for valve system 1 13 Glass guard...

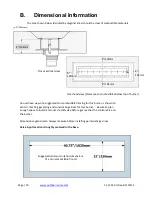
Page 19: ...and constructing a base for this burner Be sure to plan enough space to install a manual shutoff valve before gas reaches the control valve on the burner Dimensions approximate Always measure before...

Page 20: ...d disconnect the fire pit from gas supply before anything is done to electrical components LP Natural gas OUT IN Ideal test point pressures In 2 75kPa 1 13kPa Out 1 75kPa 5kPa I S Gas valve Battery Pa...

Page 21: ...lly discharge its obligations under this warranty by repairing or replacing at its discretion the defective components The Outdoor GreatRoom Company will provide replacement parts at no charge and wil...

Reviews: