18
www.outdoorrooms.com
HGI-31 : 1-23-2018
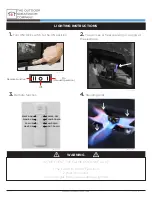
1. Install remote control batteries (Battery Type:
CR2450). Test the remote control from various
locations within the room - a blue light on the
remote will indicate the remote is working.
2.
Select remote operation on the fireplace switch, see
Img. 22.
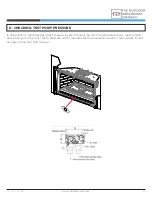
3. Push the button shown on Image 20.
4.
Press the ON button on the fireplace remote.
5. A series of two (2) beeps will be heard from the
control module of the fireplace. An additional beep
will indicate that the unit is searching for a remote
signal to operate.
6.
Remote is paired with the fireplace.
7. Turn on the main burner - this will take a few
minutes for its initial burn. It is necessary that air
bleeds out of the gas line on its initial start-up.
8. Once the pilot lights, the main burner of the
appliance will light. The glass will fog over from
moisture exhaust against the cold glass. This will
dissipate in a few minutes.
9. Allow the appliance to burn for a few minutes.
10.
Adjust the flame height a number of times from
high to low. As the valve is adjusting, you will hear
a noise of the servo motor moving within the
appliance. When the valve has reached a maximum
or minimum value, the appliance will beep twice to
indicate the highest or lowest setting.
11. Adjust the fan control up and down. Similar to
the flame height adjustment, two beeps from the
appliance will alert you when the maximum or
minimum value has been reached.
12. Repeat for ember light adjustments.
1.
With unit on, cycle down to the lowest flame setting
using the SMALL FLAME button. Two beeps will
indicate lowest flame setting.
2. Press and hold the SMALL FLAME button. The
control module will beep twice and the light on
the remote will go out and come back on following
ONE beep from the control module.
3.
Turn the unit off with the remote OFF button. Pilot
will remain lit.
1.
With unit on, cycle up to the highest flame setting
using the LARGE FLAME button. Two beeps will
indicate highest flame setting.
2. Press and hold the LARGE FLAME button. The
control module will beep twice and the light on
the remote will go out and come back on following
TWO beeps from the control module.
3.
Turn the unit off with the remote OFF button.
Pilot will no longer remain lit.
STEP EIGHT: FINAL VERIFICATION TESTING AND REMOTE FUNCTIONS
ACTIVATE PILOT ONLY OPERATION
DEACTIVATE PILOT ONLY OPERATION
POWER: ON
FLAME: UP
FAN: UP
LIGHT: UP
LIGHT: DOWN
FAN: DOWN
FLAME: DOWN
POWER: OFF
(Img. 21)
FCC STATEMENT
Warning
This device complies with Part 15 of the FCC Rules. Operation is
subject to the following two conditions:
(1) This device may not cause harmful interference, and
(2) This device must accept any interference received, including
interference that may cause undesired operation.
Attention:
Changes or modification not expressly approved by the party
responsible for compliance could void the user’s authority to
operate the equipment.
Note: This product has been tested and found to comply with the
limits for a Class B digital device, pursuant to Part 15 of the FCC
Rules. These limits are designed to provide reasonable protection
against harmful interference in a residential installation. This
product generates, uses, and can radiate radio frequency energy
and, if not installed and used in accordance with the instructions,
may cause harmful interference to radio communications. However,
there is no guarantee that interference will not occur in a particular
installation. If this product does cause harmful interference to radio
or television reception, which can be determined by turning the
equipment off and on, the user is encouraged to try to correct the
interference by one or more of the following measures:
•
Reorient or relocate the receiving antenna.
•
Increase the separation between the equipment and receiver.
•
Connect the equipment into an outlet on a circuit different
from that to which the receiver is connected.
•
Consult the dealer or an experienced radio/TV technician for
help.
(Img. 20)

