background image


1-888-514-1663  

|  WWW.OUTLANDLIVING.COM

En-9

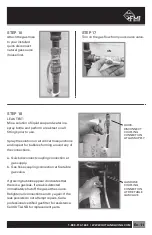
STEP 11

a.   Connect the igniter cable to 

the gas valve.

b.   Connect the round 

thermocouple cable to the 
thermocouple socket.

c.   Attach the thermocouple 

ground wire connection to the 
gas valve ground terminal. 
Use the screw provided on 
the gas valve. Ensure the 
connection is firmly set under 
the screw.

STEP 10

Attach the natural gas hose (part 4).

If the natural gas hose is not preassembled to 
the natural gas valve, remove the yellow cap 
and attach the natural gas hose to the gas valve 
coupling. Use a wrench to firmly tighten.


 WARNING:

Pay attention not to cross thread the 
coupling during tightening. Do not over 
tighten. (Max torque: 33.9 N/M)

ATTACH THE 

NATURAL GAS HOSE 

CONNECT THE 

IGNITER CABLE

CONNECT THE 

THERMOCOUPLE 

CABLE

CONNECT THE 

THERMOCOUPLE 

GROUND WIRE

Summary of Contents for 420 Series

Page 1: ...ll be installed by a qualified service agency in accordance with the manufacturer s Instructions and all applicable codes and requirements of the Authority Having Jurisdiction If the information in these instructions is not followed exactly a fire explosion or production of carbon monoxide may result causing property damage personal injury or loss of life The qualified service agency is responsibl...

Page 2: ...ar FMI BRANDS INC 101 3570 Rue 194 Surrey C B Canada V3Z 1A5 1 888 514 1663 510 OUTLAND NATURAL GAS CONVERSION KIT Distributed by FMI BRANDS INC 101 3570 194 Street Surrey BC Canada V3Z 1A5 1 888 514 1663 NGCK TAG2 510_V1 NGCK TAG1 510_V1 OUTLAND FIRE TABLE FMPPC2E 420 420 TAG 1 SIDE 1 ÉTIQUETTE 1 CÔTÉ 1 T TAG 1 SIDE 2 ÉTIQUETTE 1 CÔTÉ 2 T 2 5 in x 4 in 63 5 mm x 101 6 TABLE DE FEU OUTLAND FMPPC2E...

Page 3: ...ct part 5 which should be installed by a professional certified natural gas fitter Once the quick disconnect is properly installed proceed to the next step NATURAL GAS CONVERSION KIT RATINGS GAS ORIFICE SIZE Injector size marked clearly on the gas valve orifice 3 5 mm MANIFOLD PRESSURE 7 in WC INLET PRESSURE 0 25 PSIG INPUT RATING 50 000 Btu h Tested by CSA International ANS Z21 97 2017 CSA 2 41 2...

Page 4: ...WN SIDE PANEL FINGER LIFTS OFF STEP 1 a Ensure the fire table gas control knob is in the OFF position b Remove side panel STEP 2 a Close the valve on the LP propane cylinder b Disconnect and remove the LP cylinder from the fire table CLOSE VALVE ON LP PROPANE CYLINDER DISCONNECT AND REMOVE LP CYLINDER FROM FIRE TABLE ...

Page 5: ...W 4 STEP 3 a Disconnect the igniter cable Slide protective cap back to expose the cable connection Grasp the cable at the base and pull firmly b Disconnect the thermocouple cable Grasp the cable at the base and pull firmly c Disconnect the thermocouple ground wire Remove the screw to release the wire d Locate the black OUTLAND heat shrink tubing on the gas hose coupling and carefully remove it usi...

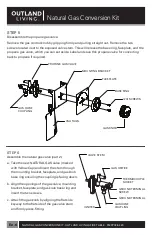
Page 6: ... FACEPLATE MOUNTING BRACKET PROPANE GAS VALVE GAS HOSE COUPLING 2X SCREWS GAS KNOB CSA TAGS THERMOCOUPLE SOCKET GAS ORIFICE VALVE STEM IGNITER GAS HOSE COUPLING GROUND TERMINAL GROUND TERMINAL SCREW STEP 6 Assemble the natural gas valve part 2 a Take the new NATURAL GAS valve marked with Yellow Cap and insert the stem through the mounting bracket faceplate and gas knob base ring ensuring the coupl...

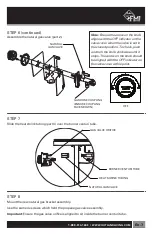
Page 7: ...he knob should be aligned with the OFF indicator on the valve cover at this point OFF STEP 7 Slide the heat shrink tubing part 3 over the burner venturi tube STEP 8 Mount the new natural gas bracket assembly Use the same 4x screws which held the propane gas valve assembly Important Ensure the gas valve orifice is aligned to sit inside the burner venturi tube NATURAL GAS VALVE GAS HOSE COUPLING ENS...

Page 8: ...se a slow back and forth motion with the flame Ensure the heat shrink tubing cinches snugly over the entire circumference and no visible gaps in the ends remain The heat shrink tubing must set firmly around the parts forming a good seal so no air gets in TIP Once you have positioned the heat shrink tubing in place you do not need to hold on to it during the heat application The flame will naturall...

Page 9: ...onnection is firmly set under the screw STEP 10 Attach the natural gas hose part 4 If the natural gas hose is not preassembled to the natural gas valve remove the yellow cap and attach the natural gas hose to the gas valve coupling Use a wrench to firmly tighten WARNING Pay attention not to cross thread the coupling during tightening Do not over tighten Max torque 33 9 N M ATTACH THE NATURAL GAS H...

Page 10: ... Repeat process until you verify the spark works STEP 13 Install the supplied Quick Disconnect part 5 The quick disconnect should be installed by a professional certified natural gas fitter Once the quick disconnect is properly installed proceed to the next step Quick Disconnect Quick Disconnect for Gas Hose for Gas Hose with 3 8 18 NPT with 3 8 18 NPT Inlet Connector Inlet Connector part 5 part 5...

Page 11: ...e table gas valve If growing bubbles appear it indicates that there is a gas leak If a leak is detected immediately shut off the gas at the source Retighten all connections and try again If the leak persists do not attempt repairs Call a professional certified gas fitter for assistance Call OUTLAND for replacement parts QUICK DISCONNECT COUPLING CONNECTION AT GAS SUPPLY GAS HOSE COUPLING CONNECTIO...

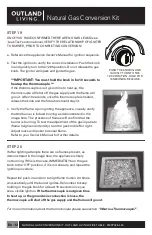
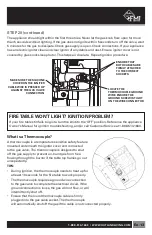
Page 12: ...ndeed burning as demonstrated in the image here The presence of flames will confirm that the burner is burning To test the adjustment of the gas input rate flame height and intensity turn the gas knob left or right Adjust rocks with poker to reveal flame Refer to your Owner s Manual for further details STEP 20 If after lighting attempts there are no flames present as demonstrated in the image here...

Page 13: ...hermocouple A thermocouple is a temperature sensitive safety feature mounted underneath the igniter cover and connected to the gas valve The thermocouple is designed to shut off the gas supply to prevent un burnt gas from free flowing through the burner if the table top flames go out unexpectedly TIPS During ignition the thermocouple needs to heat up for at least 10 seconds for the fire table to w...

Page 14: ...TICK BOX NEXT TO APPLICABLE MODEL b TAG 2 IN STRICT COMPLIANCE WITH CSA GUIDELINES THE RESPONSIBLE PARTY SHALL MARK THE DATE OF CONVERSION AND THEIR IDENTITY WITH PERMANENT MARKING MARKING WARNING LABELS English and French TABLE DE FEU OUTLAND FMPPC2E 420 420 510 510 510 50 000 0 25 3 5 mm 50 000 0 25 ENSEMBLE DE CONVERSION AU GAZ NATUREL OUTLAND Distribué par FMI BRANDS INC 101 3570 Rue 194 Surre...

Page 15: ...RTY SHALL AFFIX THE MARKING WARNING LABEL IN CLOSEST PROXIMITY TO EXISTING PRODUCT RATING PLATE IN A CONSPICUOUS LOCATION ON THE APPLIANCE BEING CONVERTED After Steps A and B above are complete affix the label on the appliance using the supplied hang strap in the location as shown on the applicable model appliance picture below MODEL HANG TAG LOCATION FMPPC2E 420 HANG TAG HOLE LOCATION PLASTIC HAN...

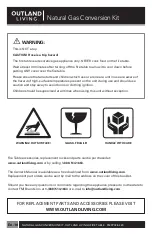
Page 16: ... should use caution and stay away to avoid burns or clothing ignition Children should be supervised at all times when using this unit without exception WARNING HOT SURFACE GLASS FRAGILE HANDLE WITH CARE FOR REPLACEMENT PARTS AND ACCESSORIES PLEASE VISIT WWW OUTLANDLIVING COM Fire Table accessories replacement rocks and parts can be purchased at www outlandliving com or by calling 1 888 514 1663 Th...

Reviews: