background image

En-4

  1-888-514-1663 |  

WWW.OUTLANDLIVING.COM

SECTION 1:

 ASSEMBLY (continued)

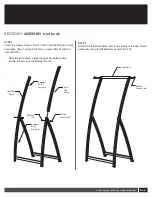
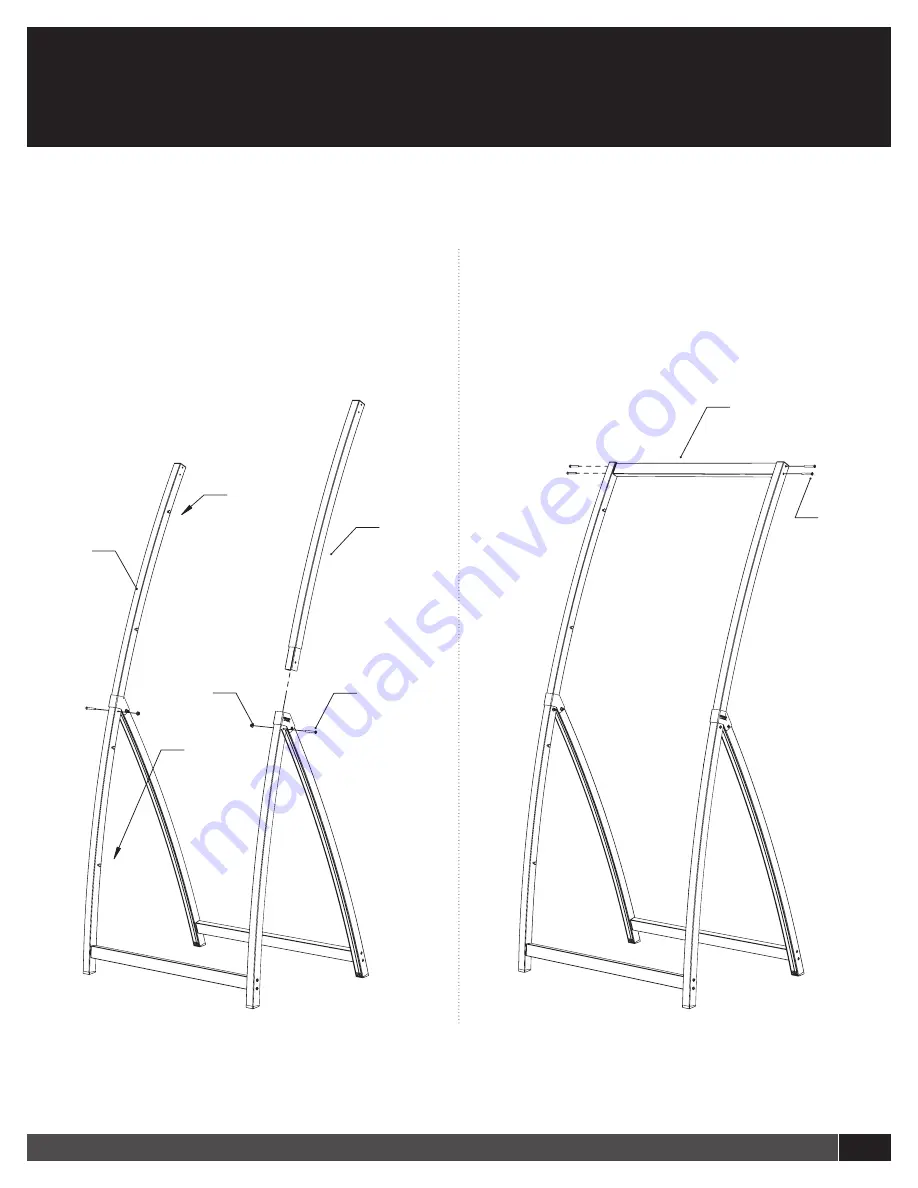
Left  Top  

Frame

Support 
Pegs 
Facing In

Cross Bar

M5x40 
Screws (x4)

Support 
Pegs 
Facing In

Right 
Top 
Frame

M5x40 
Screws (x2)

M5 Nuts 

(x2)

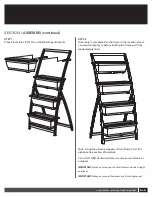
STEP 4


Insert the Upper Frames (Part 1 and 3) into the Bottom Frame 
assembly. Attach using (2x) 40mm screws (Part 8) and (2x) 
nuts (Part 10). 

  •  Note the bin hanger support pegs should be on the 

inside, the same as the Bottom Frame

.

STEP 5


Attach the third Cross Bar (Part 5) to complete the Top Frame 
assembly using (4x) M5x40mm screws (Part 8)

.

Summary of Contents for OLVG-302

Page 1: ...RANDS INC 107 19052 26 Avenue Surrey B C Canada V3Z 3V7 Toll Free 1 888 514 1663 Tel 1 778 294 0988 Email info outlandliving com D OLVG 302 000 V0 Owner s Manual 4BIN VERTICAL GARDEN Model number OLVG...

Page 2: ...se WARNING Improper installation adjustment alteration service or maintenance can cause injury or property damage Read the installation operating and maintenance instructions thoroughly before install...

Page 3: ...G COM SUPPLIED PARTS HARDWARE LIST continued PART DESCRIPTION PICTURE 5 CROSS BARS x2 6 REAR LEGS x2 7 BIN HANGER x8 8 M5x40mm SCREW x14 PART DESCRIPTION PICTURE 9 M5x45mm SCREW x2 10 M5 NUT x4 11 PLA...

Page 4: ...dentical so it doesn t matter which you assemble first Support Pegs Facing In Logos Facing Out Cross Bar M5x40 Screws x8 Cross Bar Bottom Frame Assembly M5 Nut M5x45mm SCREW x2 Left Bottom Frame Rear...

Page 5: ...t Top Frame M5x40 Screws x2 M5 Nuts x2 STEP 4 Insert the Upper Frames Part 1 and 3 into the Bottom Frame assembly Attach using 2x 40mm screws Part 8 and 2x nuts Part 10 Note the bin hanger support peg...

Page 6: ...ual D OLVG 302 000 V0 En 5 OUTLAND LIVING VERTICAL GARDEN OWNER SAFETY MANUAL SECTION 1 ASSEMBLY continued SECTION 1 ASSEMBLY continued STEP 6 Hang the Bin Hanger Brackets Part 7 on the support pegs B...

Page 7: ...location where you want to display it before loading the frame with fully loaded planter bins Note Using the silicone stoppers Drain Plugs Part 12 is optional See section 2 for details Your OUTLAND V...

Page 8: ...LVG 302 000 V0 En 7 OUTLAND LIVING VERTICAL GARDEN OWNER SAFETY MANUAL APPROXIMATE DIMENSIONS 30 760mm 23 580mm FRONT GROUND SIDE 65 1650mm WALL The Vertical Garden frame measures approximately 30 W x...

Page 9: ...onal The bottom of the planter bins have raised features denoting the drainage layer line TIP Why add a drainage layer Some people do this to help prevent root rot What this does is create a small wat...

Page 10: ...n the support pegs to make watering your plants easy and convenient The Vertical Garden should be inspected before use and at least annually More frequent cleaning and or adjustments may be required a...

Page 11: ...frame could fall causing serious injury or death At minimum it could damage your floors Always remove the planter bins before moving the frame SECTION 5 STORAGE Your Vertical Garden has been designed...

Page 12: ...At FMI Brands sole discretion products under warranty will be repaired and or replaced at no charge to the customer Any returns sent back to FMI Brands must be sent via prepaid freight and in the orig...

Reviews: