7
ECS-10 Enhanced Cube Subwoofer
Owner’s Manual
Subwoofer Placement
5.
If you are using a separate power amplifier, connect a second set of
interconnects to the connections labeled “OUTPUT” on the ECS-10
power amp.
Note:
The ECS-10’s line level output is bandwidth limited to signals above
80Hz. This enables you to use the ECS-10 with small satellite speakers by
limiting the amount of low frequency information they will be asked to
reproduce. Subsequently, the reduced demand on your power amplifier
and speakers will result in better sound across the board.
6.
Locate the corresponding amplifier channels on your dedicated power
amplifier and connect the other end of the interconnects to these jacks.
7.
Plug the ECS-10’s power cord into an un-switched AC outlet.
Due to the power requirements of the ECS-10, it must not be connected to
the accessory outlets on a receiver or processor. If a power-strip or surge
protector is used, make certain that it is rated to accommodate the ECS-10’s
power requirements.
8.
Reconnect your processor or receiver to the AC power source.
9.
Proceed to the “Setting The ECS-10’s Controls” section to learn about
the ECS-10’s controls and how they operate.
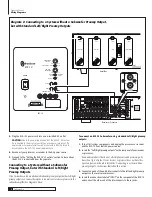
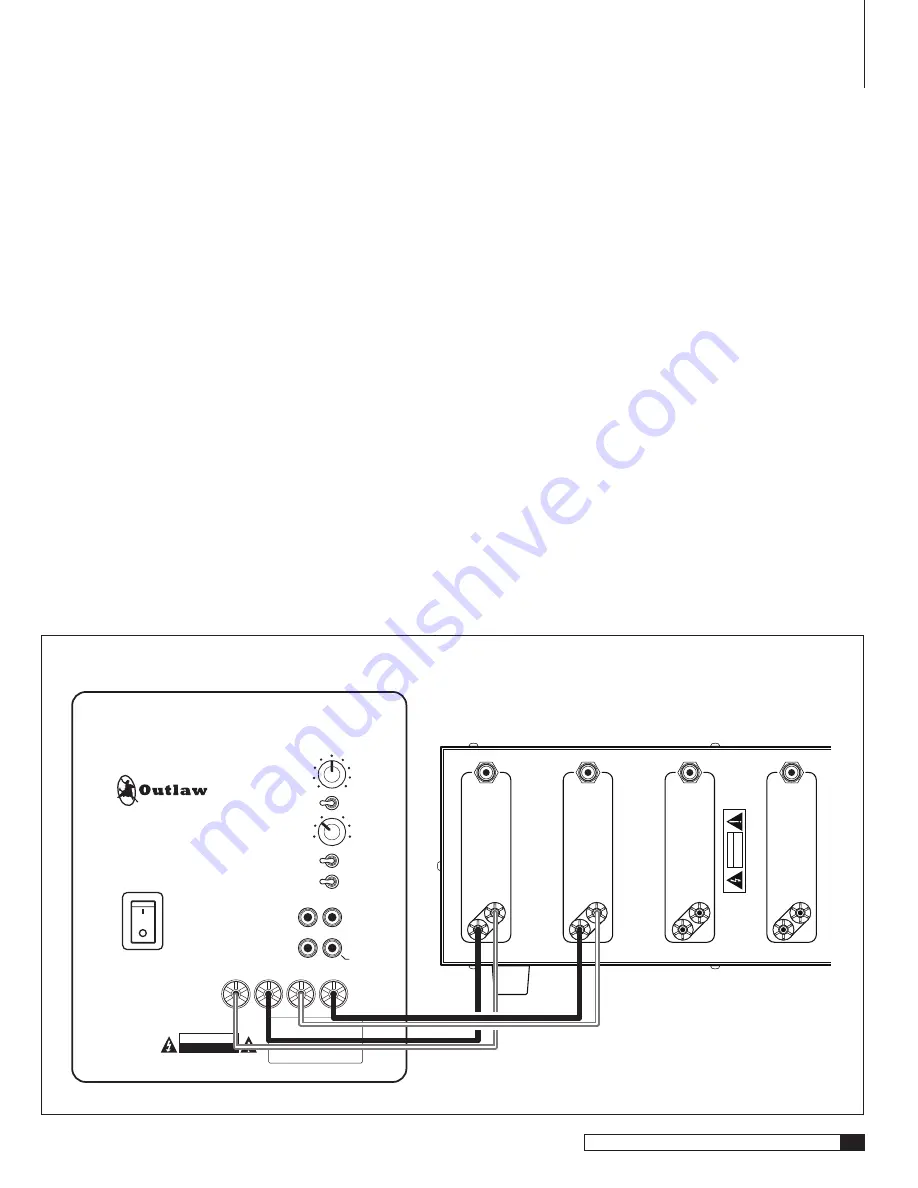
Connecting to a System with no Preamp Outputs
If no low level subwoofer or standard left/right output is available, you will need
to run speaker wires from your main amplifier or receiver to the subwoofer
amplifier. See Diagram 3 below.
To connect the ECS-10 using high level inputs:
1.
Turn off all system components and unplug the receiver and/or amplifier
and the ECS-10 from their AC power source.
2.
Locate the front left/right speaker output terminals on your receiver or
amplifier.
In cases where there are both “A” and “B” terminals, the “A” terminals should
be used. Disconnect any wire that is presently connected to these terminals.
3.
Using the same type of speaker wire used for your other speaker
connections; connect the left and right channel speaker outputs of your
receiver or amplifier to the ECS-10’s “Speaker Level Input”.
NOTE:
Be sure to connect the speaker wires to the appropriate input
binding posts located on the back of the ECS-10, making certain that
the polarity (-/+) on the receiver or amplifier matches the polarity on
the binding posts of the subwoofer amplifier. In most cases this means
connecting the red terminal on the receiver or amplifier to the red
terminal on the ECS-10, but always check the markings on the rear
panel to insure “+ to +” and “- to –“ connections.
4.
Plug the ECS-10’s power cord into an un-switched AC outlet.
CAUTION:
Due to the power requirements of the ECS-10, it must not
be connected to the accessory outlets on a receiver or processor. If a
power-strip or surge protector is used, make certain that it is rated to
accommodate the ECS-10’s power requirements.
5.
Reconnect your receiver and/or amplifier to the AC power source.
6.
Proceed to the “Setting The ECS-10’s Controls” section to learn about
the ECS-10’s controls and how they operate.
Diagram 3: Connecting to a System with No Preamp Outputs
ECS-10
Riv Alifi
POWER
ON
OFF
R
INPUT
SPEAKER LEVEL INPUT
OUTPUT
LFE
PHASE
LOW-PASS
CROSSOVER
SUBWOOFER
VOLUME
AUTO ON/OFF
SUBWOOFER
DIRECT
INTERNAL
X-OVER
180°
120 Hz
MIN
INACTIVE
ACTIVE
MAX
40 Hz
80 Hz
L
R
L
+
+
-
-
120V~
60HZ
8A
ECS-10
CAUTION
RISQUE DE CHOC ÉLECTRIQUE. NE PAS OUVRIR
WARNING: TO REDUCE THE RISK OF FIRE
OR ELECTRIC SHOCK, DO NOT EXPOSE
THIS APPLIANCE TO RAIN OR MOISTURE
RISK OF ELECTRIC SHOCK
DO NOT OPEN
AVIS:
CAUTION
RIS
K O
F E
LE
CT
RIC
SH
OC
K
DO
NO
T O
PE
N
AV
IS
:
R
IS
QU
E
DE
C
HO
C
EL
EC
TR
IQ
UE
/N
E
PA
S
OU
VR
IR
INPUT
SURROUND RIGHT
OUTPUT
+
-
+
-
+
-
+
-
+
-
INPUT
SURROUND LEFT
OUTPUT
INPUT
FRONT RIGHT
OUTPUT
INPUT
CENTER
OUTPUT
INPUT
ON
OFF
FRONT LEFT
REMOTE TRIGGER
(POWER ON/OFF)
12V DC
MASTER SWITCH
CIRCUIT BREAKER
15 AMP
120 VAC/60Hz
1800W
WARNING:
HAZARDOUS ENERGY. MAKE PROPER SPEAKER
CONNECTIONS: SEE OWNER'S MANUAL BEFORE USING.
OUTPUT
Summary of Contents for ECS-10
Page 1: ...Owner s Manual Version 1 0 Enhanced Cube Subwoofer ECS 10...
Page 12: ......


