background image

Outlaw Audio

10

Ultra-X12 Power Connection

Setting the  

Variable Tuning 

Ultra-X12 

Subwoofer's 

Controls

N

ow that you have made all the 

necessary connections between the Ultra-X12 
and your receiver or processor, it’s time to power 
up your subwoofer and adjust its controls and 
settings in order to properly integrate it with 
your speakers and room configuration. 

In the section titled “Subwoofer 

Placement,” located on page 14, we will 
focus on determining the best location for the 
subwoofer. After moving your Ultra, you might 
need to adjust the subwoofer’s controls to take 
advantage of its new room position.

Use only with a 250v fuse

Employer uniquement avec

un fusible de 250v

RIGHT

LEFT

120V - 60HZ

5A

T 5A L       250V

MODEL Ultra-X12

POWERED SUBWOOFER

CAUTION

AVIS: RISQUE DE CHOC ÉLECTRIQUE. NE PAS OUVRIR.

RISK OF ELECTRIC SHOCK

DO NOT OPEN

PASS-THRU TO

LOUDSPEAKERS

RIGHT

LEFT

HIGH LEVEL INPUTS

FROM AMPLIFIER

(INTERNAL X-OVER)

POWER

POWER

PHASE

VOLUME

THRU

INTERNAL

X-OVER

FREQUENCY

(HZ)

SUB IN

INTERNAL

X-OVER

180°

OFF

AUTO

ON

MIN MAX

60

120

PORT

MODE

MAX OUTPUT

MAX EXTENSION

L

R

SUB IN

EXTERNAL

X-OVER

ON

AC

FUSE

OFF

MASTER POWER

CAUTION

FOR CONTINUED

PROTECTION AGAINST

RISK OF FIRE, REPLACE

ONLY WITH SAME TYPE

FUSE AND RATING

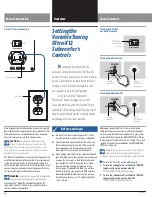
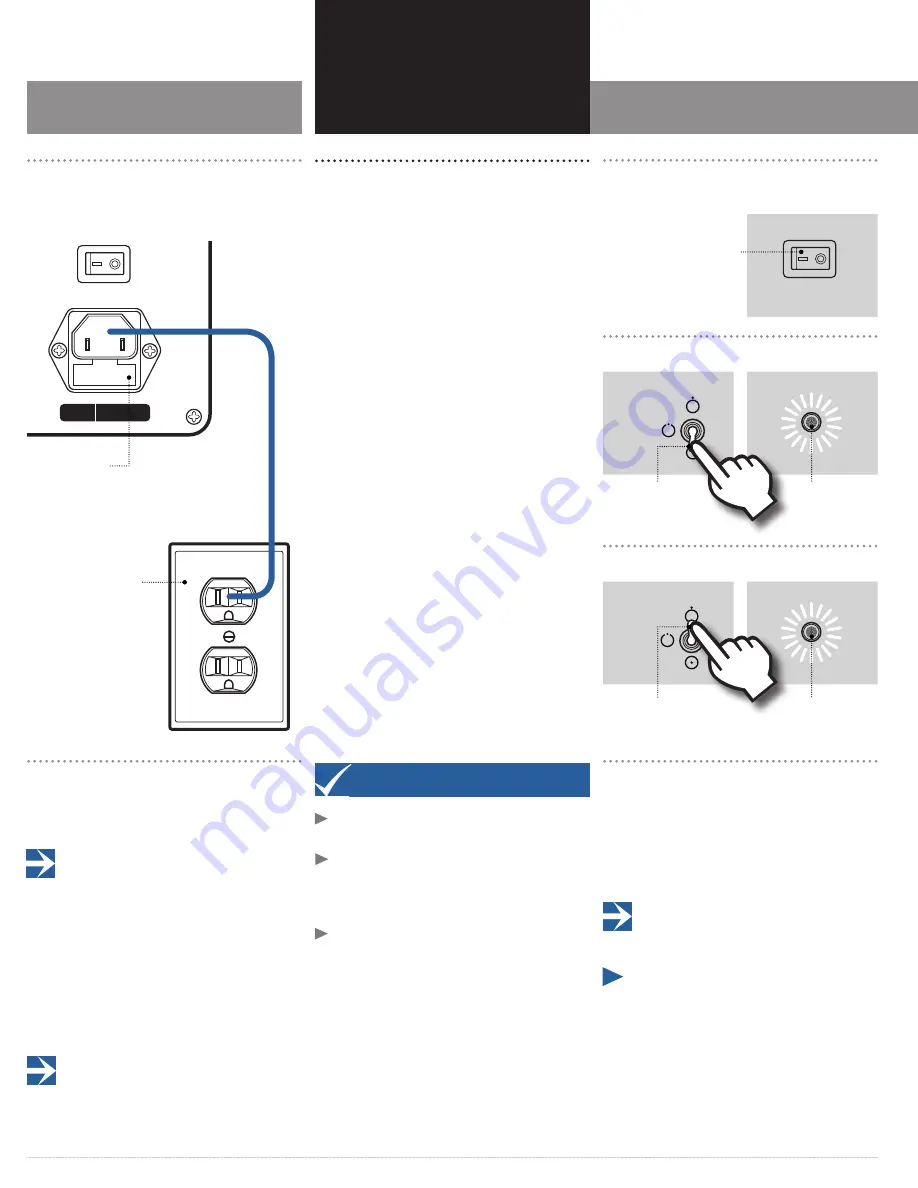
Power Connection

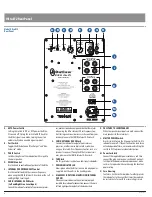
Once all connections have been made, connect the supplied 

power cord to the AC Input on the rear panel of the Ultra-X12 

Subwoofer and an un-switched AC outlet, then reconnect 

your receiver or processor to the AC power source.

CAUTION: 

Due to the power requirements of the 

Ultra-X12 Subwoofer, it must not be connected to the 

accessory outlets on a receiver or processor. If a power-strip or 

surge protector is used, make certain that it is rated to accommo-

date the Ultra’s power requirements. 

The Ultra-X12 Subwoofer uses an external fuse to protect the 

amplifier from damage. In the event that a fuse replacement 

is required, be certain that a fuse of the original rating (5 x 

20mm 5A slow blow fuse) is used. If the fuse continues to fail, 

your unit may have sustained internal component failure. In 

this event, please contact Outlaw for assistance.

WARNING: 

Always turn the subwoofer off and unplug the 

power cord from the AC Power before replacing the fuse.

Proceed to the “Setting the Variable Tuning Ultra-X12 

Subwoofer's Controls” section to learn about the Ultra’s 

controls and how they operate. 

Overview


Before you Begin


¼

Always refer to your receiver or processor’s instruc-

tions for specific procedures, warnings, and options.


¼

Do not attempt to operate the Ultra-X12 unless the 

feet have been properly installed. This may restrict 

driver movement and will cause damage to the 

subwoofer that is not covered by the warranty.


¼

When making adjustments to the volume controls of 

your subwoofer and system speakers, we recommend 

using an SPL meter such as the Radio Shack model 

(part number 33-2050). When using the test tones, 

measure from the listening position and set the 

meter’s range (if applicable) to 80dB. You will then 

be able to calibrate your speakers to 75dB and your 

subwoofer to 85dB. In order to accurately measure 

levels between channels use “C” weighting and the 

“slow” setting.

Power Controls

Before powering on the Ultra-X12, ensure that all the 

audio and AC power connections made to the subwoofer 

are secure, and that the other components in your system 

are turned off. Next, locate the MASTER POWER switch on 

the rear panel of the Ultra-X12 and set it to ON. This switch 

supplies AC current to the subwoofer. The POWER INDICA-

TOR LED will glow red.

Normally, you can leave this switch set to ON. If the unit 

will not be used for an extended period of time, we 

recommend setting this switch off to prevent accidental activation.


¼

To turn the Ultra-X12 on and off manually:

1. 

To turn the subwoofer on, set the Ultra’s POWER 

toggle switch on the rear panel to ON.

The POWER INDICATOR LED will glow green.

2. 

To turn the subwoofer off, set the Ultra’s POWER 

toggle switch on the rear panel to OFF.

The POWER INDICATOR LED will glow red.

Turning the Ultra-X12  

on and off manually

Turning the subwoofer on

Turning the subwoofer off

POWER

POWER

OFF

AUTO

ON

POWER

OFF

AUTO

ON

POWER

OFF

AUTO

ON

POWER

POWER

OFF

AUTO

ON

POWER

OFF

AUTO

ON

POWER

OFF

AUTO

ON

POWER

POWER

OFF

AUTO

ON

POWER

OFF

AUTO

ON

POWER

OFF

AUTO

ON

POWER

POWER

OFF

AUTO

ON

POWER

OFF

AUTO

ON

POWER

OFF

AUTO

ON

AC Wall Outlet

External Fuse Housing

MASTER POWER 

switch should be 

set to ON

POWER 

INDICATOR LED 

glows green

Set POWER 

switch to ON

Set POWER 

switch to OFF

POWER 

INDICATOR LED 

glows red

Summary of Contents for Ultra-X12

Page 1: ...VariableTuning Ultra X12 Subwoofer Version 1 2 ...

Page 2: ...nditioners may cause circuit breakers to trip Itisalwaysagoodideatoavoidusinganyaudioorvideoequipmenton thesameACcircuitasequipmentwithmotors suchasairconditionersor refrigerators Thiswilllessenthepossibilityofpowervariationandelectrical start upnoiseaffectingyoursoundsystem Extension Cords and Power Strips Wedonotrecommendthatextensioncordsbeusedwiththisproduct unlesstheyareofsufficientgaugetopas...

Page 3: ...ial number label has not been altered in any manner In the event that you wish to return your Outlaw Product back to us for any reason please call to arrange for a Return Authorization Number This will ensure that your problem is discussed with a service technician who will determine if there is a quick solution to your problem Outlaw Audio shall not be liable for or in any way respon sible for an...

Page 4: ...c turn on off 180 degree phase control Line and speaker level inputs Variable Port Tuning Detachable power cord Features Model Ultra X12 Accessories Model Ultra X12 Features Before you Begin In order to receive the maximum enjoyment from your new subwoofer please take a few minutes to read this manual This important information will help you make certain that the Ultra is properly configured for o...

Page 5: ...annel digital soundtracks contain a special audio channel devoted specifically to extreme low frequency extension This signal is the 1 in 5 1 6 1 and 7 1 systems and is sometimes referred to as the LFE channel Subwoofers Bass and Overall System Performance Typical Multi channel System with Satellite Speakers Typical Two channel System with Traditional Bookshelf or Tower Speakers Typical 7 1 Multi ...

Page 6: ...the standby mode J HIGH LEVEL INPUTS FROM AMPLIFIER INTERNAL X OVER Whenyourreceiverdoesnothavelineleveloutputs availableforasubwooferconnection connectthemain leftandrightspeakeroutputsofthereceiverhere K PASS THRU TO LOUDSPEAKERS When the speaker level inputs are used connect the main speakers to these terminals L MASTER POWER Switch Use this switch to turn the AC power to the Ultra X12 subwoofe...

Page 7: ... Proper installation of the supplied feet carpet spikes is necessary for ALL Variable Tuning subwoofer setups These spikes provide the floor clearance required for optimal performance and safety Failure to use the feet provided will result in damage not covered under the Outlaw Audio Warranty For your convenience we have provided dimpled discs that may be used when the Ultra is placed on non carpe...

Page 8: ...N Beforeyoumakeanyconnectionstothe Ultra X12 pleasemakesuretoturnoffallsystem componentsandunplugtheprocessororreceiverandtheUltra fromtheirACpowersource Connection from Receiver or Pre Pro using the Receiver or Pre Pro s Crossover Ultra X12 Low level Inputs Connection from Receiver or Pre Pro using the Subwoofer s Crossover To connect the Ultra X12 to a Receiver or Processor with a Subwoofer LFE ...

Page 9: ...t avec un fusible de 250v RIGHT LEFT 120V 60HZ 5A T 5A L 250V MODEL Ultra X12 POWERED SUBWOOFER CAUTION AVIS RISQUE DE CHOC ÉLECTRIQUE NE PAS OUVRIR RISK OF ELECTRIC SHOCK DO NOT OPEN PASS THRUTO LOUDSPEAKERS RIGHT LEFT HIGH LEVEL INPUTS FROM AMPLIFIER INTERNAL X OVER POWER POWER PHASE VOLUME THRU INTERNAL X OVER FREQUENCY HZ SUB IN INTERNAL X OVER 0 180 OFF AUTO ON MIN MAX 60 120 PORT MODE MAXOUT...

Page 10: ...ng the Variable Tuning Ultra X12 Subwoofer s Controls section to learn about the Ultra s controls and how they operate Overview Before you Begin Always refer to your receiver or processor s instruc tions for specific procedures warnings and options Do not attempt to operate the Ultra X12 unless the feet have been properly installed This may restrict driver movement and will cause damage to the sub...

Page 11: ...evel on page 13 to fine tune your subwoofer so that there is a seamless blend between the Ultra and the main speakers output Let your ears be your guide PleasenotethattheUltra sinternalfrequencysettings onlycontrolthesubwoofer scrossoverpoint leavingthe mainspeakersunchanged Ifyourreceiverorprocessorhasitsown crossoversettings itisbettertousethemastheycontrolboththe crossoverpointofthesubwooferand...

Page 12: ...e Ultra Try both positions of the phase switch to determine which way sounds more bass heavy The bass heavier position is the setting where the output of the Ultra and the main speakers are most in phase Use program materials with bass in the crossover region such as music containing bass drums double basses bass guitar etc to determine the correct setting RIGHT LEFT PASS THRUTO LOUDSPEAKERS RIGHT...

Page 13: ...annel Setting the VOLUME knob to the 12 o clock position should provide enough gain to properly match the sub level to your speakers PORT MODE MAXOUTPUT MAXEXTENSION PORT MODE MAXOUTPUT MAXEXTENSION PORT MODE MAXOUTPUT MAXEXTENSION PORT MODE MAXOUTPUT MAXEXTENSION To measure and set the speaker channel levels 1 Sittinginyourfavoritelisteningseat turnontheSPL meter orstarttheSPLmeterapponyourphone ...

Page 14: ...energy sets up standing waves in most every room These standing waves can cause areas with too much bass areas with too little bass and areas in between Try to avoid creating a listening position that falls directly between the front and back walls The interference due to the collision between bass waves bouncing off the rear wall and new waves emanating from the Ultra can create an unnatural buil...

Page 15: ...butethebassthroughouttheroomwithgreateraccuracy thanasinglesub Forthisreason manyprofessionalacousti ciansandinstallersrecommendmorethanonesubwoofer The finalresultisthatyouwillcreateamuchlarger sweetspot wherethebassispowerful butmoreimportantly smoothand consistent Ifnearperfectbassresponseisyourgoal consider usingtwoormoreUltra X12Subwoofers When calibrating the final levels of each subwoofer y...

Page 16: ...ayinginsecticide waxes polishingagents oranyaerosolproductneartheunit When You Are Away Cleaning Symptom Solution HummingorBuzzingNoise PowerdownyoursystemandremovetheInterconnectsbetweenyourcomponents Power yoursystembackon Ifthehumgoesawaywhentheinterconnectsaredisconnected the humiscomingfromtherestofyourequipment PlugintheInterconnectsoneatatimefor eachcomponentuntilyoucomeacrossthespecificcom...

Reviews: